


What is HubSpot?
HubSpot is a customer relationship management (CRM) thought to be a golden standard. It helps marketing and sales teams collaborate on lead acquisition through features such as lead capture, user behavior tracking, analytics, and automated follow-ups.
Why Integrate Webflow with HubSpot?
Webflow handles design and publishing well, but lacks CRM, automation, and attribution tracking. HubSpot fills that gap.
With a Webflow HubSpot integration:
- Forms sync directly into CRM
- Live chat and chatbots can run on-site
- User behavior and UTMs are tracked
- Workflows and sales routing trigger automatically
This ensures no leads get lost between form submission and pipeline.
Many teams still choose Webflow over HubSpot CMS because it offers:
- Greater design control
- Faster builds
- Better performance
- Lower cost for front-end features
We break this down further in our Webflow vs HubSpot comparison, including when each platform makes the most sense.
Challenges of Webflow + HubSpot Integration
Integrating Webflow with HubSpot can fail if:
- Form fields are not mapped correctly
- Workflows require more logic than the native setup allows
- Multiple forms need different routing
- UTMs aren’t passed for attribution
- Sales teams must manually process submissions
Partnering with a Webflow development company helps you avoid these gaps, especially as your lead pipeline scales.
Best Practices for Integrating HubSpot with Webflow Web Development
Once HubSpot is connected to Webflow, the real results come from how your development workflow supports marketing and sales operations.
- Track the right conversion events: Ensure all CTAs and demo requests trigger HubSpot events, not just form submissions.
- Map every key form field to HubSpot properties: Include revenue-focused fields like job title or company size so sales can prioritize.
- Add the HubSpot tracking script site-wide: This enables analytics and automation across every page.
- Connect high‑intent pages directly to CRM workflows: Pricing, demo, and product pages should instantly route qualified leads.
- Enable chat on decision‑stage pages: Real‑time support improves conversion rates where intent is highest.
- Keep shared forms in the Webflow CMS: Update once, stay consistent, and avoid CRM mismatches.
"As soon as we implemented the new website, our traffic increased by 100%, and our HubSpot saw a jump in MQLs by 120%."
— Brandon Redlinger, CMO @Avarra AI

With that being said, let's get into the step-by-step instructions for each integration method. No coding knowledge is required – just follow along with the steps, and you’ll have Webflow and HubSpot working together in no time!
Webflow + HubSpot Sync: 4 Options
There are four main ways to connect Webflow forms to HubSpot CRM:
- Webflow's native app: Fastest, official integration. No code required.
- Zapier: Adds logic and extra steps without technical setup.
- Make (Integromat): Ideal for advanced workflows and full automation control.
- HubSpot API: The most technical setup giving you the most control
Each method suits different teams based on complexity, budget, and technical comfort. Below, we break down three out of four of the methods with setup steps and pros/cons.
Not sure which to choose? The comparison table below highlights the differences to help you pick the best approach for your needs. And if you need help deciding which is the right tool for your automation workflows, see our Make vs Zapier comparison guide.
Each of these methods will help you send leads captured on your Webflow site directly into HubSpot. If you want to learn how to be more effective in capturing those leads, we have written a marketer's playbook with strategies for creating high-converting pages.
Method 1: Using the Official Webflow–HubSpot App (App Marketplace Method)
The most seamless way to connect Webflow with HubSpot is by using the official Webflow–HubSpot App available in the Webflow App Marketplace. This method allows you to connect Webflow forms directly to your HubSpot CRM without needing to manually install tracking codes or use third-party tools.
It’s a no-code integration ideal for marketers and business owners who want to quickly sync form data into HubSpot with minimal setup.

Step 1: Install the HubSpot App in Webflow
- Open your Webflow project and go to the Apps tab
- Search for HubSpot and click Install App
- Authorize your HubSpot account when prompted to connect
Step 2: Map Your Webflow Form to HubSpot
- Once connected, Webflow will show a list of forms in your project
- Select the form you want to sync (e.g., “Contact Us”)
- Choose the matching fields in HubSpot for each input (e.g., name, email, phone)
Step 3: Save and Publish
- After mapping your fields, click Save Mapping
- Publish your Webflow site to activate the integration

Step 4: Test the Connection
- Submit a test entry via your Webflow form
- Check your HubSpot Contacts to confirm the data was captured
Step 5: Keep Forms Updated
- Any time you create a new form or update fields, revisit the App tab to ensure everything is mapped correctly
Pros of Using Webflow App
- Easiest and most official method
- No tracking code or third-party tools required
- Fully visual field mapping
- Supported directly by Webflow and HubSpot teams
Cons of Using Webflow App
- Limited to form submissions only
- Cannot include conditional logic or multi-step workflows. For that, use Zapier or Make (Learn how to set up a Webflow Zapier integration in our step-by-step guide.)
This app-based integration is ideal if you're looking for a fast, reliable, and user-friendly way to sync Webflow leads with HubSpot , with no code and no extra configuration required.
Method 2: Using Zapier to Connect Webflow Forms to HubSpot
Zapier is a popular no-code automation platform that acts as a bridge between different apps. With Zapier, you can create a "Zap" that sends Webflow form data to HubSpot whenever a form submission occurs.
This method is slightly more involved than the native integration, but it offers more flexibility — like adding extra actions or filters in between. Zapier’s interface is user-friendly, making it a great choice for non-technical users who want a bit more automation power.

Step 1: Log in to Zapier and create a new Zap
If you don’t have a Zapier account, sign up for a free one. Once logged in, click Make a Zap. A Zap is an automated workflow consisting of a trigger and one or more actions. You'll start by choosing Webflow as the trigger app.
Step 2: Set Webflow as the trigger app
Search for "Webflow" and select it. Choose Form Submission as the trigger event. If you haven’t connected your Webflow account before, Zapier will prompt you to do so.
Step 3: Connect your Webflow account to Zapier
Click Connect an Account. This will open a popup where you'll enter your Webflow API credentials. To get these:
- Go to your Webflow dashboard.
- Navigate to Account > Integrations.
- Generate and copy your API token.
Paste the token into Zapier. You’ll see a list of your Webflow sites — select the one containing the form you want to integrate.
Step 4: Configure the Webflow trigger
Choose your site name from the dropdown, then select the specific form to monitor — for example, “Contact Form.” If you want Zapier to trigger on any form, there’s an option for that too. Click Test trigger to verify the connection. Make sure you've submitted a test entry to your form before this step.
Step 5: Set HubSpot as the action app
Click the + button to add an Action step. Search for "HubSpot" and select it. Choose an action event, such as Create Contact (a common use case). This will add or update a contact in your HubSpot CRM.

Step 6: Connect your HubSpot account to Zapier
Click Connect an Account for HubSpot. A new window will ask you to log in and authorize Zapier. Choose the right account and confirm access. Once connected, proceed to the next step.
Step 7: Map the form fields to HubSpot properties
This is where you map Webflow form inputs to HubSpot fields:
- Zapier will show HubSpot fields like Email, First Name, etc.
- Click each field and assign it the correct Webflow data.
If you’re using custom fields, make sure those properties exist in HubSpot. You can map them in this step too.
Step 8: Test the Zap and turn it on
Click Test & Continue to send sample data to HubSpot. Check HubSpot to see if a contact was created correctly. If everything looks good, switch the Zap to On.
Step 9: Monitor and refine (optional)
Zapier will now run in the background. New form submissions in Webflow will create new contacts in HubSpot automatically. Use the task history in Zapier to check for errors or failed runs. You can also add steps — like sending notifications or creating deals — as needed.
If you need a visual representation of how this connection would look like, here's a video explainer for the integration:
Pros of using Zapier for HubSpot Integration:
- Friendly UI with plenty of flexibility.
- Multi-step workflows and filters supported.
- No coding required.
Cons of using Zapier for HubSpot Integration:
- The free plan has usage limits.
- Reliance on third-party uptime (Zapier).
- Complex workflow limitations.
Summary: Zapier is a great option if you want more control than Webflow’s native integration. It’s especially useful for conditional logic, extended workflows, and integrating with additional tools over time.
Method 3: Integrating Webflow and HubSpot via Make (ex Integromat)
Make (formerly Integromat) is another powerful no-code automation platform that can connect Webflow to HubSpot. It allows you to create multi-step workflows (called "scenarios") with routers, filters, and various app modules.
It’s a bit more complex than Zapier but offers deeper customization. If you’re tech-savvy or have advanced integration needs, this might be your best option.

Step 1: Sign Up and Create a Scenario
- Sign up for a Make account (free plan is available)
- In the dashboard, click Create a new scenario
- You’ll be presented with a visual canvas to build your automation
Step 2: Add a Webflow Trigger Module
- Click the + icon to add your first module
- Search for Webhooks module
- Add a Webhooks module and choose Custom Webhook
- Make will generate a unique webhook URL
- In Webflow, go to Project Settings > Forms and paste the URL
- Submit a test form to send sample data to Make
Step 3: Connect Your Webflow Account
- Use an API token from Webflow (Account > Integrations)
- Add it in Make to authenticate the connection
- Choose your site and form to monitor
Step 4: Add a HubSpot Action Module
- Click the next + to add a module
- Search for HubSpot and select an action like Create or Update a Contact
- Authenticate your HubSpot account when prompted
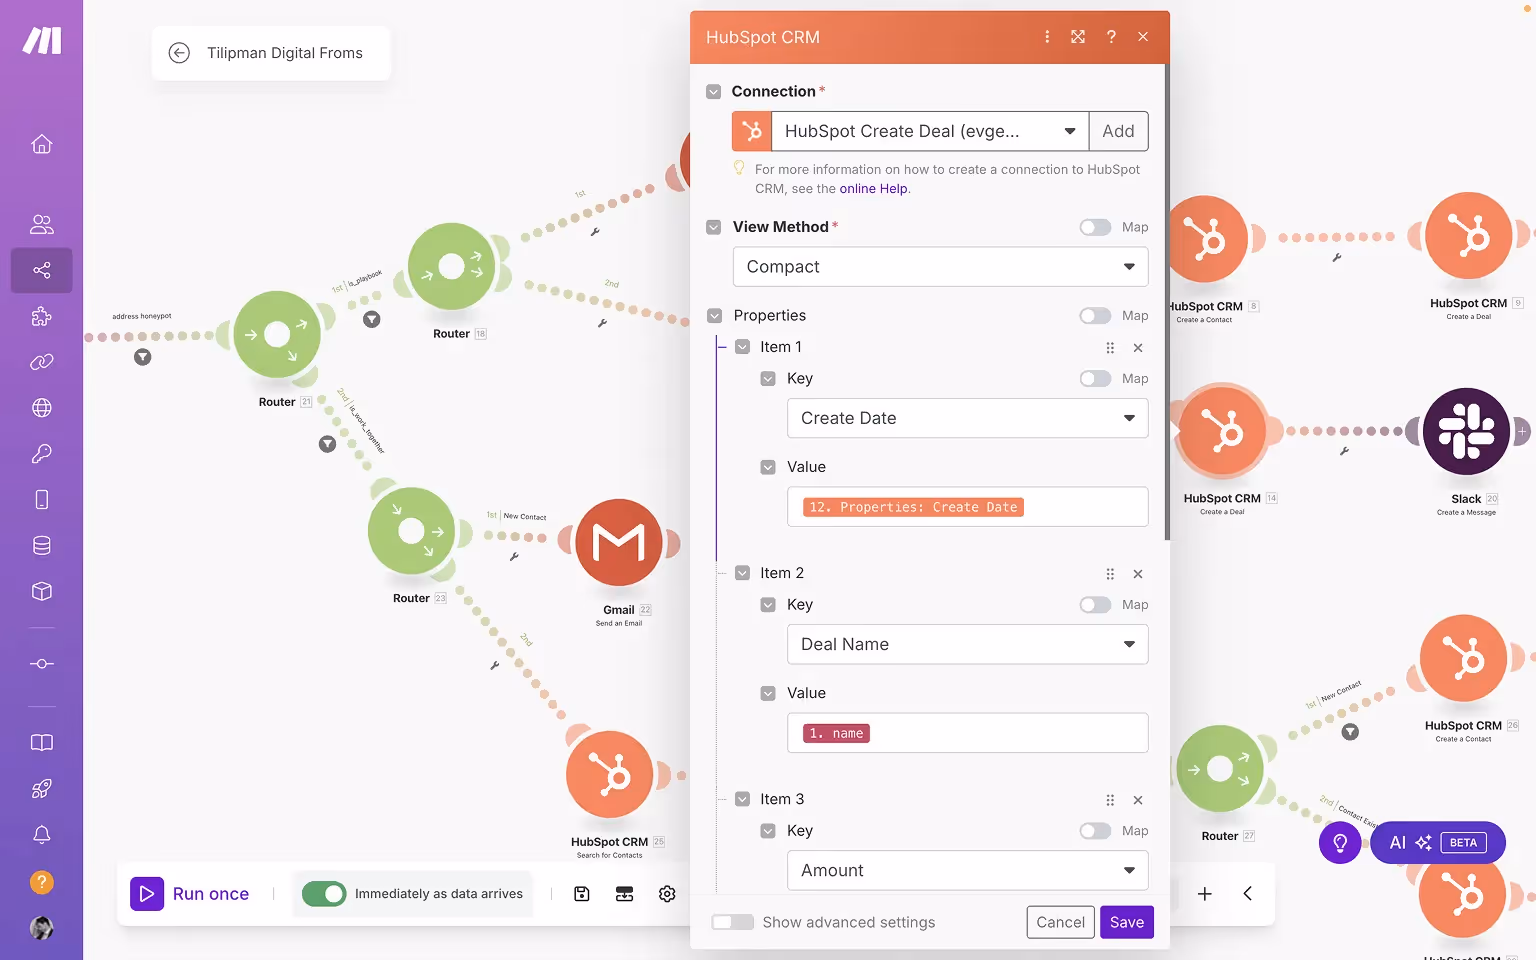
Step 5: Map Fields Between Webflow and HubSpot
- Map Webflow form fields (email, name, etc.) to HubSpot properties
- If using Webhooks, Make will show a JSON sample to map fields from
- Leave any non-required fields blank if not needed
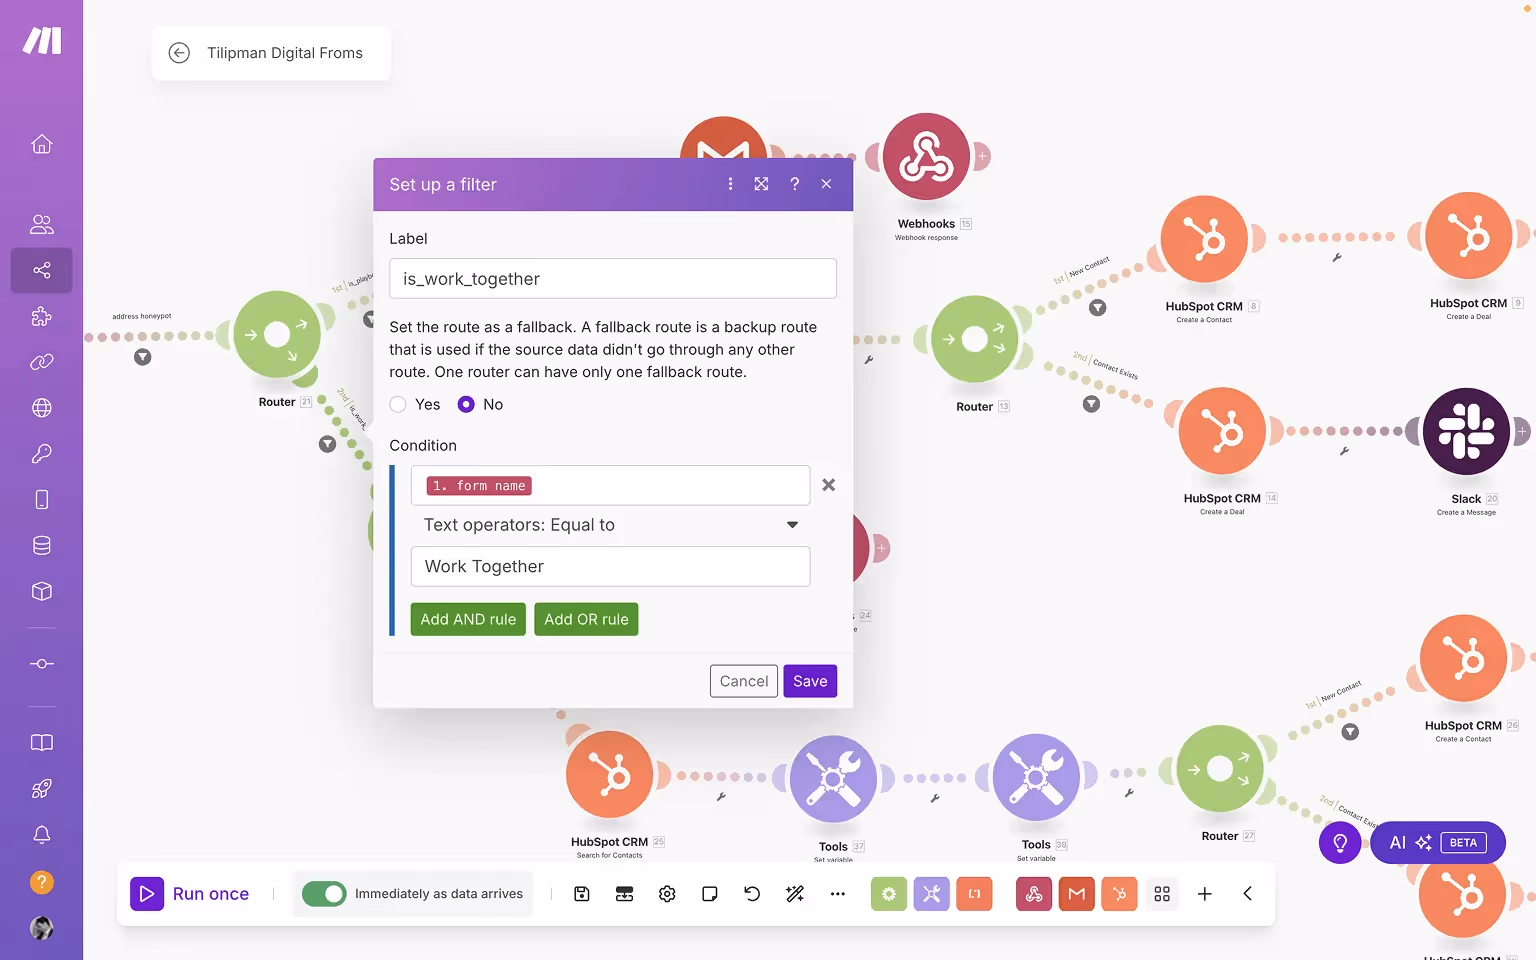
Step 6: (Optional) Add Extra Steps or Logic
- Add filters, routers, or extra modules (e.g., Slack, Sheets)
- Handle different forms with branching logic
- Build complex workflows from a single form trigger
Step 7: Test the Scenario
- Use the Run once feature to simulate your workflow
- Submit a test Webflow form and confirm it appears in HubSpot
Step 8: Activate the Scenario
- Enable Scheduling to turn your automation live
- Choose real-time (webhook) or interval-based execution
Step 9: Monitor and Maintain
- Use Execution History to review workflow runs
- Fix errors, refine logic, or expand your scenario as needed
- Update Webflow webhook URLs if you change domains or forms
Cons of using Make for HubSpot Integration:
- Extremely flexible with powerful customization
- Supports multi-step and multi-app workflows
- More generous limits than Zapier’s free plan
Cons of using Make for HubSpot Integration:
- Steeper learning curve
- UI may feel overwhelming to beginners
- Setup (especially Webhooks) is slightly more technical
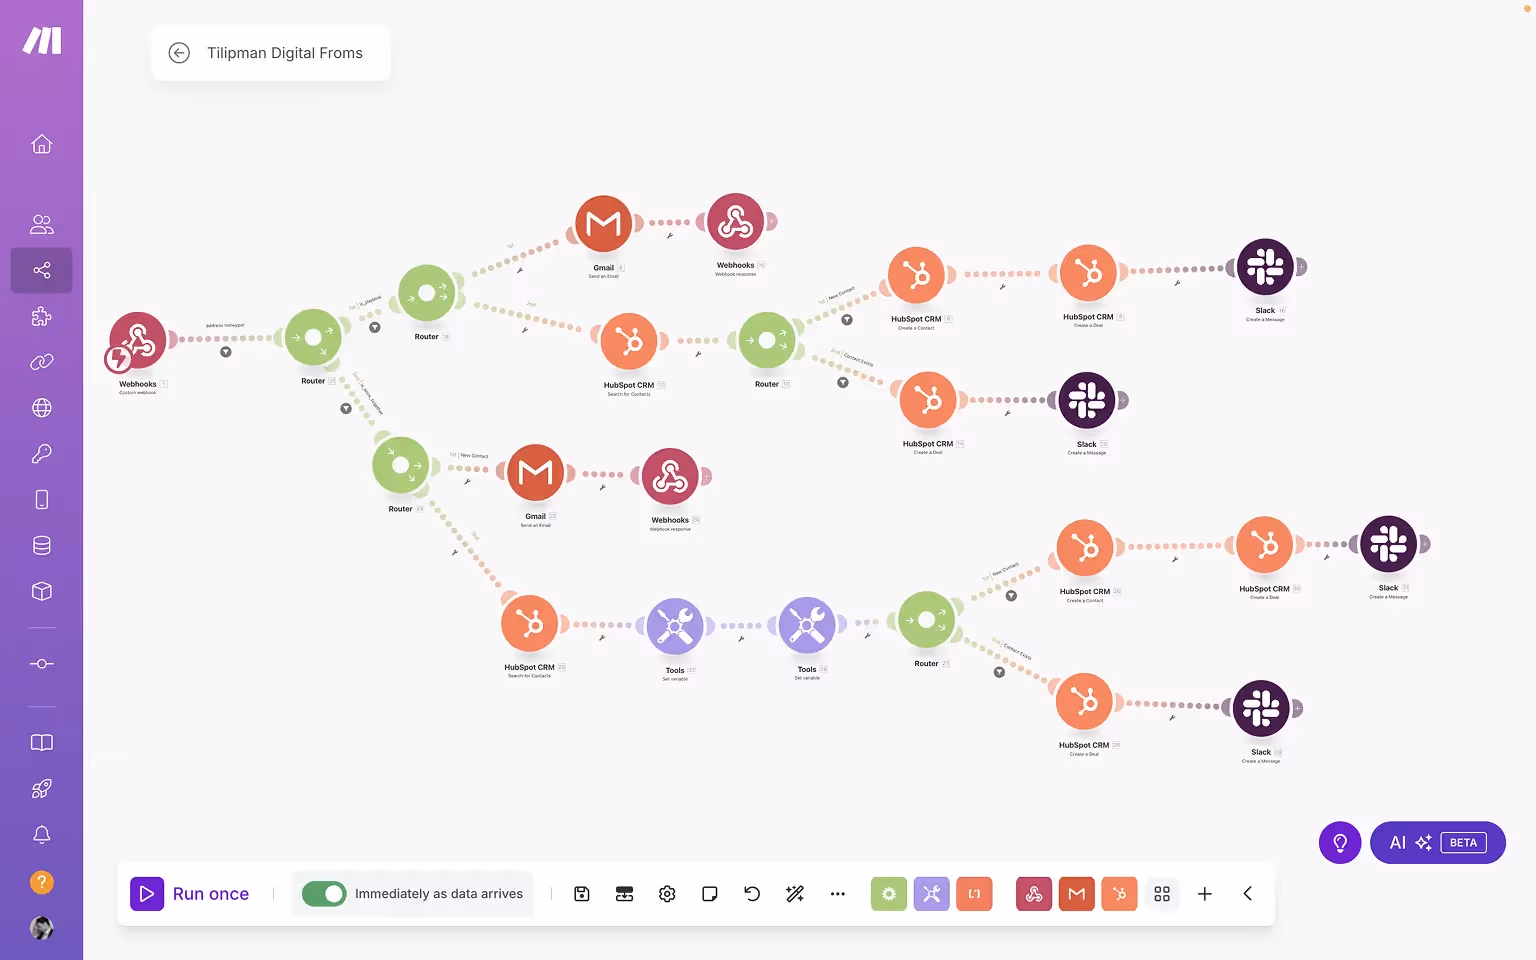
Make is best for power users who need full control over their automation logic. If you want to combine Webflow → HubSpot + other tools in one streamlined workflow, Make delivers that capability with precision. This is how we have integrated Webflow with HubSpot for our own site, Tilipman Digital.
How to Choose the Best Webflow HubSpot Integration Method
Integrating Webflow with HubSpot is a smart move to unify your website leads with your marketing workflow.
If You Want Simplicity
If you want a quick, no-fuss setup and only need to send basic form info to HubSpot, Webflow’s official integration (native method) is ideal. It’s as easy as copy-pasting a code snippet and toggling a setting. Perfect for small businesses or anyone who values simplicity and reliability with minimal maintenance.
If You Need Moderate Automation
If you’re looking for more automation flexibility — like tagging contacts, notifying team members, or connecting to additional apps — Zapier is a great middle-ground. It’s friendly to non-technical users and requires only a few more steps. With Zapier’s massive integration ecosystem, it’s easy to extend workflows (e.g., send a follow-up email or log submissions in a spreadsheet).
If You Want Full Control and Flexibility
If your business needs complex workflows or you anticipate evolving processes over time, Make (Integromat) gives you maximum flexibility. It’s ideal for power users or tech-savvy teams who want advanced branching logic, multiple form source handling, or multi-app automation — all in one powerful interface.
FAQs About Webflow HubSpot Integration
What’s the official way to integrate HubSpot with Webflow?
All above-mentioned approaches are official in their own way. In example, Zapier has an official integration and so does Make. That being said, the Webflow App Marketplace has an official application made for such a use case. It connects Webflow form submissions directly into HubSpot CRM without any custom code.
Does Webflow have a certified HubSpot App I can install?
Yes. The app is listed in the Webflow Marketplace and is supported by both HubSpot and Webflow. It’s the simplest setup for basic lead capture.
Can I map existing Webflow forms to HubSpot so submissions create CRM contacts?
Yes. As long as your fields are properly mapped to HubSpot Contact Properties inside the app, every submission creates or updates a HubSpot record.
How do I map form fields from Webflow to HubSpot Contact Properties?
Inside the Webflow–HubSpot App, select the form, then assign each input to the correct HubSpot property (email, first name, phone, etc.). Be sure custom properties are already created inside HubSpot.
What’s the recommended approach to embed HubSpot assets and track activity in Webflow?
Add the HubSpot tracking script site-wide for page analytics, and embed live chat or chatbots directly using their provided code snippets or via the Webflow App installation.
Can I personalize Webflow pages using HubSpot properties?
Yes, but this requires HubSpot’s personalization tokens and custom logic. For most teams, personalization is best implemented using Make or the HubSpot API.
How much does it cost to integrate HubSpot with Webflow?
Pricing depends on how complex your workflows and CRM setup are:
- Basic Webflow App setup: $500–$1,800
- Zapier integration with automation: $1,000–$3,000
- Make integration with advanced workflows: $1,500–$4,000
- Custom HubSpot API integration: $5,000+
Pricing varies based on:
- Number of forms
- Field mapping and routing logic
- UTM tracking and analytics setup
- Testing environments and QA requirements
Most teams fall into the first two categories, depending on scale and automation needs.
Final Thoughts
The goal of integrating Webflow with HubSpot is to ensure every your marketing and sales efforts actually work. When the setup is solid, your website drives ROI through pipeline instead of leaving gaps in your funnel.
If you would like a clean and reliable integration, our experts can handle it for you. We configure the right method for your needs, whether that is the native app, Zapier, Make, or even a custom HubSpot API setup. And if you're not sure if we can integrate your tech stack with Webflow, browse our Webflow integrations.
With the right approach, your website can become a lead engine.


