


Seeing your product price, rating, or business info in the search result creates confidence before users even land on your page. In short, schema markup doesn’t replace foundational SEO, but it amplifies your visibility—especially when paired with high-quality content and strong internal linking.
What Is Schema Markup (Structured Data)?
Schema markup is a standardized way to label elements on your website so that search engines can better understand the content. It’s invisible to users but highly visible to crawlers like Googlebot.
The markup follows a vocabulary defined by Schema.org, and it's commonly implemented using JSON-LD (JavaScript Object Notation for Linked Data), which sits inside a <script type="application/ld+json"> tag in your page’s head or body.
For example, if you publish a blog post, schema lets you define:
- That the page is an Article
- The headline is the blog title
- The author is a Person
- The datePublished is a specific ISO date
This added context helps search engines render rich results and understand how your content should be indexed.
Schema can describe nearly any type of content: articles, products, reviews, FAQs, people, organizations, events, and more. Each type has required and optional properties.
In Webflow, you add schema manually. Either through the Page Settings > Custom Code section for static pages, or via Embed components for CMS Collection pages. Webflow doesn’t generate structured data by default.
Schema markup is critical for communicating directly with search engines. It helps them extract accurate information, improve content classification, and serve richer search experiences to users.
Why Schema Markup Matters for SEO
Schema markup doesn’t directly improve your rankings, but it increases the visibility and engagement of your search listings—especially in competitive SERPs.
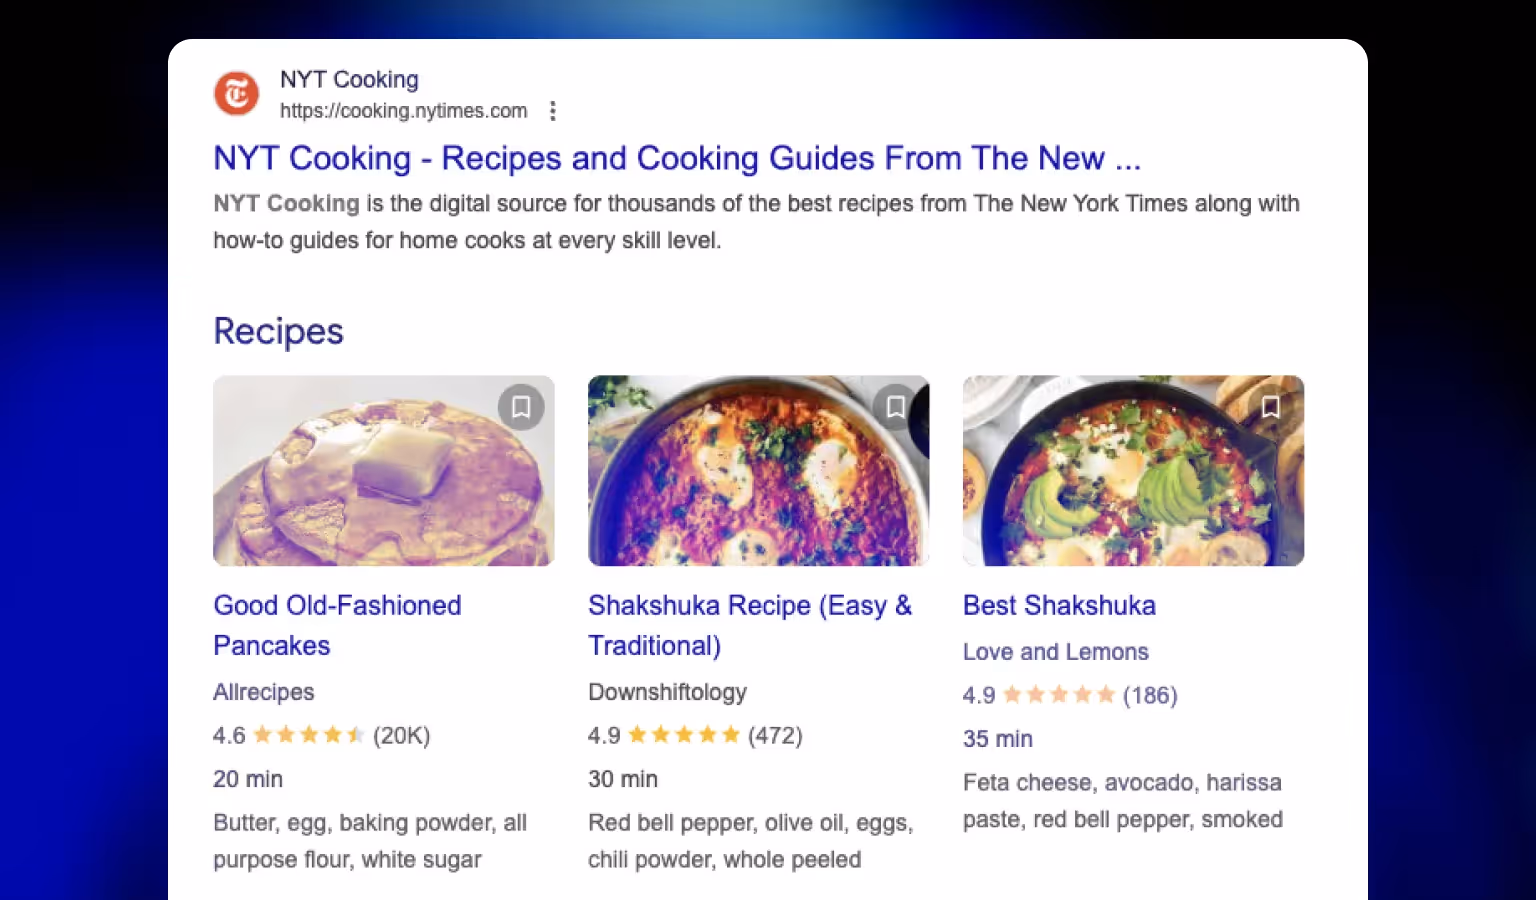
1. Unlocks rich results
Schema markup enables enhanced search features like:
- Star ratings
- Price and availability for products
- FAQ dropdowns
- Event dates and locations
- Author and publish dates for articles
These additions make your listing stand out, which boosts click-through rate (CTR). A higher CTR tells search engines your result is valuable, which can lead to better placement over time.
2. Enhances search engine understanding
Schema gives Google explicit context about the content:
- Article or blog post?
- Product or service page?
- Local business or organization?
The clearer your markup, the easier it is for Google to categorize and serve your content in the right place.
3. Future-proofs your SEO
Voice search and AI-generated answers often pull from structured data. Pages marked up with schema are more likely to be cited in featured snippets, knowledge panels, or assistant-powered answers.
To further improve AI visibility, Webflow’s new llms.txt feature lets you provide a curated map of your site for large language models – another strategy covered in our guide.

Launching soon? Don’t wing it.
Use our free website launch checklist to avoid common pitfalls—like broken links, tracking issues, and SEO mistakes. It’s a comprehensive pre- and post-launch guide built for teams that care about getting it right the first time.
4. Increases trust and conversions
Rich snippets build credibility. Seeing your product price, rating, or business info in the search result creates confidence before users even land on your page.
In short, schema markup doesn’t replace foundational SEO, but it amplifies your visibility—especially when paired with high-quality content and strong internal linking.
Common Schema Types for Webflow Websites
Different types of schema markup serve different content formats. Selecting the correct type is key to getting eligible for rich results.

Article / BlogPosting
Use this for blog posts, news updates, and educational guides.
Properties to include:
- headline
- image
- author
- datePublished
- publisher
Best used on CMS blog templates. Can be implemented dynamically using Webflow’s embed component and CMS fields.
Example:
1{
2  "@context": "https://schema.org",
3  "@type": "BlogPosting",
4  "headline": "How to Add Schema to Webflow",
5  "image": "https://example.com/images/schema-cover.png",
6  "author": {
7    "@type": "Person",
8    "name": "Jane Doe"
9  },
10  "datePublished": "2024-06-01"
11}
WebPage / WebSite
For general site context. Use WebPage on static pages and WebSite sitewide.
Common properties:
- name
- description
- url
- inLanguage
Example:
1{
2  "@context": "https://schema.org",
3  "@type": "WebPage",
4  "name": "Services Page",
5  "url": "https://example.com/services",
6  "inLanguage": "en"
7}
Product
Best for ecommerce or feature landing pages.
Important properties:
- name
- image
- description
- offers (price, availability)
- aggregateRating
Example:
1{
2  "@context": "https://schema.org",
3  "@type": "Product",
4  "name": "Smart Watch",
5  "image": "https://example.com/smartwatch.jpg",
6  "description": "A waterproof smart watch with 7-day battery life.",
7  "offers": {
8    "@type": "Offer",
9    "price": "199.99",
10    "priceCurrency": "USD",
11    "availability": "https://schema.org/InStock"
12  }
13}
FAQPage
Used when you have a clearly formatted question-and-answer section on the page.
Each Q&A pair must be visible on the page.
Example:
1{
2  "@context": "https://schema.org",
3  "@type": "FAQPage",
4  "mainEntity": [
5    {
6      "@type": "Question",
7      "name": "Does Webflow support schema markup?",
8      "acceptedAnswer": {
9        "@type": "Answer",
10        "text": "Webflow does not support it natively, but you can add it manually via custom code."
11      }
12    }
13  ]
14}
LocalBusiness / Organization
Used on About or Contact pages for company identity and NAP (Name, Address, Phone).
Can include:
- name
- address
- telephone
- openingHours
- sameAs (social links)
Example:
1{
2  "@context": "https://schema.org",
3  "@type": "LocalBusiness",
4  "name": "Khod.io",
5  "address": {
6    "@type": "PostalAddress",
7    "streetAddress": "123 Agency Blvd",
8    "addressLocality": "Vienna",
9    "addressCountry": "AT"
10  },
11  "telephone": "+4312345678",
12  "sameAs": ["https://linkedin.com/company/khod"]
13}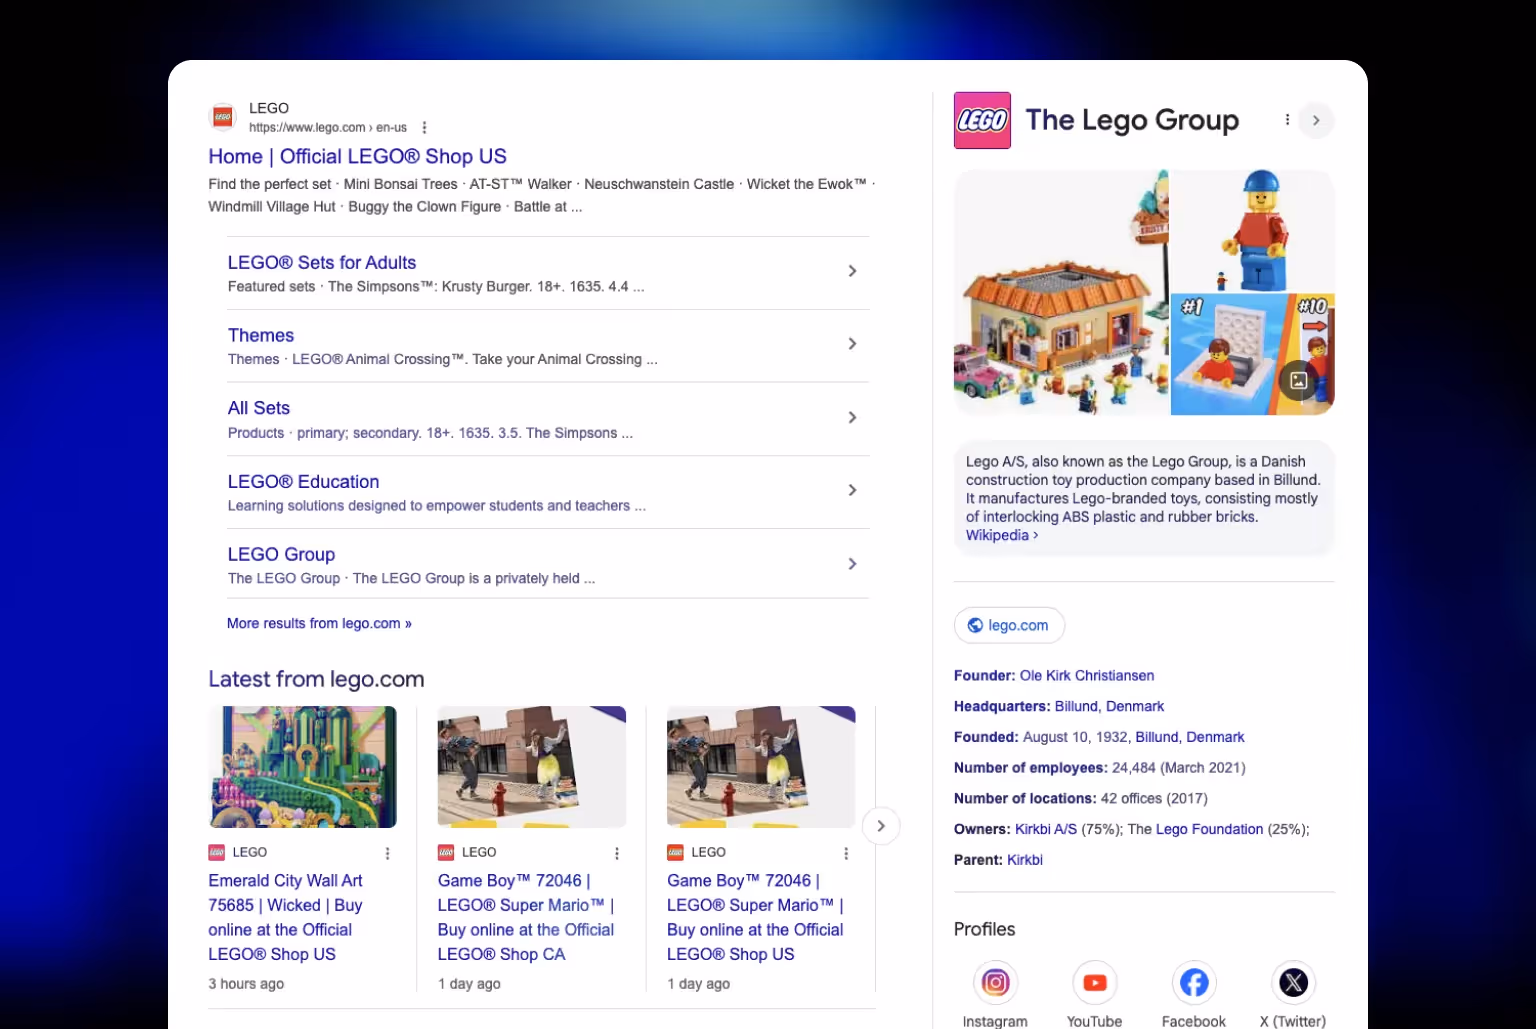
Review / AggregateRating
Can be embedded in Product, Service, or standalone Review pages.
Used to generate star ratings in search listings.
Example:
1{
2  "@context": "https://schema.org",
3  "@type": "Product",
4  "name": "Smart Watch",
5  "aggregateRating": {
6    "@type": "AggregateRating",
7    "ratingValue": "4.7",
8    "reviewCount": "93"
9  }
10}
11
Event
For webinars, conferences, and community events.
Fields include:
- name
- startDate / endDate
- location or eventAttendanceMode
Example:
1{
2  "@context": "https://schema.org",
3  "@type": "Event",
4  "name": "Webflow Schema Workshop",
5  "startDate": "2024-08-15T19:00",
6  "eventAttendanceMode": "https://schema.org/OnlineEventAttendanceMode",
7  "location": {
8    "@type": "VirtualLocation",
9    "url": "https://example.com/workshop"
10  }
11}
12
HowTo
Structured markup for tutorials or guides with steps.
To qualify, steps must be clear and sequential.
Example:
1{
2  "@context": "https://schema.org",
3  "@type": "HowTo",
4  "name": "How to Add Schema in Webflow",
5  "step": [
6    {
7      "@type": "HowToStep",
8      "name": "Open Page Settings",
9      "text": "Navigate to the desired page and open the settings."
10    },
11    {
12      "@type": "HowToStep",
13      "name": "Insert JSON-LD",
14      "text": "Paste the schema code into the custom code head section."
15    }
16  ]
17}
Choosing the right schema type—and filling in the key properties—makes your content eligible for visual enhancements in search. Webflow supports all of the above through manual implementation. Other schema types such as recipe, author, and many more exist beyond those listed here. For the full reference, visit Schema.org.
How to Add Schema Markup to Static Webflow Pages
Adding schema markup to static pages in Webflow involves manually inserting JSON-LD into the page’s custom code section.
Step 1: Identify the schema type
Determine which schema type fits the page content. For example:
- Article schema for blog-like resources
- FAQPage schema for support pages with Q&A
- LocalBusiness schema for the contact page
Use Schema.org to verify required and optional fields.
Step 2: Generate the schema code
You can use a tool like Merkle’s Schema Markup Generator to create the JSON-LD code, or write it manually if you’re familiar with the format.
Step 3: Add the schema to the page
Search engines use schema to better interpret your content—and reward sites that provide clarity with enhanced visibility in SERPs.
In Webflow:
- Go to the Pages panel
- Hover over the static page and click the settings icon (⚙️)
- Scroll to the Custom Code section
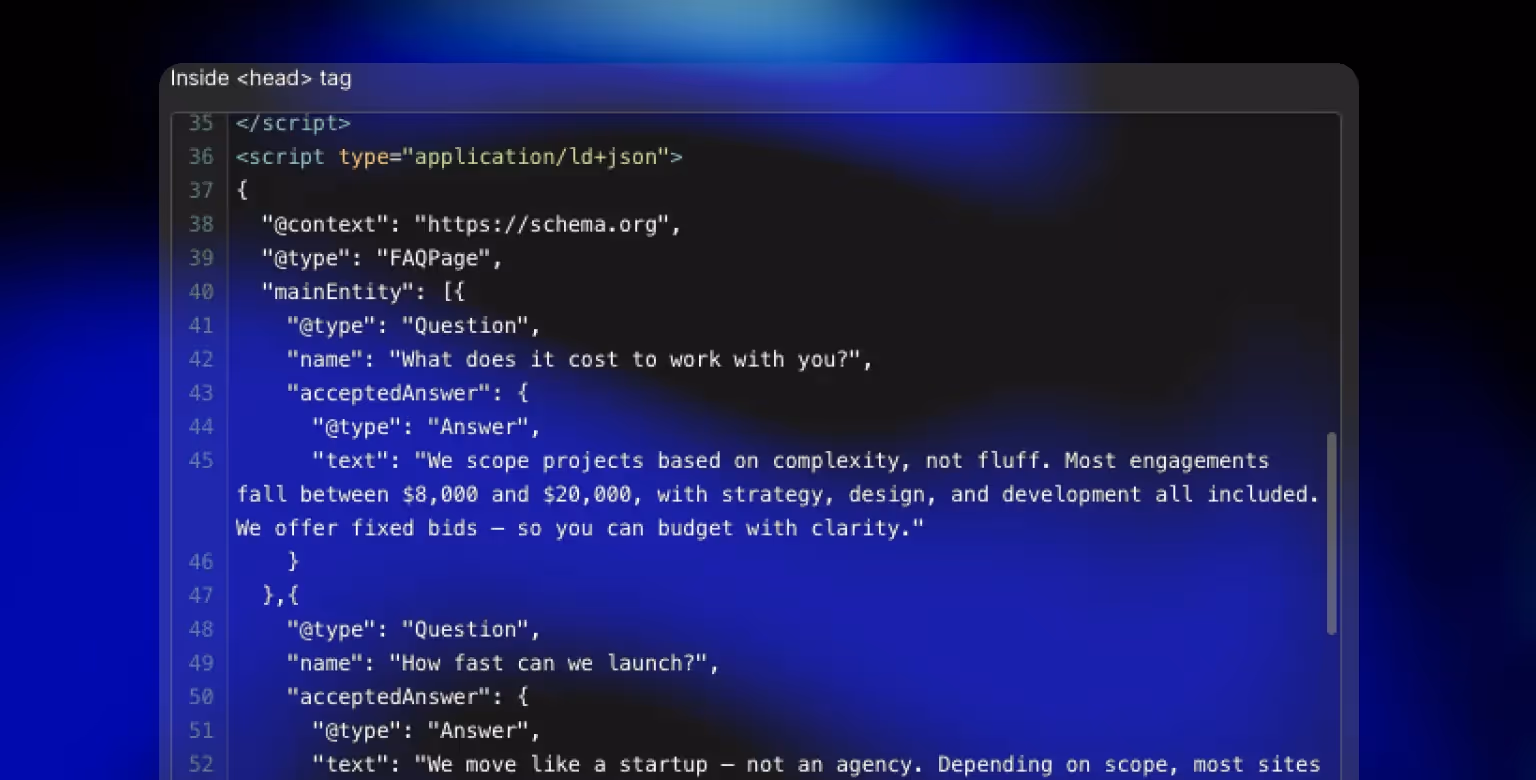
- Paste your schema inside the Inside tag field:
1<script type="application/ld+json">
2{
3  "@context": "https://schema.org",
4  "@type": "FAQPage",
5  "mainEntity": [
6    {
7      "@type": "Question",
8      "name": "How do I add schema in Webflow?",
9      "acceptedAnswer": {
10        "@type": "Answer",
11        "text": "Paste your JSON-LD in the head section of the page settings."
12      }
13    }
14  ]
15}
16</script>- Save the changes and publish the site
Step 4: Validate the implementation
Use Google’s Rich Results Test to verify that Google can detect and read your schema.
If you see errors, check for:
- Invalid JSON formatting (commas, quotes, brackets)
- Missing required fields
- Fields that don’t match visible content
Static schema gives you full control over what gets rendered—but it requires a manual update per page. If you want this implemented at scale without diverting internal resources, a specialized Webflow development agency can handle it efficiently and in line with best practices.
Use this method for landing pages, about pages, or one-off content pieces where automation isn’t needed.
Done right, structured data helps B2B websites earn rich results like star ratings, FAQ dropdowns, product specs, and more.
When Cryptoworth, a Web3 accounting platform, rebuilt their site in Webflow, preserving SEO performance was critical. We managed the Webflow-to-Webflow migration and executed a full technical SEO overhaul—including over 300 schema markup fixes across critical pages.
- Site health improved from 78 to 95%
- 440+ SEO-blocking errors resolved
- Organic keyword visibility increased from 1,200 to 1,800+ terms
- Traffic was fully preserved post-launch
"They’ve been the best vendor we’ve had… From now on, they’re my only SEO agency recommendation.”
— Ariel Eiberman, CMO @Cryptoworth

How to Add Schema Markup to Webflow CMS Template Pages
For dynamic content like blog posts or product pages, schema markup should be implemented on the CMS Collection Template so it applies to every item.
Step 1: Choose your CMS collection and schema type
Identify the CMS Collection (e.g., Blog Posts, Case Studies, Products) and select the appropriate schema type.
Example pairings:
- Blog Posts > BlogPosting
- Products > Product
- FAQs > FAQPage
Step 2: Plan field mappings
Map Webflow CMS fields to the schema properties.
- Name > headline
- Main Image > image
- Publish Date > datePublished
- Author > author.name
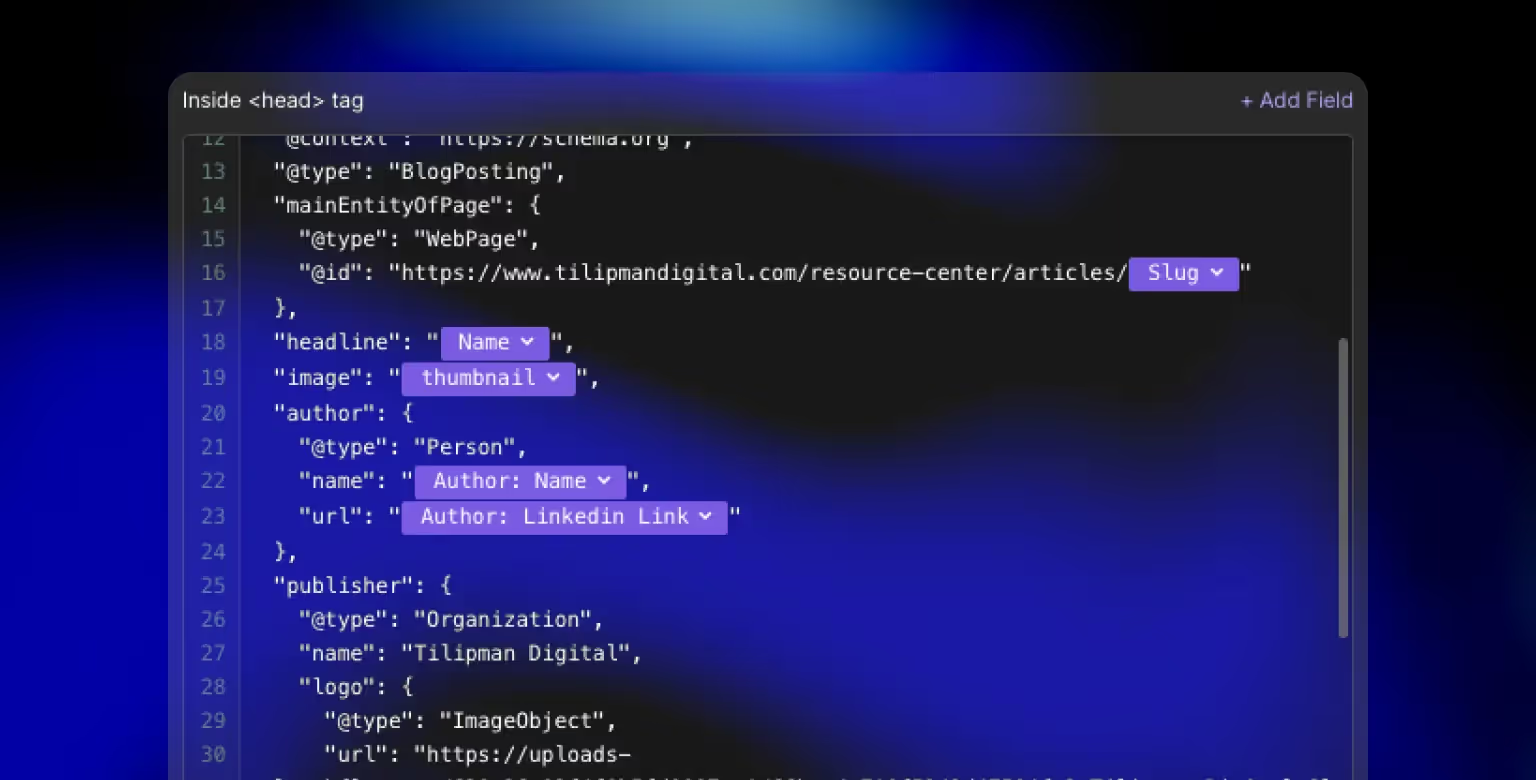
Step 3: Open the CMS Template and add an embed
In the Webflow Designer:
- Navigate to the CMS Collection Page (e.g., Blog Post Template)
- Drag an Embed element into the page (usually before the footer)
- Paste your JSON-LD code, inserting dynamic fields using the Add Field button
Example:
1<script type="application/ld+json">
2{
3  "@context": "https://schema.org",
4  "@type": "BlogPosting",
5  "headline": "{{ Name }}",
6  "image": "{{ Main Image }}",
7  "author": {
8    "@type": "Person",
9    "name": "{{ Author }}"
10  },
11  "datePublished": "{{ Publish Date }}"
12}
13</script>Note: Webflow will replace {{ }} with the live CMS content for each page.Step 4: Hide the embed (optional)
If needed, add a combo class like is-hidden and set the display to none so it doesn’t take up space.
Step 5: Publish and test
Publish the site and validate a live CMS page using Google’s Rich Results Test. Check that the schema appears with the right content values.
Using dynamic schema ensures every CMS item includes structured data without requiring manual edits. This approach is scalable and essential for blogs, ecommerce, or resource-heavy Webflow sites.
Testing and Validating Your Schema Markup
After adding schema markup to your Webflow pages, you need to test it to ensure search engines can read and use it properly.
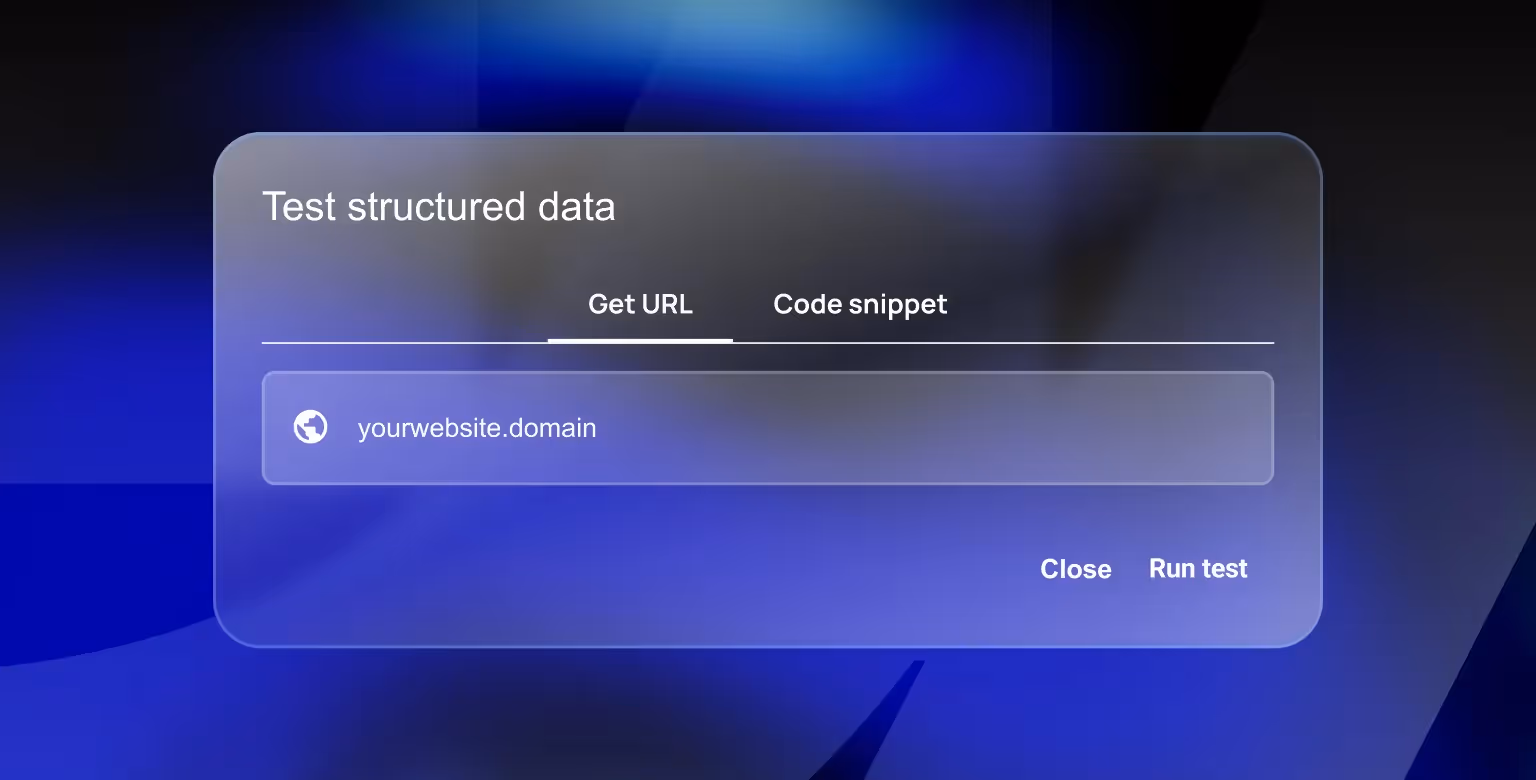
Step 1: Use Google’s Rich Results Test
Go to Google’s Rich Results Test.
- Enter the page URL or paste the HTML code with your schema
- Click "Test URL" or "Test Code"
- Review the results for detected schema types and eligibility for rich results
What to look for:
- Green checkmarks for valid schema
- Warnings that indicate optional fields
- Errors that indicate critical issues (fix these immediately)
Step 2: Use the Schema Markup Validator
For a broader syntax check, use the Schema Markup Validator.
- It checks whether your JSON-LD follows Schema.org formatting rules
- Helpful for debugging code not flagged by Google's test
Step 3: Monitor in Google Search Console
Once your site is live and crawled:
- Go to Google Search Console
- Open the "Enhancements" tab
- Check for schema types like Article, FAQ, or Breadcrumb
- View how many items are valid, invalid, or pending review
Step 4: Check live search results
Sometimes the schema passes validation but doesn’t show in results. This can happen due to:
- Google’s algorithmic choices
- Page not having enough authority
- Schema not matching visible content
Be patient and keep the markup accurate. Google may take time to start displaying rich results.
Schema Markup Best Practices for Webflow
Follow these best practices to ensure your structured data is valid, scalable, and aligned with SEO guidelines.
Match schema to on-page content
Only mark up content that exists on the page and is visible to users. Google may penalize sites that use schema to represent misleading or invisible content.
Prefer JSON-LD format
JSON-LD is Google’s recommended format. It’s easier to manage, doesn’t interfere with page design, and can be inserted cleanly in head tags or embeds.
Use Microdata only when necessary
Use Microdata if you’re marking up multiple repeating elements within a Collection List (e.g., multiple reviews or FAQs on a single page). Otherwise, stick to JSON-LD.
Keep the markup up to date
When you update content—like changing a product price or adding new FAQs—update your schema to reflect those changes. Outdated structured data reduces trust and accuracy.
Avoid duplicate schemas
Don’t place multiple schema types of the same kind on a single page unless required. For instance, one Product schema per product page is sufficient.
Don’t over-optimize
Adding unnecessary schema types or stuffing irrelevant keywords into your markup won’t improve rankings. Stay relevant and minimal.
Validate regularly
Any time you update schema or publish new pages, validate with Google’s tools. Add this step to your pre-launch QA checklist.
Use CMS variables strategically
For dynamic schema, carefully map CMS fields to relevant schema properties and ensure fallback values are handled (e.g., missing images or author names).
Good schema markup enhances your visibility without increasing design or dev complexity. Implement it intentionally and keep it clean to maximize SEO impact.
Frequently Asked Questions About Schema Markup in Webflow
Does Webflow support schema markup natively?
No. Webflow doesn’t have a built-in schema feature. You need to add JSON-LD manually using page settings or embed components.
What’s the easiest way to generate schema?
Use tools like Merkle's Schema Markup Generator or Google's Structured Data Markup Helper. These tools let you fill in fields and output valid JSON-LD.
Can I use the same schema type on multiple pages?
Yes, as long as the content fits the schema. For example, every blog post can use BlogPosting schema if it follows the correct format.
Do I need to include every property?
No. Only required properties are mandatory. However, adding recommended fields improves your chances of getting rich results.
Will schema improve my rankings?
Not directly. Schema helps enhance how your content appears in search results, which can improve CTR and indirectly impact rankings.
How long does it take for rich results to show up?
There’s no fixed timeline. Google may take days or weeks to recognize and display your schema, depending on crawl frequency and page authority.
Can I test schema on unpublished pages?
Yes. Use the "Test Code" option in Google's Rich Results Test if the page isn’t published yet.
Should I use JSON-LD or Microdata?
Use JSON-LD for most cases. Microdata is useful for repeated items on a single page, but it’s harder to manage and less preferred by Google.