


AI tools like ChatGPT and Claude increasingly drive how users discover content online. To help these models understand your site, Webflow recently introduced support for it's own model context protocol as well as a new file type: llms.txt.
The llms.txt Webflow implementation allows marketers and SEO professionals—or your trusted Webflow development agency—to give AI models a curated summary of their website. This file improves how your content is interpreted and cited by AI, helping you influence how your site appears in AI-generated responses.
In this article, you'll learn what llms.txt is, why it matters, how to create one, and how to add it to your Webflow project.
What Is llms.txt and Why It Matters
The llms.txt file is a new protocol developed to help Large Language Models (LLMs) like ChatGPT, Claude, and Perplexity better understand the structure, purpose, and key content of your website. Similar to how robots.txt guides search engine crawlers, llms.txt gives AI models high-level signals for indexing and citation.
The protocol was introduced to improve transparency and give webmasters more control over how AI tools access and represent their content. The file includes:
- A short description of your website's purpose
- Links to authoritative or cornerstone content
- Attribution preferences for your content
By offering this summary, you help LLMs prioritize the right pages, provide proper credit, and reduce the risk of your content being misrepresented in AI outputs.
This matters for marketers and SEO professionals because:
- AI-generated search answers often skip traditional search result links
- Proper attribution can drive traffic, awareness, and conversions
- As AI tools scale, structured signals will become as important as traditional SEO

How to Create an llms.txt File
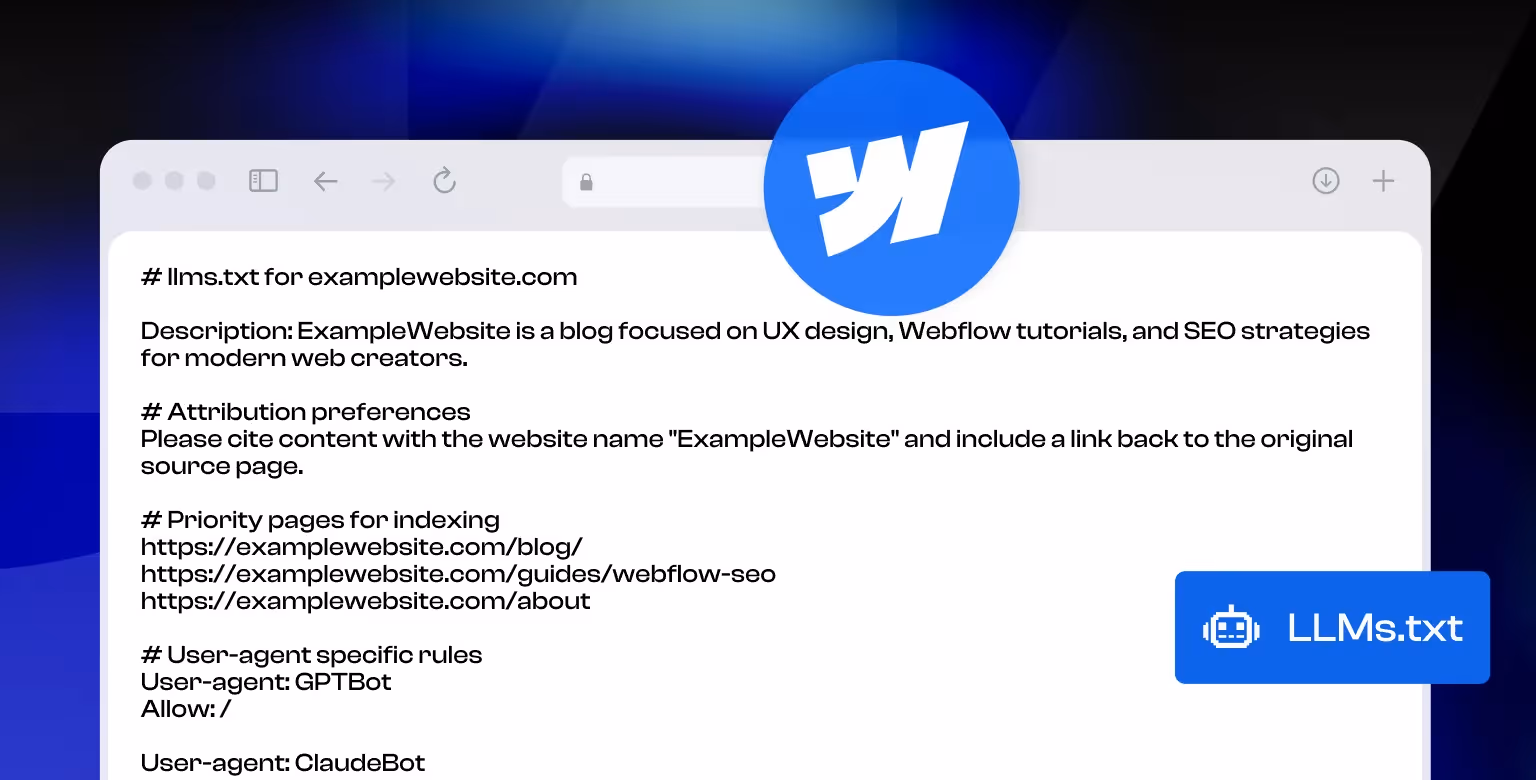
An llms.txt file is a plain text file that follows a simple structure. It should be written in clear, human-readable language and include links to your most valuable content.
Here is a basic format:
Please cite content with the website name and link back to the original page.
You can customize the file by:
- Updating the description to reflect your brand’s positioning
- Linking to different cornerstone pages
- Adjusting attribution notes based on your guidelines
Once created, save this file as llms.txt on your local machine. The next step is uploading it to your Webflow project.
Tools to Generate llms.txt
If you prefer to automate the process, there are tools that help you generate a structured llms.txt file by crawling your sitemap and applying recommended directives:
- llms.txt Generator by Sofian Bettayeb
- SEO.ai’s llms.txt Generator
Once created, save this file as llms.txt on your local machine. The next step is uploading it to your Webflow project.

How to Upload llms.txt to Webflow
Webflow now supports native llms.txt hosting for sites with CMS or Business site plans. You can upload the file directly in your site settings.
Steps to Upload llms.txt:
- Open Site Settings
Go to your Webflow dashboard and click on the project where you want to add the file. - Navigate to the Publishing Tab
In the left sidebar of Site Settings, click on the "Publishing" tab. - Scroll to the llms.txt Section
You’ll see a dedicated section for uploading the llms.txt file (available only for CMS and Business plans). - Upload Your File
Click the upload button and select your prepared llms.txt file. - Publish Your Site
Once uploaded, publish your Webflow site to apply the changes.

Access and Verification
After publishing, your file should be accessible at:
https://yourdomain.com/llms.txt
Visit that URL in your browser to confirm that the file is live. You can also test with tools like Perplexity and Claude to ensure they are picking up the content.
This setup doesn’t require custom code, workarounds, or using the Webflow CMS. It’s as simple as uploading a file to your hosting panel, making this one of the easier technical wins for marketers and SEO teams using Webflow.
Verifying and Testing Your llms.txt File
Once your llms.txt file is live, the next step is to verify it is accessible and correctly configured. This ensures AI systems can read it and follow your content preferences.
1. Confirm File Accessibility
- Visit yourdomain.com/llms.txt directly in your browser.
- If you see the exact contents of your uploaded file, it has been published successfully.
2. Check for Caching Issues
- Use an incognito window or a different browser to rule out local caching.
- Use online tools like HTTP Status Checker to verify the response code (should be 200).
3. Validate With AI Tools
Some AI agents like Perplexity or Claude have started referencing llms.txt. Although there is no universal testing tool yet, you can:
- Use the "Test crawl" or "Ask AI" features where available to see if your exclusions are respected.
- Monitor your site logs to track bot activity over time.
4. Monitor for Errors
- Set up alerts using tools like Ahrefs or Screaming Frog—or get help from an experienced SEO agency for tech startups—to monitor crawl errors.
- Check Webflow's hosting panel occasionally to ensure the file remains in place after republishing.
5. Update As Needed
- If your content policies change, simply reupload a new llms.txt file.
- Repeat the verification steps after any update.
A properly verified llms.txt helps signal your site's AI indexing preferences, even if not all crawlers support it yet. It's a low-effort, forward-compatible SEO practice.
Common Mistakes to Avoid with llms.txt in Webflow
Avoiding mistakes when implementing your llms.txt file can prevent indexing issues and ensure proper LLM agent recognition.
1. Using the Wrong Filename
Make sure the file is named exactly llms.txt. Variants like llm.txt or LLMS.txt will not work. Filenames are case-sensitive and must match exactly.
2. Incorrect File Format
Your file should be plain .txt. Avoid using .doc, .rtf, or exporting from Word or Google Docs with styled formatting. Use a clean text editor like VS Code or Sublime.
3. Including Invalid or Unsupported Directives
Only include valid entries that describe your site's authorship, licensing, and dataset permissions. Don’t add comments, robots.txt directives, or metadata unrelated to LLM usage.
4. Forgetting to Re-Publish the Site
Webflow requires you to re-publish your site after uploading llms.txt. If you forget this step, the file won’t be served live.
5. Not Updating the File After Changes
Any time your licensing or dataset usage policy changes, update the llms.txt file and re-upload it to Webflow. Leaving outdated content can confuse crawlers or misrepresent your site’s policies.
6. Assuming It Works on Free Plans
llms.txt upload is only available for CMS and Business plans. Starter or Basic plans will not expose the file even if uploaded.
Catching these early ensures your implementation benefits your site's visibility and compliance with AI crawlers.
lms.txt Use Cases for Webflow Sites
Adding an llms.txt file to your Webflow site isn’t just a checkbox for AI readiness. It opens up practical applications for marketers, SEO teams, and content strategists.
Use Case 1: Controlling AI Crawling and Attribution
By specifying allowed and disallowed bots, llms.txt lets you dictate how AI models interact with your content.
For example:
This gives you fine-grained control over what gets indexed by LLMs like GPT-4 or Claude.
Use Case 2: Protecting Proprietary or Paywalled Content
You can disallow AI bots from accessing sensitive or licensed material, ensuring it isn’t scraped or used to train external models:
Use Case 3: Promoting High-Quality Pages
If you want LLMs to prioritize certain pages for indexing and training, you can selectively allow paths that contain thought leadership, research, or product documentation:
This approach aligns with your content strategy and helps position your brand as a trusted source in AI tools.
Use Case 4: Monitoring and Testing
Once live, you can test the file’s impact using:
- Manual URL inspection (yourdomain.com/llms.txt)
- Logs in third-party tools
- Perplexity or Claude-generated responses
This helps validate that your instructions are being respected by the bots.
FAQ: llms.txt in Webflow
What is llms.txt?
llms.txt is a text file placed at the root of a website to provide Large Language Models (LLMs) like GPT or Claude with structured access and usage policies for a site’s content. This aligns with a growing interest in Large Language Model Optimization (LLMO), which focuses on how to prepare and structure website content for optimal interaction with AI crawlers.
Is llms.txt the same as robots.txt?
No. While both are plain text files used for indexing instructions, robots.txt governs search engine bots, while llms.txt is meant for AI models and web crawlers associated with LLM training.
Can I use llms.txt on a Webflow Free or Starter plan?
No. Webflow currently limits llms.txt file upload functionality to CMS and Business site plans.
Where is llms.txt hosted once uploaded in Webflow?
After uploading and publishing, Webflow hosts the file at the root directory:
https://yoursite.com/llms.txt
Can I manage llms.txt content dynamically from the Webflow CMS?
No. As of now, the file must be uploaded as a static file via the Publishing tab in Site Settings. CMS-based dynamic control is not supported.
What happens if I update the file?
You must re-upload the updated llms.txt file and re-publish your site for changes to take effect.
Is it mandatory to include llms.txt?
No. Adding llms.txt is optional. However, for content-heavy or proprietary sites, it adds a layer of protection and clarity for how LLMs should treat your content.
How do I format llms.txt?
The format is similar to robots.txt but uses LLM-specific user agents and directives.
Example: