


We’ll show you four ways to connect Mailchimp to Webflow and explain which one you should use depending on your needs.
Why Connect Mailchimp to Webflow?
You’d have to be mad to organize email list contacts by hand. And if you’re using both tools, Webflow and Mailchimp, but haven’t connected them, you know how annoying migrating Webflow form data to Mailchimp gets. Updating contact lists and exporting CSVs is not only slow and messy, it’s a nightmare.
Once you connect the two, your life gets significantly easier. Every signup from your site goes straight into Mailchimp without the need for your constant input. Contacts get automatically tagged and get ready for follow-ups without lifting a finger.
The integration helps you avoid the busywork so you can actually use your time doing whatever it is you do to improve your bottom line. Taking similar manual tasks and automating them is what our Webflow development services are all about.
What You Get When You Integrate
- Faster lead capture: No manual copying / exporting emails into lists.
- Automatic follow-ups: Welcome emails, drip campaigns, and more email workflows triggered on signup.
- Better targeting: Segment and personalize messages with Mailchimp tags.
This setup is perfect if you’re running SaaS waitlists, newsletters, or lead magnet campaigns.
Methods to Integrate Webflow with Mailchimp
There are a few ways to connect Webflow and Mailchimp.
1. Mailchimp Form Embed (Easiest)
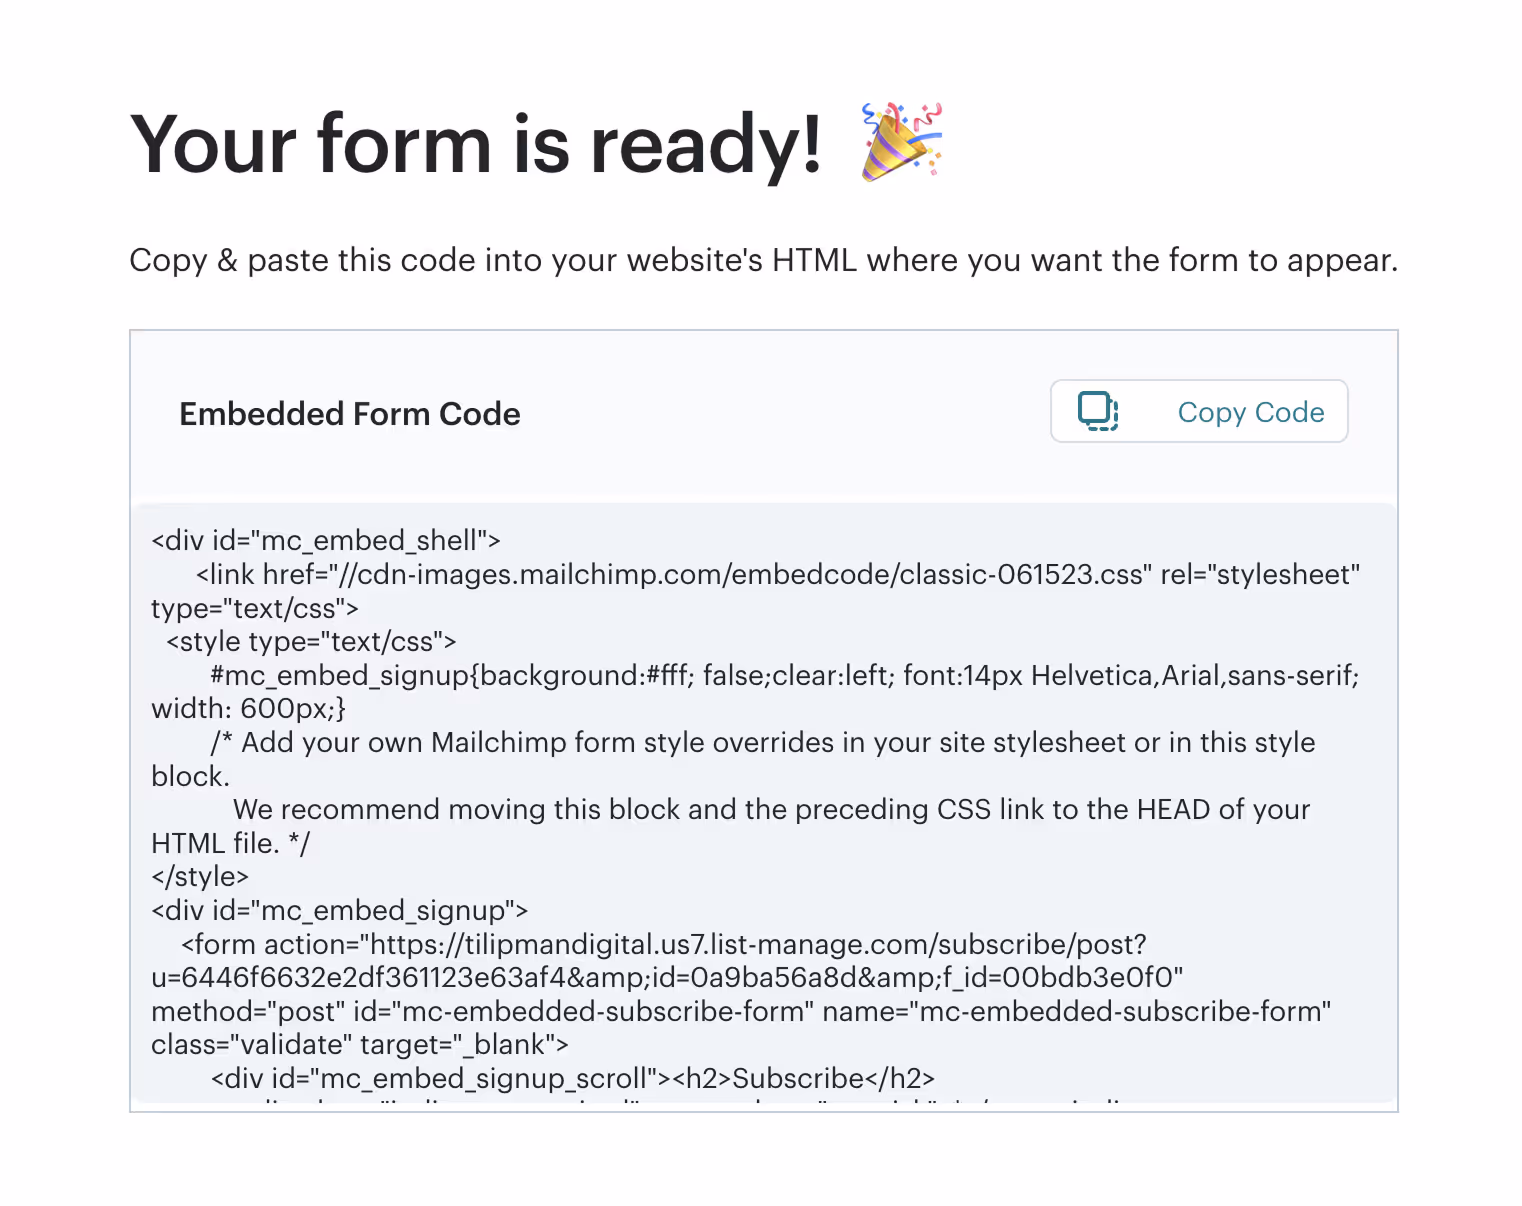
Mailchimp gives you an embed code for signup forms. Copy that code into an Embed element in Webflow using the following steps:
- Go to your Mailchimp dashboard.
- Open your Audience > Signup forms > Embedded forms.
- Copy the HTML code.
- In Webflow, drag an Embed block onto your page.
- Paste the code, save, and publish.
This method is great because it takes a simple copy-paste. On the other side of the same coin, styling the embedded form is very limited. Mailchimp doesn’t give you many options for this to be done.
2. Webflow Form Action URL (Cleanest)
This is when you start thinking of using your own branding for your forms. You can do that by using Webflow’s native forms and styling and using Mailchimp to get the appropriate form action URL.
Steps:
- In Mailchimp, open your form embed code.
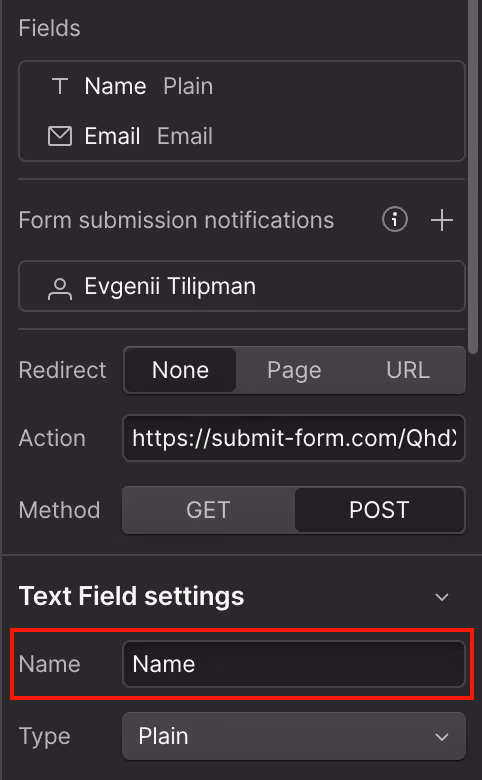
- Copy the long URL from inside the
<form action="...">line. - In Webflow Designer, select your form and paste that URL into the Form Action field.
- Set the method to POST.
- Redirect to the wanted success / thank you page (If you don’t have one, here are some thank you page examples for inspiration).
- Publish and test your form.
So while you have successfully removed the risk of limited design, this method doesn’t allow you to segment or tag your subscribers easily.

3. Webflow Mailchimp Integration via Zapier (Most Flexible Option)
Now this is where things start having more control. Using Zapier is the simplest way to send your form data to Mailchimp while keeping the tags and segmentations intact. You can also use it to sort leads into audiences and start email workflows when something happens (form submitted).
Why Use Zapier or Make
Zapier and Make are automation tools allowing you to significantly extend Webflow’s functionality and connect it to different tools such as Mailchimp.
They help you add logic to your projects, accounting for “if this then that” scenarios. Both Zapier and Make allow you to do things such as:
- Add signups to different lists based on the submitted out form.
- Apply tags to forms to identify intent. I.e. “Newsletter”, or “Demo.”
- Notify you via communication channel of choice (i.e. Slack, email, or telegram) on new subscriptions.
- Trigger welcome or nurture sequences.
This method is best if you want to save time and personalize how you handle leads.

Step-by-Step Setup in Zapier
Step 1: Create a Zapier Account
Go to zapier.com and create a free account. Once logged in, click Create Zap.
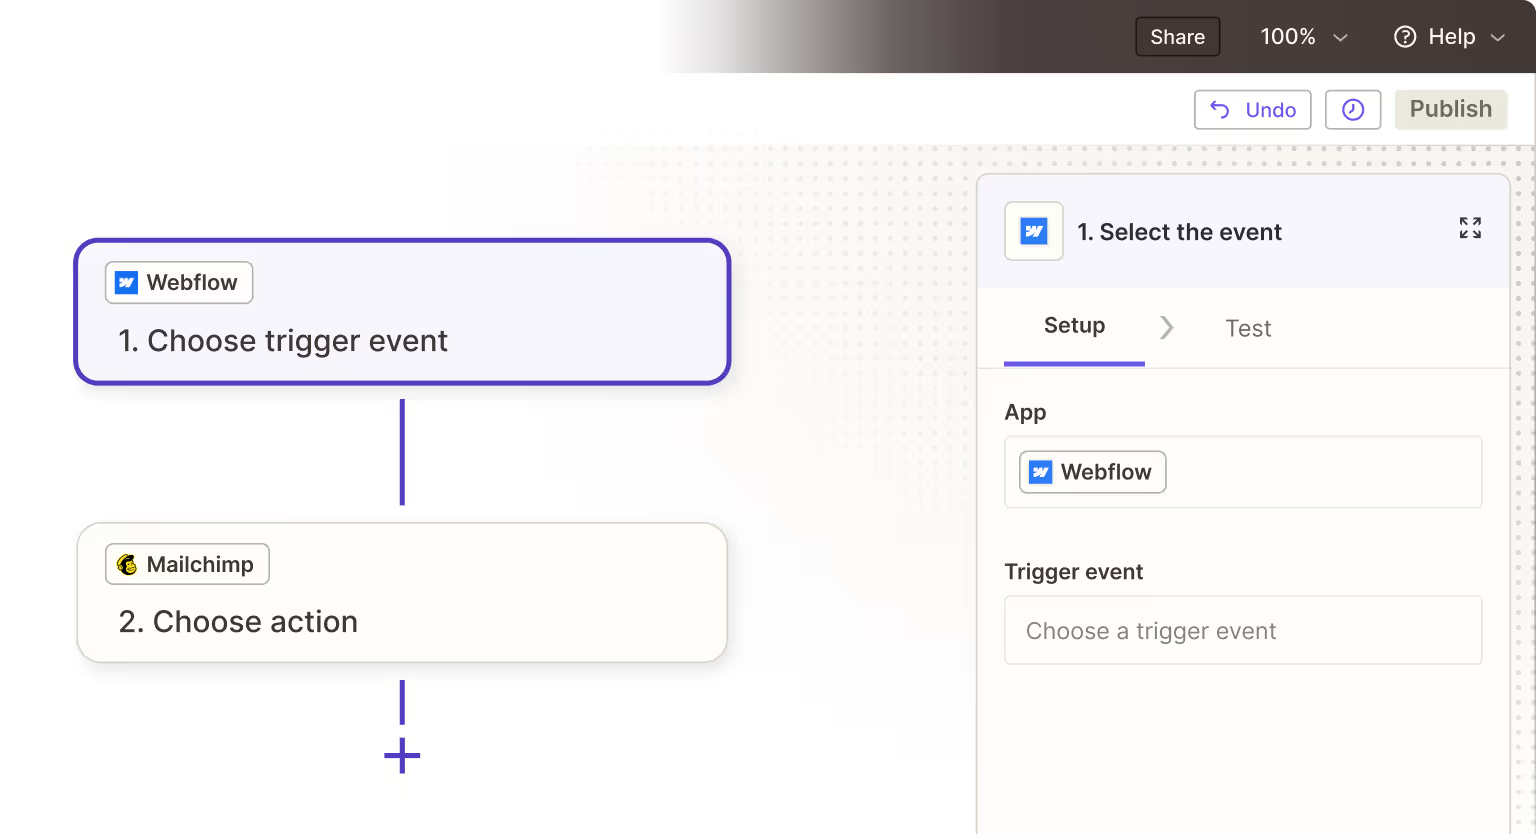
Step 2: Choose Webflow as the Trigger
- Select Webflow as the app.
- Pick Form Submission as the trigger event.
- Connect your Webflow account when prompted.
Step 3: Add Mailchimp as the Action
- Choose Mailchimp as the action app.
- Select Add/Update Subscriber.
- Connect your Mailchimp account.
Step 4: Map the Form Fields
- Rout your Webflow form fields (i.e. Name, Email, Company) to the correct Mailchimp fields.
- Add tags or select the right audience to send them to.
Step 5: Test and Turn On the Zap
- Run a test submission to make sure everything works
- If the data shows up in Mailchimp, click Publish Zap.
- Finally, submit a real form on your site to confirm the automation is live.
Alternative: Using Make (Integromat)
- Make is very similar to Zapier in the way it works, but also quite different in terms of UI. It also gives you more flexibility. We wrote a detailed guide on Zapier vs Make that covers the topic.
- Ideal for teams in need of advanced workflows.
When to Use This Method
Use Zapier or Make if you:
- Need to tag or segment leads automatically.
- Need to trigger welcome or follow-up emails right after signup.
- Manage multiple lists or audiences.
- Want to notify your team when a new contact is added in the same workflow.
It’s not the fastest method, but it saves you a lot of time through automations.
4. Mailchimp API (For Developers)
Have an engineering team? Using Mailchimp’s API allows you to do everything you can do with Zapier. The api gives you full control over triggers, data flows, and is much more scalable compared to the previous methods. That being said, it is a lot more technically demanding and requires expensive engineering hours (that should be spent working on your product).
Each option works. If you just want signups to land in Mailchimp, the Form Action method is enough. If you want automation and tagging, go with Zapier. You can get a deeper understanding of Webflow Zapier Integration in our guide.
Common Issues & How to Fix Them
Even simple setups go wrong when details are omitted. Here are the most common Webflow-Mailchimp integration issues we saw so far:
Form Submissions Not Reaching Mailchimp
Cause: The form action URL or field names don’t match Mailchimp’s settings.
You can fix the issue by following the steps:
- Open your Mailchimp embed code.
- Ensure the same form action URL is used in Webflow as the correct Mailchimp form.
- For each input in Webflow, match Name to the Mailchimp field (like
EMAIL,FNAME,LNAME). - Publish the site again and submit a test.
Tags or Lists Not Updating
Cause: Zapier / Make setup is missing a tag or list field.
You can fix the issue by following the steps:
- Open your Zap or Make scenario.
- Check that the correct Mailchimp audience and tag are selected.
- Make sure the settings are saved.
- If using Zapier, test the step again and re-publish.
Form Works in Staging but Not on Live Site
It happens that the site is launched to staging, but not to the live domain. Therefore the changes aren’t propagated to the live site. To fix this issue, simply publish your site. Check for console errors in the browser (usually missing action values or mismatched field names).
No Confirmation Email Sent
Cause: The Mailchimp automation isn’t triggered or list settings are off. You can fix that issue by doing going over the following steps:
- Go to your Mailchimp Audience.
- Ensure contacts are added successfully.
- Verify the automation is active and linked to that list.
Most issues come from a data flows between Webflow and Mailchimp not being mapped out well. Review the basics. That will solve most of your problems.
Other Common Setup Problems
These aren’t direct integration errors but can still confuse users or cause frustration.
Form Styling Looks Off
Cause: You’re using Mailchimp’s embed code, not a native Webflow form.
You can fix the issue by using Webflow’s form element instead of the Mailchimp embed and using the URL from mailchimp to add it to your Webflow form’s form action.
GDPR or Double Opt-In Issues
Cause: In European countries, there are privacy laws in place that prevent data collection with no prior approval. In the same way, Mailchimp requires permission from the users for compliance. You can make the setup GDPR compliant in the following way:
- Add a checkbox in Webflow for consent (like “I agree to receive emails”).
- Turn on Mailchimp’s double opt-in in Audience settings.
Best Integration Practices
If you’ve read this far, you’re ready to set up a Webflow Mailchimp integration right. Best practices are just that, covering the basics in the right way. The end result should be error free. Here’s a quick recap of what to keep in mind:
- Double-check that your field names match between platforms.
- Always be testing (ABT): Use your staging domain before going live.
- Segment your audiences for controlled targeting.
- On signup show a thank-you message or redirect to thank-you page.
- Enable notifications (more of a strategic than technical best practice)
- Monitor API keys
Want to take your site even further, but out of ideas? Explore other Webflow integrations, and see how they can work together to save time and grow your business.
Frequently Asked Questions (FAQ)
Can I use Mailchimp for free with Webflow?
Yes. Mailchimp’s free plan lets you connect a Webflow form using the embed or form action method. It supports up to 500 contacts and includes basic automations.
Do I need Zapier to connect Webflow and Mailchimp?
No. If you just want form submissions to be added as contacts to your Mailchimp list, then the Form Action URL method is more than enough. Zapier should be used in case you want to extend the basic functionality through multi-step workflows to enable tagging and notifications.
Why aren’t my Webflow form submissions appearing in Mailchimp?
ppEither the form action URL is incorrect or your Webflow form field names don’t match Mailchimp’s fields. Verify your input names match those of Mailchimp’s (i.e. EMAIL or FNAME).
How do I collect GDPR consent in Webflow forms?
Add a checkbox field for consent (i.e. “I agree to receive marketing emails”). In Mailchimp, make sure GDPR fields are enabled in your audience settings.
Can I send a welcome email automatically after someone signs up?
Yes. You need to set up an automation in Mailchimp to send an email when a new subscriber joins your list. You can also trigger the email flow through Zapier’s automation.
Is Mailchimp the best email tool for Webflow sites?
Mailchimp is great for small email lists and basic automations. If you’re running an e-commerce site, Klaviyo will be a better option as it gives you more data and product flows. We use Beehiiv. It is made for newsletters (not that we’re running one at the moment) and quite simple to set up.
Do Webflow integrations affect site performance?
No. Adding Mailchimp integrations through a form action or automation tools such as Zapier and Make doesn’t affect site speed.

