


Introduction
Building eCommerce sites is tough. ECommerce projects require a lot of technical know-how. Thankfully, Webflow helps make lives of entrepreneurs pursuing the eCommerce business model simpler.
It's a development platform that combines development tools with eCommerce functionality. It doesn't rely on rigid templates, although you can definitely purchase a template, and start by customizing it.
If you choose to do things in a custom fashion, Webflow offers full creative control, letting you build a digital store in whatever way that suits your brand the most.
If you have not yet decided whether Webflow is the right tool to build your eCommerce shop on,we recommend reviewing our Webflow vs. Shopify comparison. It provides the the pros and cons of both platforms.
This guide will take you through the setup motions, taking you from not knowing how to enable eCommerce functionality in Webflow to launching your eShop.
If you get overwhelmed and realize you need help with implementation, our Webflow Development Agency can help.
Why Use Webflow for Your eCommerce Store?
Webflow is a development platform best known for its visual development feature. Essentially it allows you to develop without an immediate need to write code. When comparing Webflow's eCommerce features to that of other platforms such as Shopify, it gives you a more flexible front-end environment.
To put it simply, Webflow allows you to develop designs of any complexity. The best part is that with all the front-end flexibility, it still tackles all the product management, payment processing, and order tracking.
Pros of Using Webflow’s eCommerce
Webflow's eCommerce solution provides a customizable, visually-driven experience that gives you complete control over your store's appearance and functionality. Here are the key advantages:
- Design Freedom – Fully customizable storefronts without coding.
- No Plugins Needed – Built-in eCommerce features mean no reliance on third-party apps.
- Integrated CMS – Easily manage product pages and content updates.
- Optimized Checkout – Secure transactions with Stripe and PayPal integration.
- Responsive Design – Optimized for mobile and desktop users.
Cons of Using Webflow’s eCommerce
Despite its flexibility, Webflow does have some limitations that users should consider before committing to the platform:
- Limited Payment Options – Only supports Stripe and PayPal, unlike Shopify, which offers more gateways.
- No Multi-Currency Checkout – Webflow does not currently support multiple currencies in a single store.
- Learning Curve – Although no-code, Webflow requires time to master for full customization.
- No Free eCommerce Plan – Going against the trends set by Shopify and WooCommerce, Webflow has no free plans for testing it's eCommerce features.
While Webflow offers several advantages, there are also some limitations to be aware of. This guide is for those who have already decided to use Webflow’s eCommerce and want to learn how to implement it. We will focus on how to build your store step by step rather than evaluating all of Webflow’s eCommerce features.
Getting Started With Webflow eCommerce
Before building your store, you need to choose a Webflow eCommerce plan and set up a project. To get a better understanding of eCommerce pricing plans, we have written an article on Webflow's pricing policies.

Prerequisite: Enable Webflow eCommerce in CMS
Before you can work through these steps, you need to enable eCommerce functionality within Webflow’s CMS:
- Navigate to CMS Collections > Ecommerce in Webflow’s settings.
- Ensure that the eCommerce option is activated so that you can manage and display products in your store.
- Once enabled, you can proceed with adding products and configuring your store settings.

10 Essential Steps to Set Up Your Webflow eCommerce Store
Flux Academy has done a great job with this video guide on setting up your eCommerce store. It is a little dated, but shows the general setup idea. With that being said, follow these 10 steps to successfully setup your online shop in Webflow:
Step 1: Add a Business Address (Optional)
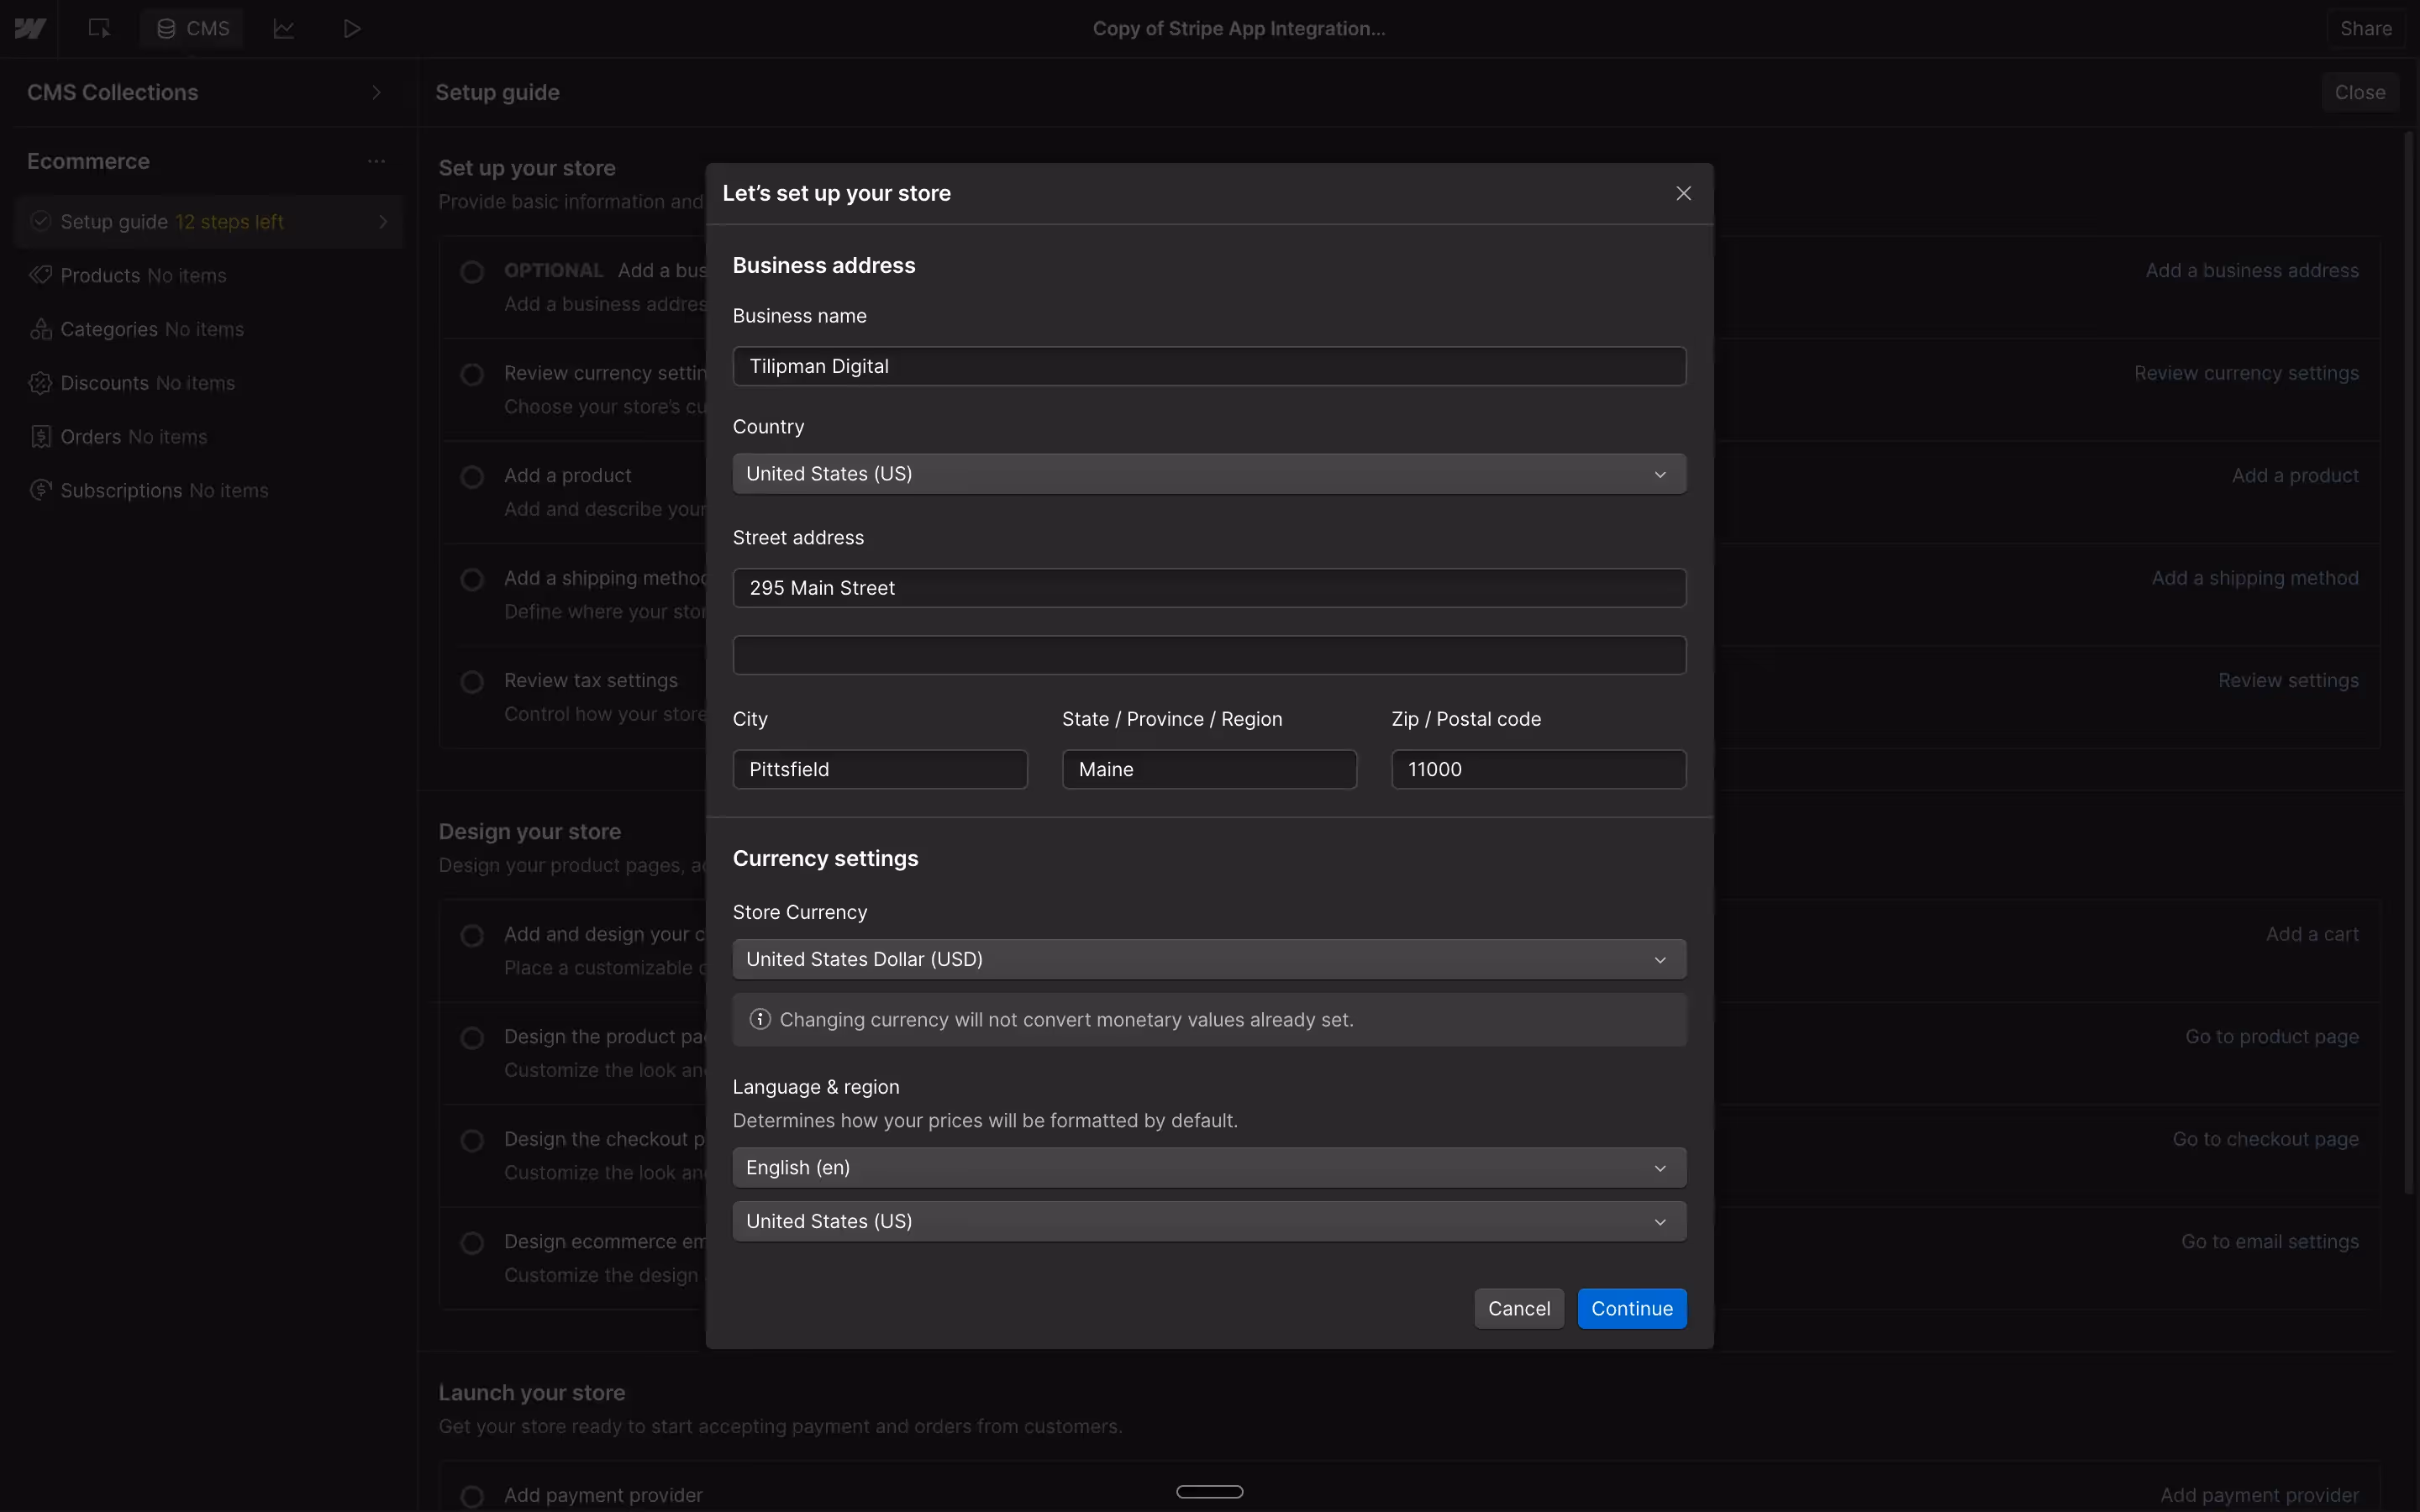
Adding a business address is important for shipping and tax calculations. Here’s how to set it up:
- Navigate to Ecommerce Settings > General.
- Enter your store name – this will be referenced in emails sent to customers and store managers.
- Input your customer support email – this is the email address provided for customer inquiries.
- Under Business Addresses, fill in:
- Business name
- Country
- Street address
- City
- State/Province/Region
- Zip/Postal Code
- Save the details to apply the changes.
Step 2: Review Currency Settings
Choose your store’s currency and set up price formatting.
- Navigate to Ecommerce Settings > Currency.
- Choose the correct Store Currency (e.g., USD, EUR, RSD, etc.).
- Set your language & region – this determines how prices are displayed.
- Customize price formatting if needed.
- Save the changes to apply your settings.

Step 3: Add a Product
Your store revolves around the products you offer, so it's crucial to set up product listings properly.
- Go to the Products panel.
- You can either add sample items (5, 10, or 15) to start with pre-filled product data or create a new product from scratch.
- Fill in product details including:
- Name
- Slug (URL path for the product)
- Description
- Categories (if applicable)
- Pricing and discounts
- Shipping details
- Product variants (e.g., sizes, colors, styles)
- Click Save to add the product.

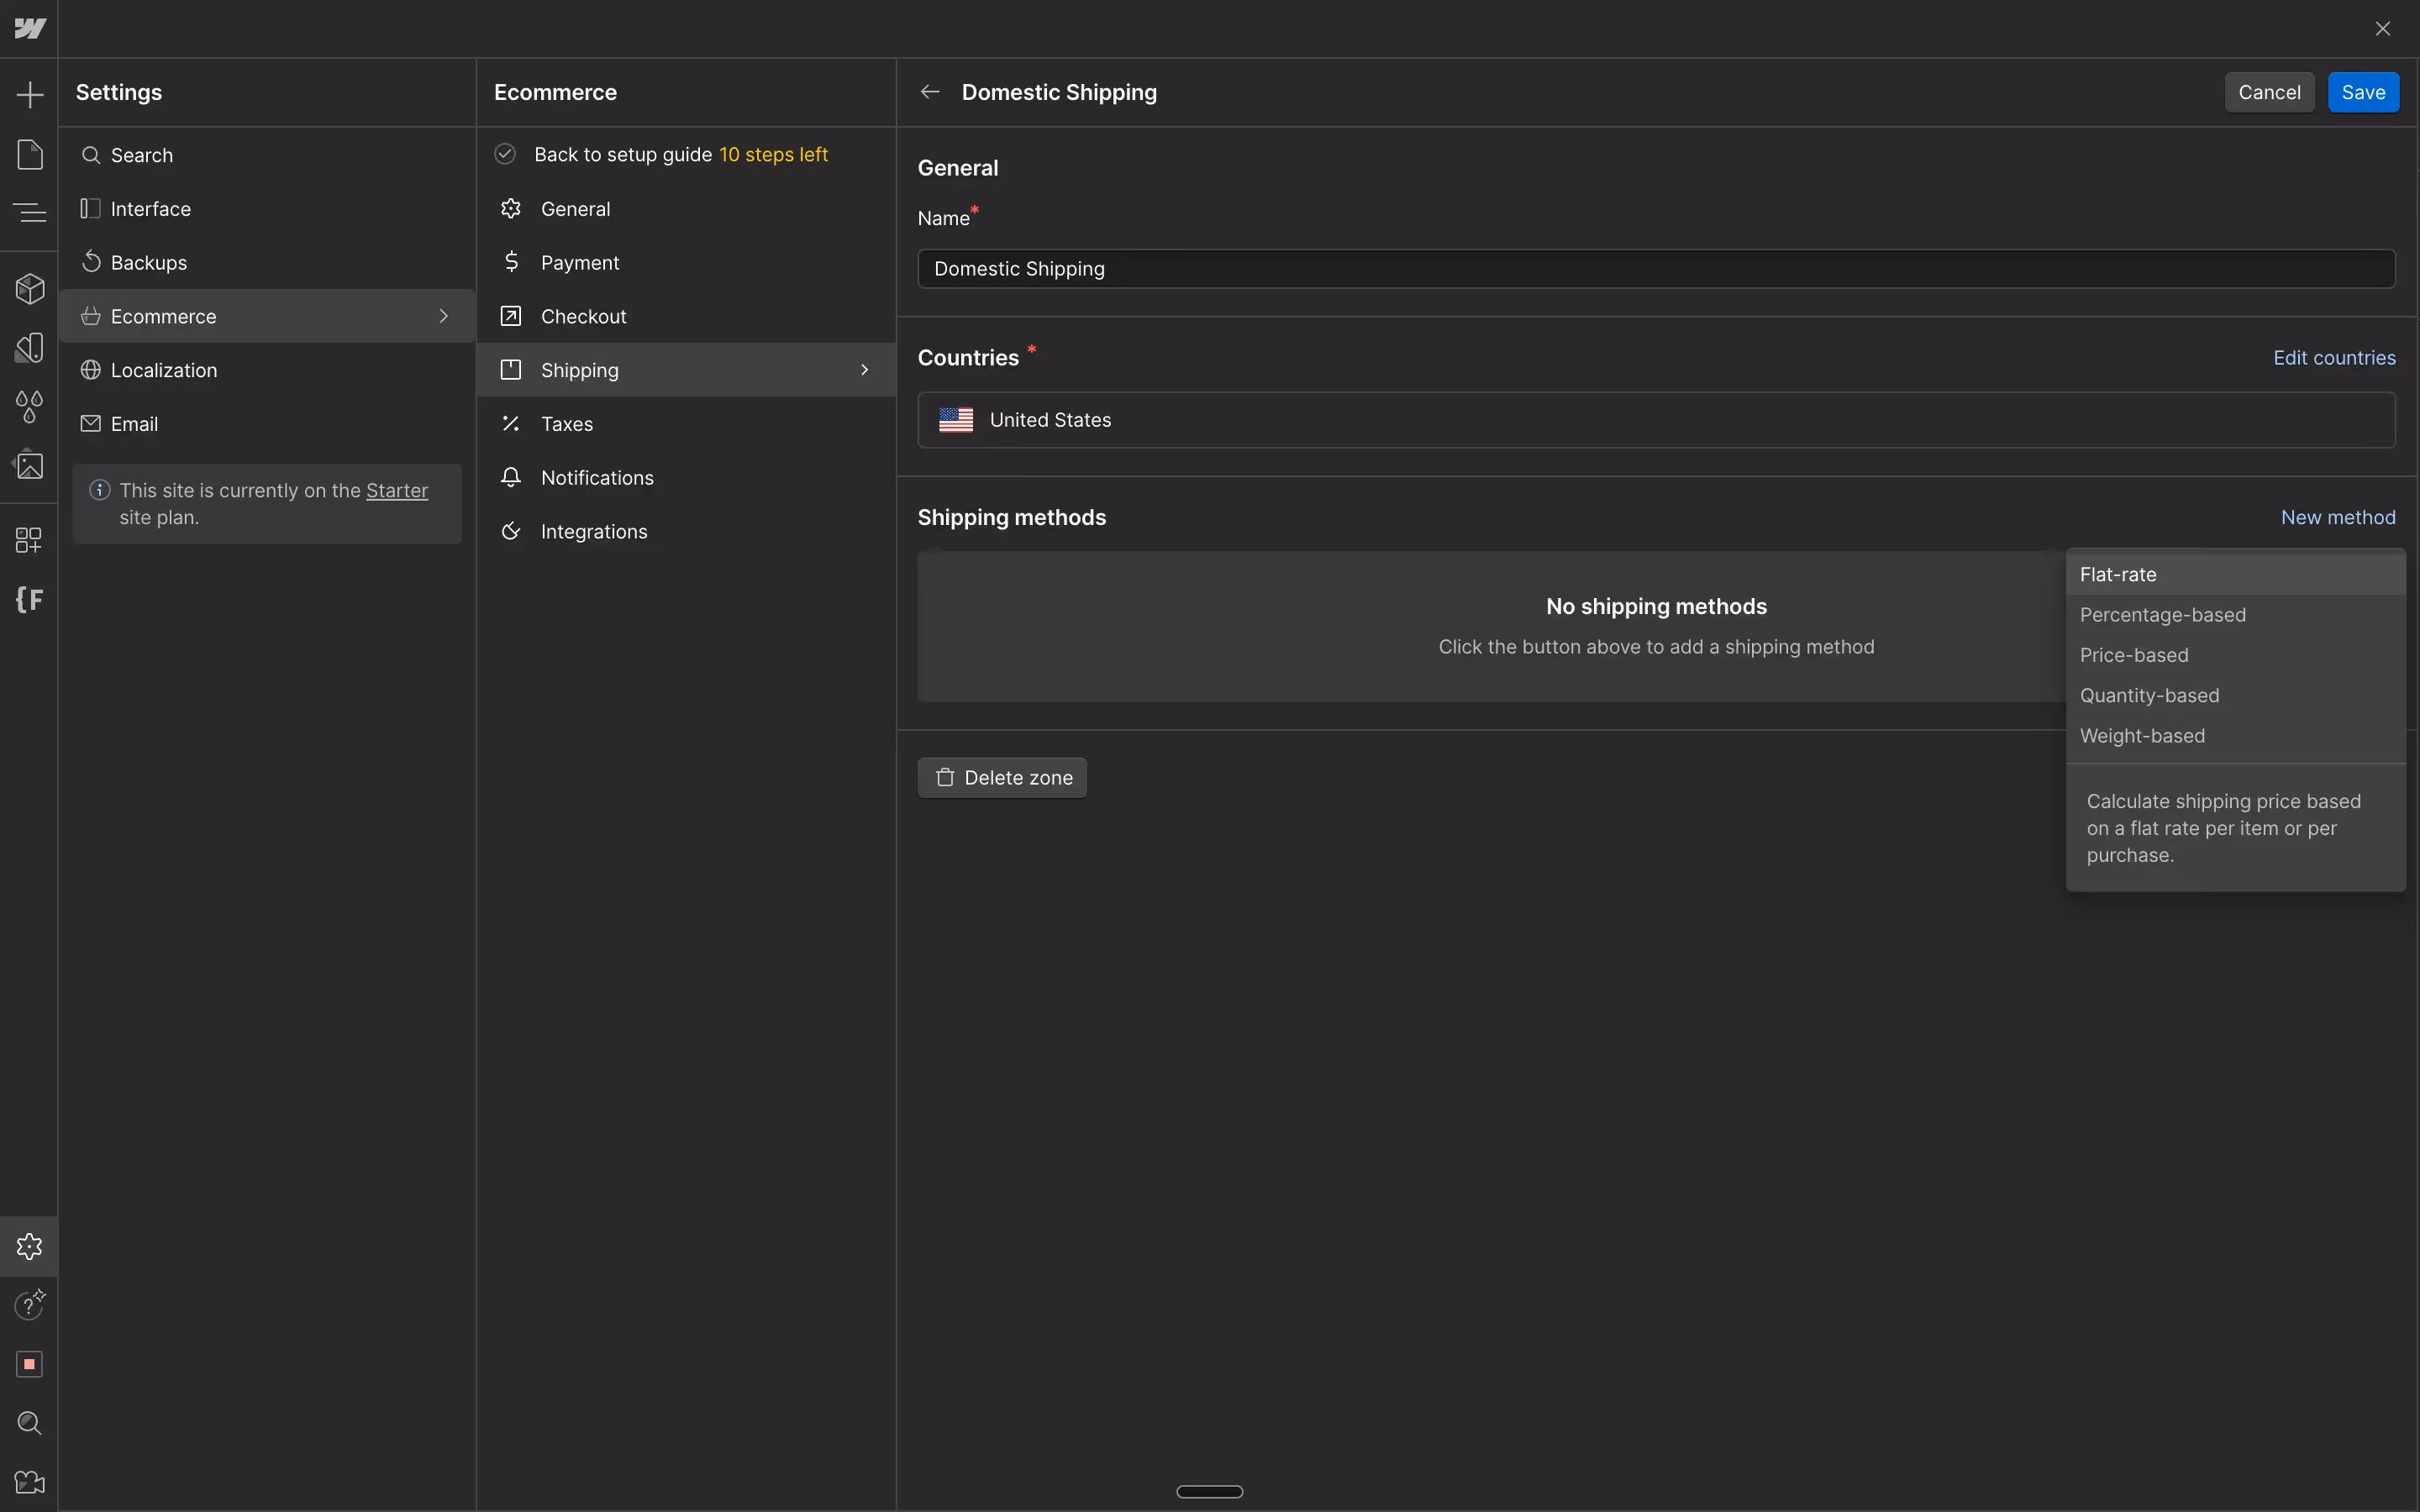
Step 4: Add a Shipping Method
Define how your store ships products and calculate shipping rates.
- Go to Ecommerce Settings > Shipping.
- Configure Flat Rate, Percentage-Based, Price-Based, or Weight-Based shipping methods.
- Set up shipping zones for each serviced refion (e.g., domestic and international shipping).
- Add shipping methods for each serviced region (e.g., free shipping, express delivery, etc.).
Step 5: Review Tax Settings
Ensure that taxes are calculated correctly for your store.
- Navigate to Ecommerce Settings > Taxes.
- Choose a default tax category or set up specific tax exemptions (e.g., books, clothing, etc.).
- For supported countries (e.g., the U.S.), Webflow can automatically calculate tax rates.
- For regions without automatic tax calculation (e.g., EU and Eastern Europe), manually enter tax rates based on local regulations.
- Provide a Nexus address if your business has a physical presence in multiple locations to ensure accurate tax calculations.

Step 6: Set Up a Payment Provider
Enable secure payment processing.
- Navigate to Ecommerce Settings > Payments.
- Webflow natively supports Stripe and PayPal, but these are only available in eligible countries.
- If your country is not supported, you will need alternative methods.
- There are various other ways to integrate Stripe into your Webflow website. We cover these in our article: Hook Up Webflow to Stripe.

Step 7: Add and Design Your Cart
Place a customizable cart anywhere on your site.
- Open the Add Panel in Webflow Designer and insert the cart element.
Step 8: Design Product & Checkout Pages
Customize the look and feel of your product and checkout pages.
- Go to Designer > Product Page to edit the layout and style.
- Modify the Checkout Page to match your branding.

Step 9: Customize Ecommerce Emails
Design the emails that will be sent to customers.
- Go to Ecommerce Settings > Emails.
- Update templates for order confirmations, shipping updates, etc.

Step 10: Enable Checkout & Launch Your Store
Finalize store setup and go live.
- Ensure hosting is enabled.
- Activate SSL for secure transactions.
- Enable Checkout so customers can place orders.
Final Thoughts: Grow Your Webflow eCommerce Store
Congratulations on making it this far! If you've followed the above steps correctly, you should now have a working eCommerce store.
The process we went through might seem like a long one. The bad news is that it was the easy part. It is just the beginning.
Running an online business requires inputting continuous efforts. Those efforts include:
- Optimizing your site for conversions
- Refining your product pages
- Implementing new marketing strategies
- Etc.
With that being said, we hope you can keep improving your eCommerce business until it is successful. Remember, success in eCommerce is about evolution.
Now, it's time to start selling! Good luck.