


Introduction
Creating a well-structured sitemap is one of the most overlooked steps in launching a successful Webflow website. Whether you're building a marketing site, scaling a content hub, or managing multiple locales, your sitemap plays a key role in how search engines discover and index your content.
Unlike other platforms where sitemap generation can be manual or plugin-dependent, Webflow provides built-in sitemap functionality — including automatic XML generation, exclusions, and even hreflang support for multi-language sites.
This guide walks you through everything you need to know about Webflow sitemaps: from the basics of finding your sitemap URL to advanced tasks like customizing your sitemap, excluding specific pages, adding it to your robots.txt file, and submitting it in Google Search Console.
If you’re managing SEO as part of your growth strategy, this is foundational knowledge and if you ever need expert support implementing it across a complex site, our Webflow development agency can help.
What Is a Sitemap and Why It Matters in Webflow
A sitemap is a structured XML file that lists the URLs of your website. It acts as a roadmap for search engine crawlers, helping them discover and prioritize the pages on your site for indexing. While a crawler can find pages through links alone, a sitemap ensures nothing gets overlooked, especially newer or harder-to-reach URLs.
As one of the main SEO features, Webflow gives you a way to automatically generate sitemaps when hosting is enabled and the project is published. This built-in functionality simplifies technical SEO and removes the need for external plugins or third-party tools. It’s especially useful for sites with dynamic content, such as blog posts, product pages, or multi-language versions.
Without a clear sitemap:
- Your most important pages might not get crawled
- Orphaned pages may be missed entirely
- Duplicate or low-priority pages may confuse search engines
- Your site’s indexing speed could suffer
A well-optimized sitemap is not just a technical checkbox. It directly supports discoverability, ranking performance, and overall SEO health. And if you're scaling a site with growing content needs, ensuring your sitemap stays clean and intentional becomes even more critical.
How to Access Your Webflow Sitemap
Webflow makes sitemap access straightforward. You don’t need to manually upload it, although you could in certain cases. You also don’t need to rely on plugins, or other complicated setup required you would otherwise have in platforms like WordPress.
As soon as you upgrade to a paid site plan, connect your domain, and publish your Webflow-hosted site, Webflow automatically generates an XML sitemap and makes it available at the standard URL:
https://yourdomain.com/sitemap.xml
Here's how to confirm or locate your sitemap:
- Set a Default Domain — Head to your Webflow Project Settings > Hosting tab. Ensure that one domain is marked as the “default.” The sitemap will use that domain in all its links. If you skip this step, your sitemap may point to non-canonical URLs or throw redirect errors.
- Check Sitemap in Browser — After publishing your site, simply go to yourdomain.com/sitemap.xml in your browser. You should see a raw XML file listing all indexable URLs — including static pages and CMS-generated content.
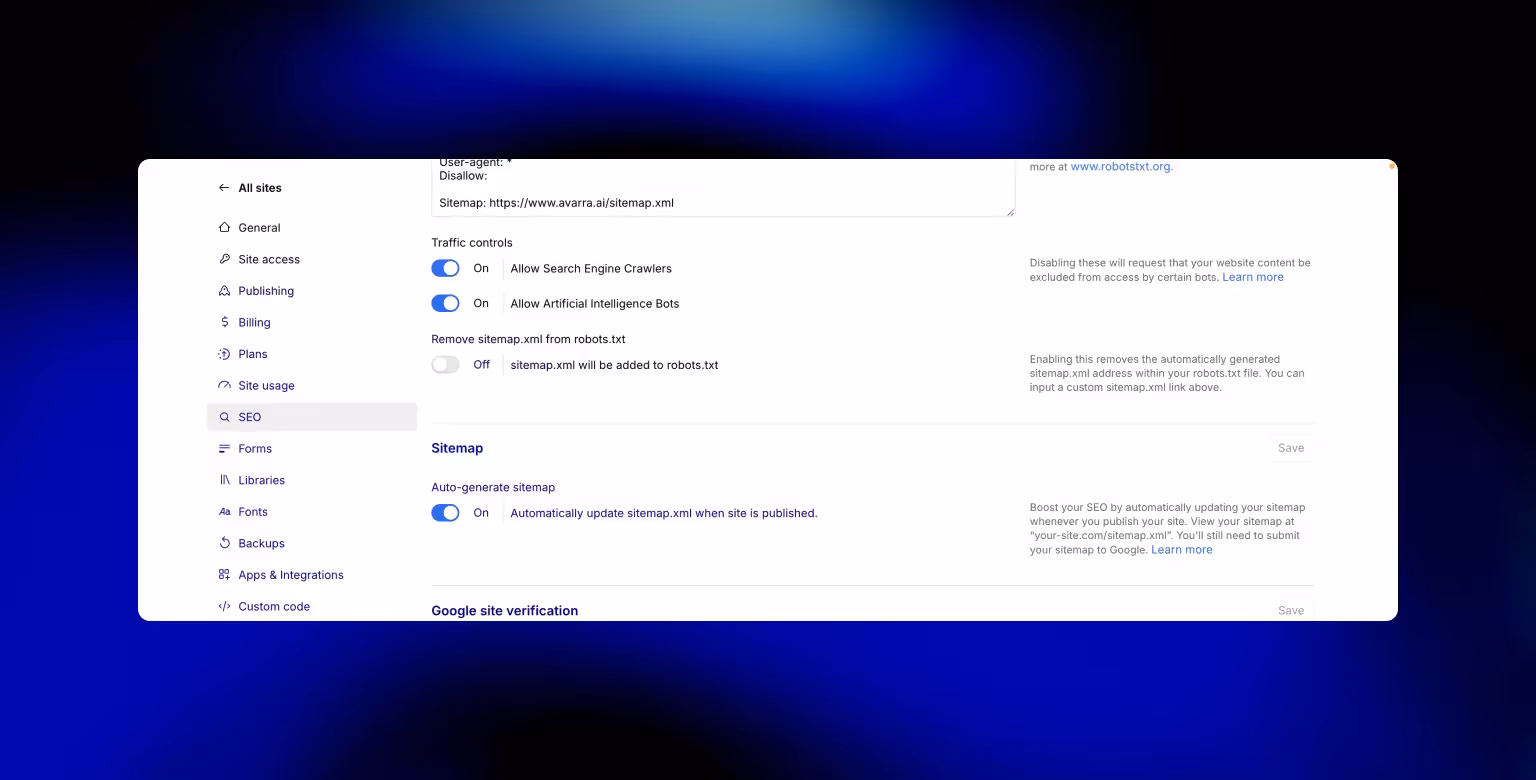
- Toggle Auto-Generate On (Optional) — If for any reason your sitemap isn't appearing, go to Project Settings > SEO, scroll to the Sitemap Settings, and confirm that “Auto-generate sitemap” is enabled.
By default, Webflow regenerates the sitemap every time you publish the site. This ensures that any new pages are included and unpublished ones are removed automatically, saving you the hassle of managing it manually.
Whenever you delete or move a page, set up 301 redirects from the old URL to the new one to maintain SEO value.

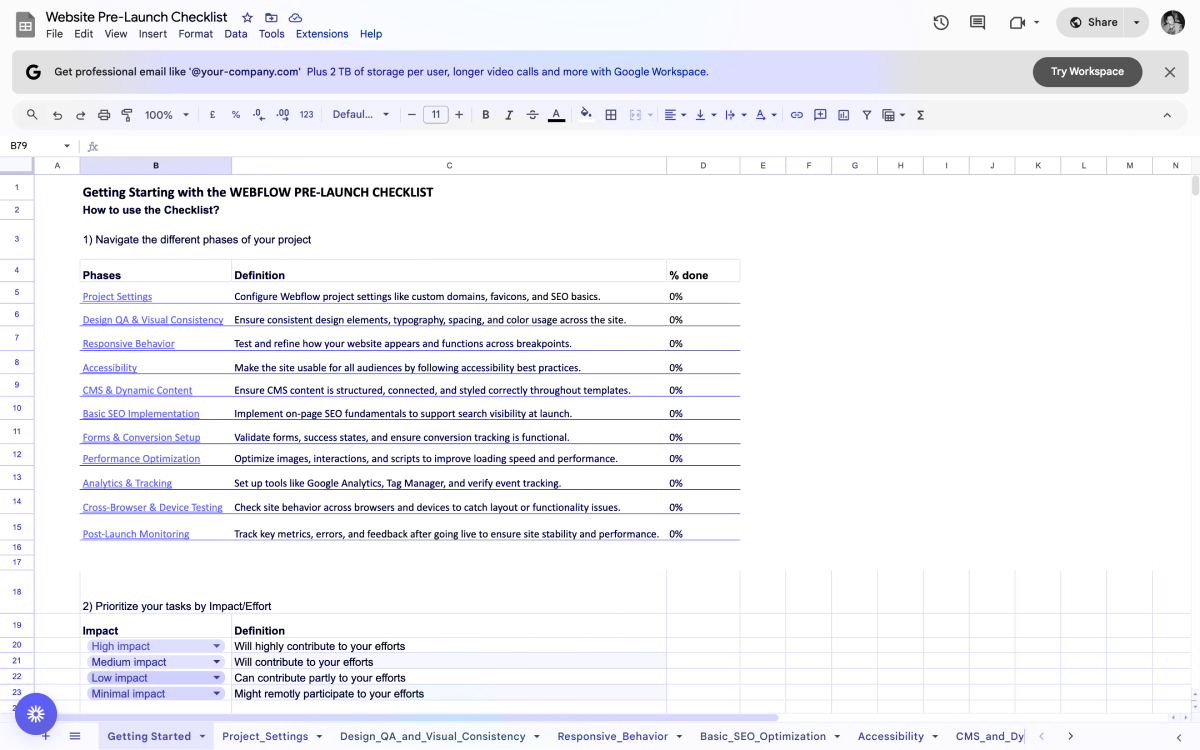
Launching soon? Don’t wing it.
Use our free website launch checklist to avoid common pitfalls—like broken links, tracking issues, and SEO mistakes. It’s a comprehensive pre- and post-launch guide built for teams that care about getting it right the first time.
How to Exclude Pages from Your Webflow Sitemap
There are plenty of reasons you might want to exclude a page from your sitemap. Examples of such cases include thank-you pages, landing pages used in paid campaigns, internal resources, or anything you don’t want indexed by search engines.
Webflow gives you a native way to manage this through each page’s SEO settings.
Here’s how to exclude a page from the sitemap:
- Open the Page in Designer — Navigate to the page you want to exclude, and click the gear icon next to its name in the Pages panel.
- Scroll to the SEO Settings — Within the page settings, locate the Sitemap Indexing toggle.
- Disable Sitemap Indexing — Switch the toggle to Off. This not only removes the page from sitemap.xml but also automatically applies a noindex meta tag to prevent it from being indexed.
- Publish the Site — Webflow only updates the sitemap after a publish event. Make sure you republish the site to reflect the exclusion.
Pro Tip: Use This for Staging and Experimental Pages
If you create a duplicate page, test a new layout, or launch a page that shouldn’t be crawled yet, excluding it from the sitemap ensures it doesn’t surface in search results prematurely.
And if you need more control, you can manually add a noindex meta robots tag, or create a completely custom sitemap, which we’ll cover in the next section.
Creating a Custom Sitemap in Webflow (Advanced)
While Webflow’s auto-generated sitemap works for most users, there are cases where you’ll want full control over what gets included, how URLs are structured, and even which external domains or hreflang attributes appear.
For those advanced use cases, Webflow allows you to disable the auto-generated sitemap and paste your own custom sitemap XML.
How to set up a custom sitemap in Webflow:
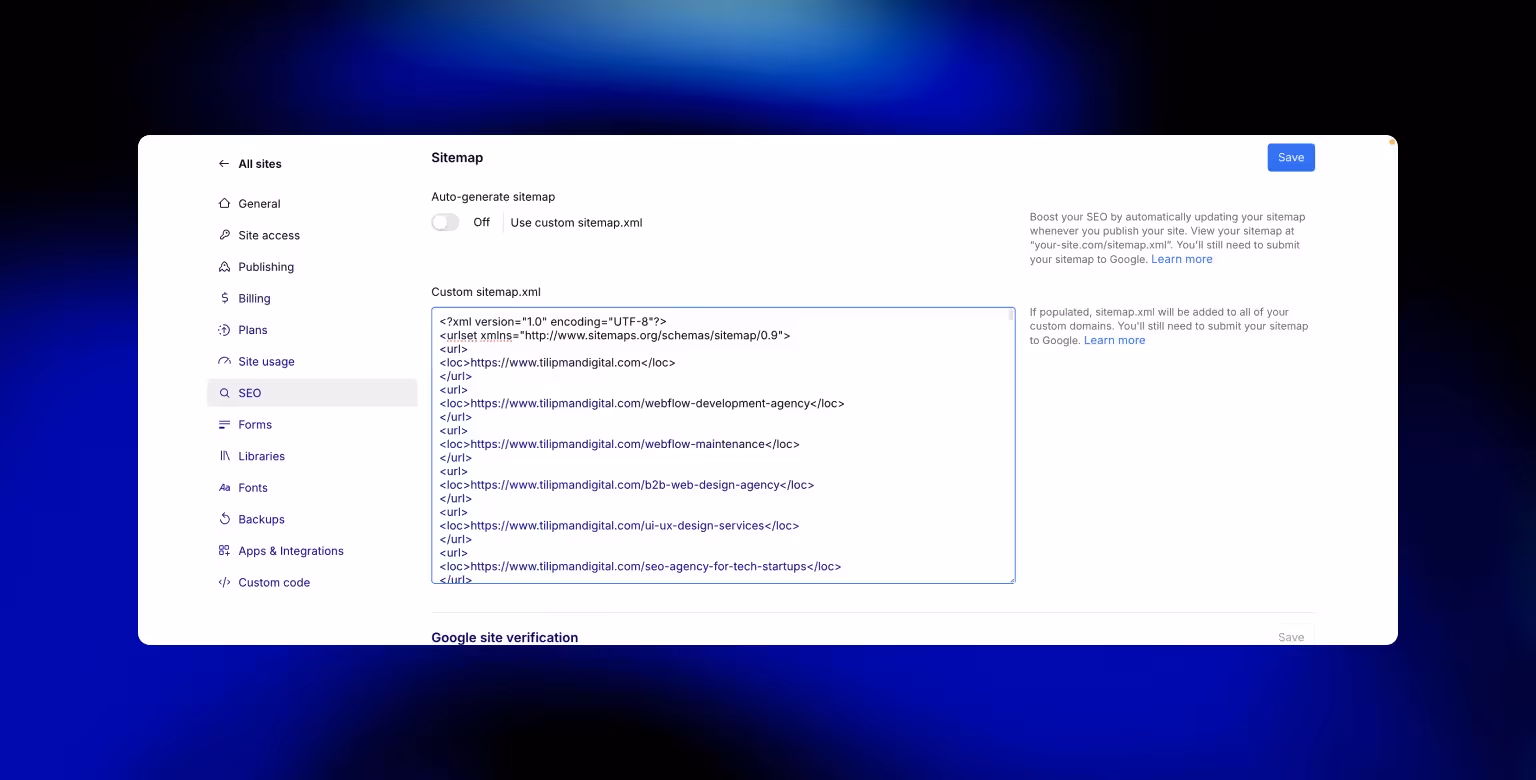
- Disable Auto-Generated Sitemap — In your Project Settings > SEO tab, locate the “Sitemap Settings” section and toggle Auto-generate sitemap to No.
- Paste Custom XML — A new field will appear below labeled Custom sitemap. You can now paste the full contents of your custom sitemap.xml — whether generated via a tool like Screaming Frog, XML-sitemaps.com, or written by hand.
- Use Proper Format — Make sure your custom sitemap follows proper XML syntax. Google offers guidelines that cover priority settings, lastmod values, and sitemap indexes (for large sites).
- Advanced Features You Can Control
- hreflang support: Add locale-specific URLs with xhtml:link tags for multilingual sites.
- Priority & frequency: Specify crawl frequency and priority scores per page.
- External links: Reference subdomains or static resources hosted elsewhere.
Custom sitemaps are especially useful if you're combining multiple domains, managing regional content structures, or need to override Webflow’s automated behavior for technical SEO reasons. Here's an example of how we generated a custom sitemap at Tilipman Digital:
1<?xml version="1.0" encoding="UTF-8"?>
2<urlset xmlns="http://www.sitemaps.org/schemas/sitemap/0.9">
3	<url>
4		<loc>https://www.tilipmandigital.com</loc>
5	</url>
6	<url>
7		<loc>https://www.tilipmandigital.com/webflow-development-agency</loc>
8	</url>
9	<url>
10		<loc>https://www.tilipmandigital.com/webflow-maintenance</loc>
11	</url>
12	<url>
13		<loc>https://www.tilipmandigital.com/b2b-web-design-agency</loc>
14	</url>
15	<url>
16		<loc>https://www.tilipmandigital.com/ui-ux-design-services</loc>
17	</url>
18	<url>
19		<loc>https://www.tilipmandigital.com/seo-agency-for-tech-startups</loc>
20	</url>
21	<url>
22		<loc>https://www.tilipmandigital.com/conversion-rate-optimization-experts</loc>
23	</url>
24</urlset>
Once you’ve saved the custom sitemap and published your site, it will become live at the usual /sitemap.xml URL, ready to be discovered or submitted.
Adding Your Sitemap to robots.txt
Your sitemap is only effective if search engines can find it and one of the simplest ways to help them do that is by referencing it in your robots.txt file.
Fortunately, Webflow handles this automatically. But in custom scenarios, especially if you're using a manually crafted sitemap, it's a best practice to double-check or manually add the entry.
Here’s how it works in Webflow:
Auto-Generated Sitemap
If you're using Webflow’s default sitemap generation, the platform will automatically insert this line into your robots.txt:
Sitemap: https://yourdomain.com/sitemap.xml
You can view this by visiting https://yourdomain.com/robots.txt after publishing.
Adding It Manually (for Custom Sitemaps)
If you've created your own sitemap, or you're using a different domain structure, you can manually insert the line by:
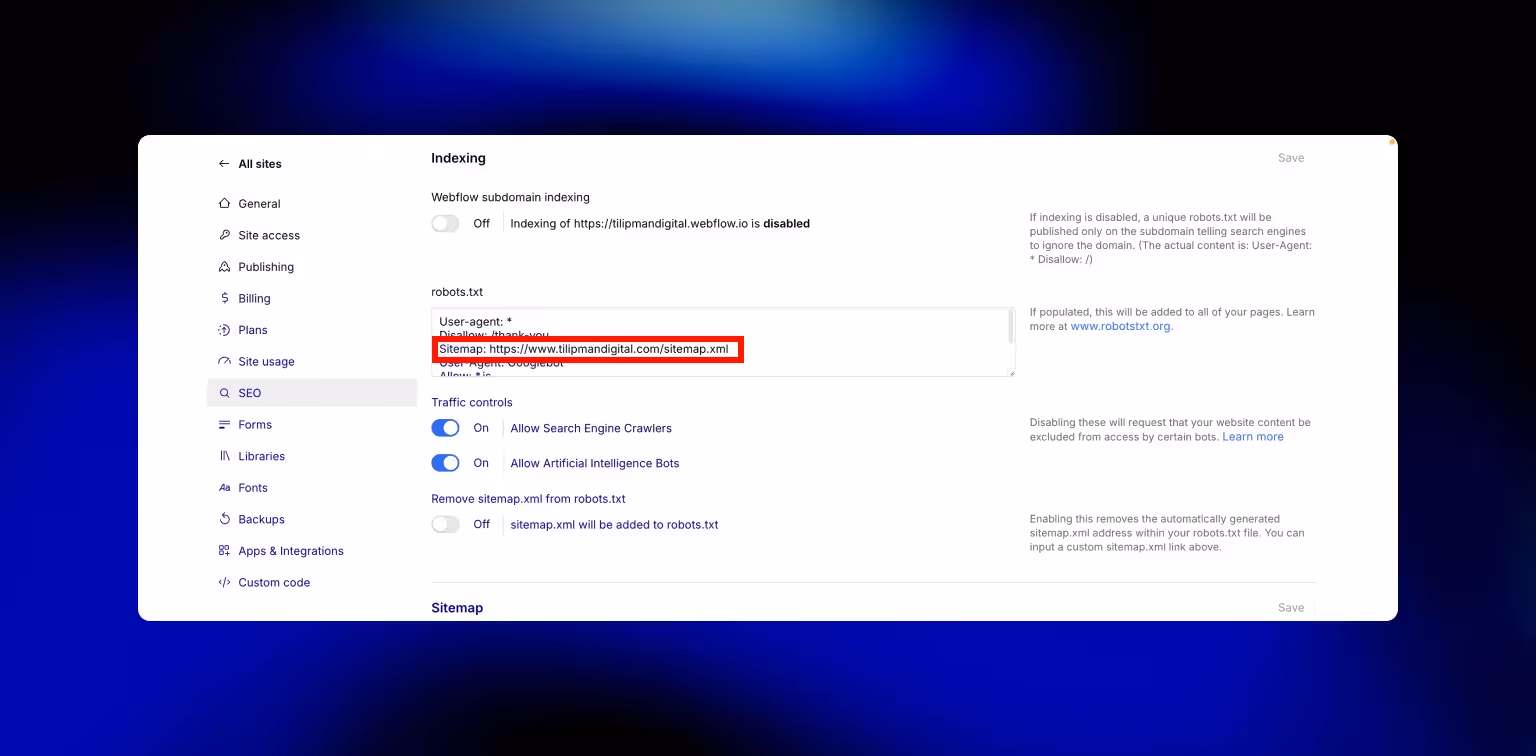
- Going to Project Settings > SEO
- Scrolling to the Indexing section
- Editing the robots.txt field and pasting:
Sitemap: https://yourdomain.com/custom-sitemap.xml
Make sure there is only one Sitemap: entry if you're customizing this file as multiple entries can confuse crawlers if not structured properly.
Including your sitemap in robots.txt is a lightweight but impactful step that improves discoverability and signals to search engines that your site is crawl-ready.
Real World Use Case
When we helped our crypto accounting client Cryptoworth, we added their sitemap URL to the robots.txt and excluded obsolete pages. This led to faster indexing of new content and a measurable lift in search traffic.
Tilipman Digital’s sitemap work boosted our organic visibility – we saw about a 15% jump in Google traffic within weeks.
— Ariel Eiberman, CMO @Cryptoworth

Submitting Your Webflow Sitemap to Google Search Console
Once your sitemap is live and correctly linked in your robots.txt file, the next step is to submit it directly to Google Search Console. This ensures Google is aware of your sitemap and can start indexing your content faster and more accurately. We have written a full guide outlining the Webflow Google Search Console Integration. Here's a short overview of the process below.
How to submit your Webflow sitemap to GSC:
- Verify Your Domain
If you haven’t already, add your domain in Google Search Console and verify ownership. Use the Domain verification method if possible — it covers all subdomains and protocol variations (e.g., www and non-www, http and https). - Open the Sitemaps Report
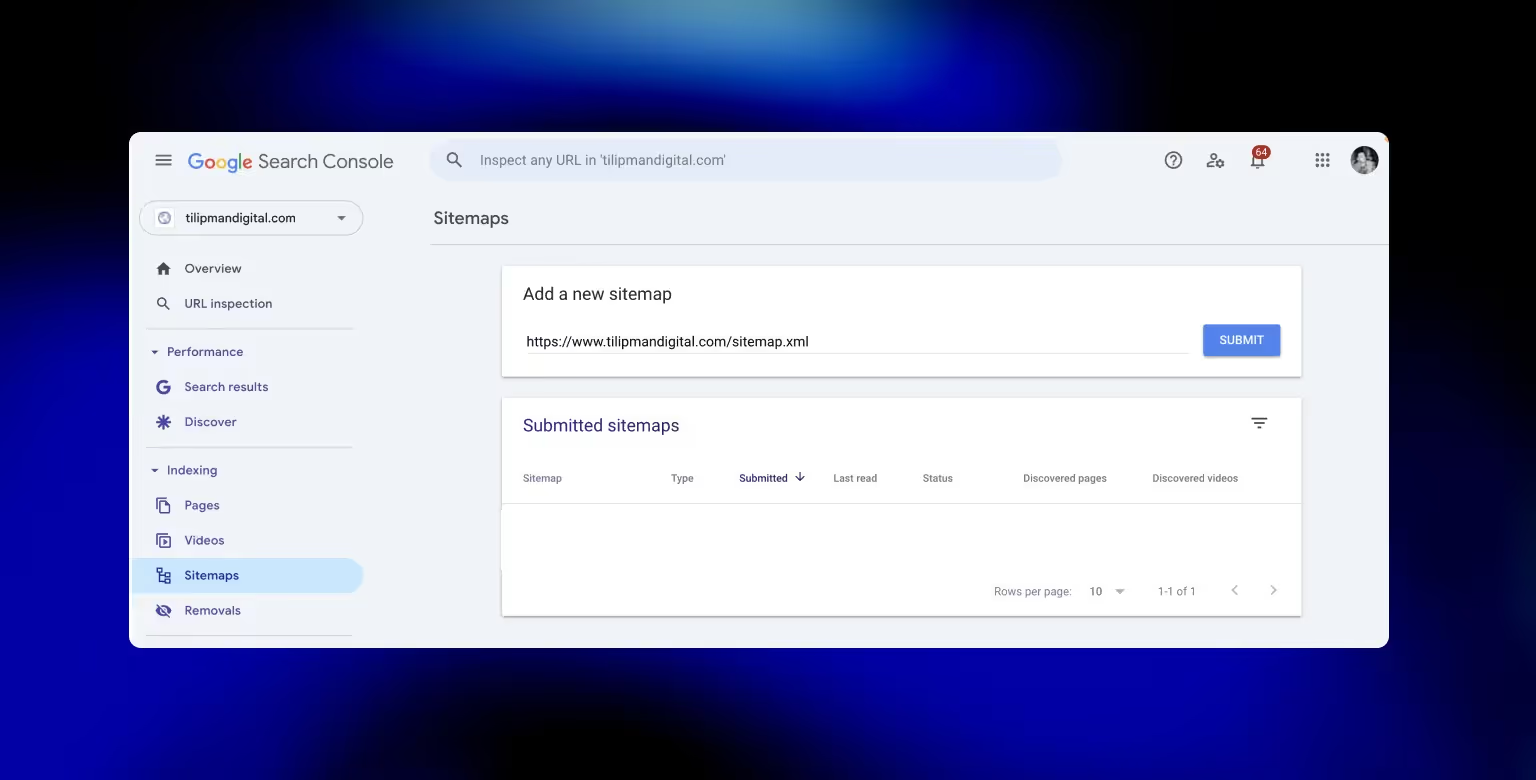
In your GSC dashboard, go to the Sitemaps tab on the left sidebar. - Enter Your Sitemap URL
In the “Add a new sitemap” field, and typesitemap.xml(No need to enter the full domain as Google assumes the root is already verified.) - Click Submit
Google will validate the file, fetch it, and begin indexing the URLs inside. - Monitor Results
After a few days, return to the Sitemaps report to check:- When the sitemap was last read
- How many URLs were discovered
- Whether there were any errors
- When the sitemap was last read
For a deeper look, use the Coverage and Pages reports to see which URLs were indexed, which were excluded, and why.
Why sitemap submission matters
Even if your sitemap is linked in robots.txt, direct submission helps Google process updates faster. This is especially helpful when:
- You launch a new site
- You add many new pages at once
- You want to re-crawl updates quickly
Submission is also a chance to catch problems early, such as URLs returning 404s or being blocked by noindex. This way you can fix these issues before they impact rankings.
SEO Best Practices for Your Webflow Sitemap
A sitemap isn't just a technical feature, but a strategic SEO tool. When maintained properly, it improves crawl efficiency, prioritizes your best content, and ensures your site structure stays aligned with search intent.
Here’s how to get the most SEO value out of your Webflow sitemap:
Always Set a Default Domain
Ensure you've set a default domain in Hosting > Custom Domains. Webflow will use this version in your sitemap. Without it, Google might crawl both www. and non-www. URLs, diluting authority.
Republish After Major Edits
Webflow updates your sitemap only when you publish the site. So if you add or delete pages, republish to trigger a refreshed sitemap.
Avoid Low-Value URLs
Exclude thank-you pages, admin screens, campaign URLs, and placeholder pages. These offer no long-term SEO value and can bloat your sitemap unnecessarily.
Use Clean Slugs
Before publishing new pages, ensure slugs are concise, descriptive, and keyword-relevant. Your sitemap reflects these exactly, so don’t let /services-copy-3 sneak in.

Leverage CMS Filtering
For CMS-driven sites, use collection filters and conditional visibility to ensure only complete, high-quality CMS items make it into the sitemap.
No Orphan Pages
If a page is in your sitemap but not linked anywhere on your site, it’s an orphan. Internal linking not only supports SEO but reinforces the importance of the page to crawlers.
Indexing Troubles? Check Coverage
If certain sitemap URLs aren’t indexing, open the Coverage report in Search Console. Look for:
- Crawled - currently not indexed
- Discovered - currently not indexed
- Excluded by
noindextag
Resolve issues and resubmit via the URL Inspection Tool if needed.
Complement With Great On-Page SEO
Even a perfect sitemap can’t fix thin content or missing metadata. Ensure each page has:
- A unique meta title and description
- Proper heading structure (
H1-H3) - Internal links
- Keyword-relevant content
This is where pairing technical execution with strategy really matters. If your team needs support aligning your sitemap strategy with broader growth goals, our SEO agency for tech startups can help.
Frequently Asked Questions about Webflow Sitemap
Where can I find my Webflow sitemap URL?
You can access your sitemap at https://yourdomain.com/sitemap.xml once your site is published and hosting is active. Make sure a default domain is set in your Webflow project settings to avoid redirection issues.
How do I exclude a page from my Webflow sitemap?
Open the page settings in Webflow, scroll to the SEO section, and toggle off “Sitemap Indexing.” This will remove the page from the sitemap and apply a noindex tag so search engines won’t index it.
Can I use a custom sitemap in Webflow?
Yes. Disable the auto-generated sitemap in your site’s SEO settings and paste your custom XML code in the provided field. This gives you full control over what gets indexed, including support for multiple domains or advanced hreflang setup.
Should I include my sitemap in robots.txt?
Yes. Webflow automatically adds your sitemap to robots.txt, but if you’re using a custom sitemap, you should manually add the line:
Sitemap: https://yourdomain.com/sitemap.xml
How do I submit my Webflow sitemap to Google Search Console?
Log into Search Console, go to the Sitemaps tab, and enter sitemap.xml as the path. Click submit. This helps Google discover and crawl your site faster, and lets you monitor indexing progress and issues. Keep in mind that sitemaps cover search engines only. For AI platforms like ChatGPT or Claude, Webflow’s llms.txt is a complementary file that provides crawlers with AI-specific indexing instructions.