


In a world powered by digital interactions, a website is no longer just an option - it's a necessity.
Let us be clear here: having an online presence is crucial for reaching your audience and achieving your goals. Think of it as your digital storefront, open 24/7 and accessible to anyone in the world with an internet connection.
While social media pages can support your online presence, they can’t fully replace the benefits of an owned site; our website vs social media article breaks down why a dedicated website remains indispensable.
But the idea of building a website from scratch can seem complex, right?
Coding, design, hosting… where do you even begin? It's easy to get overwhelmed by the technical jargon and the sheer number of options available.
Take a deep breath, because we're here to tell you that creating your own website is entirely achievable, even without any prior experience.
In this guide, we'll demystify the process and break it down into 7 manageable steps, guiding you through every stage, from defining your purpose to launching your online masterpiece.
Let's empower you with the knowledge and confidence to start this exciting journey of learning how to build a website from scratch.
Step 1: Define Your Purpose and Audience
Before you even think about design or code, it's crucial to establish a clear vision for your website.
Ask yourself: what is the primary purpose of this website? Are you building an online portfolio to showcase your work, an e-commerce store to sell products, a blog to share your thoughts and expertise, or perhaps a combination of these?
Equally important is identifying your target audience.
Who are you trying to reach with your website? What are their interests, needs, and online behaviors? Understanding your audience will help you tailor your website's content, design, and functionality to resonate with them.
For B2B companies, this process starts with a B2B website strategy to ensure every decision supports business goals and speaks to complex buyer groups.
For example, if you're creating a website for your photography business, your target audience might be couples looking for wedding photographers or businesses seeking corporate headshots. This understanding will influence your choice of imagery, website copy, and even the overall tone and style of your site.
By clearly defining your purpose and audience, you'll lay a strong foundation for the rest of the website-building process, ensuring that every decision you make aligns with your goals and resonates with your intended visitors.
Step 2: Choose a Domain Name and Hosting
Now that you have a clear vision for your website, it's time to give it an address – a domain name.
Your domain name is your unique identity on the internet, like yourname.com or yourbusiness.net. It's what people will type into their browser to find you, so choose wisely!
Aim for a domain name that is short, memorable, easy to spell, and relevant to your website's purpose or brand. Avoid hyphens and numbers, as they can be confusing and difficult to remember.
Next, you'll need web hosting.
Think of web hosting as renting space on a server to store your website's files and make them accessible to visitors online.
There are different types of hosting available:
- Shared hosting: The most affordable option, where your website shares a server with other websites.
- VPS hosting: Offers more resources and control than shared hosting, ideal for growing websites.
- Dedicated hosting: Provides an entire server exclusively for your website, offering maximum performance and security.
When choosing a hosting provider, consider factors like reliability, uptime, customer support, and pricing. Read reviews and compare features to find the best fit for your needs and budget.
Many hosting providers also offer domain name registration, making it convenient to manage both in one place.
Step 3: Select a Website Building Platform
With your domain name secured and hosting in place, it's time to choose the tools you'll use to build your website.
Fortunately, there's no shortage of website-building platforms available, each with its own strengths and weaknesses.
Here are a few popular options:
- WordPress: A highly versatile and customizable platform that powers a significant portion of the internet. It offers a vast library of themes and plugins, allowing you to create almost any type of website imaginable. However, it can have a steeper learning curve and may require some technical knowledge.some text
- Pros: Extensive customization, large community support, excellent for SEO.
- Cons: Can be complex for beginners, requires ongoing maintenance.
- Explore further: wordpress.org
- Wix: A user-friendly drag-and-drop website builder that makes it easy to create visually appealing websites without any coding knowledge. It offers a wide range of templates and apps to add functionality. However, customization options can be somewhat limited compared to WordPress.some text
- Pros: Easy to use, great for beginners, visually appealing templates.
- Cons: Limited customization, can be less flexible for complex websites.
- Explore further: wix.com
- Squarespace: Known for its elegant templates and focus on aesthetics, Squarespace is a popular choice for creatives and businesses that prioritize visual appeal. It offers a good balance of ease of use and customization options.some text
- Pros: Beautiful templates, user-friendly interface, good for visual brands.
- Cons: Can be more expensive than other options, limited third-party integrations.
- Explore further: squarespace.com
- Webflow: A powerful platform that combines design freedom with robust CMS capabilities. It allows you to create visually stunning and highly customized websites without writing code. Webflow's focus on responsive design and scalability makes it an ideal choice for businesses that are growing rapidly.some text
- Pros: Unparalleled design flexibility, excellent for responsive design, scalable for future growth.
- Cons: Can have a steeper learning curve than some drag-and-drop builders, pricing can be higher for advanced features.
- Explore further: webflow.com
At Tilipman Digital, we're big fans of Webflow. Its powerful features and design flexibility empower us to create great websites that are not only visually stunning but also optimized for performance and user experience.
However, the best platform for you will ultimately depend on your specific needs, budget, and technical skills.
Step 4: Plan Your Website Structure and Content
Imagine walking into a store with no clear aisles, no signage, and products scattered haphazardly.
You'd likely feel lost and frustrated, right?
The same applies to websites. A well-organized website structure is essential for providing a positive user experience and guiding visitors toward their desired actions.
Before you start creating pages, take some time to plan your website's structure. Create a sitemap outlining the main pages and how they will be interconnected — if a planned page is later unnecessary, see how to delete a page in Webflow to remove it. This will help you visualize the flow of your website and ensure easy navigation for your visitors.
Next, think about your content strategy. What types of content will you create to engage your audience and achieve your website's goals? Will you have a blog, a resources section, customer testimonials, or a portfolio?
Conduct keyword research to identify relevant search terms that your target audience is using and incorporate them naturally into your website copy.
Remember, your website content should be informative, engaging, and valuable to your audience. Think about the questions your visitors might have and provide clear, concise answers.
Use a conversational tone and avoid jargon to ensure your content is accessible to everyone.
Step 5: Design Your Website
Now comes the fun part – bringing your website to life with captivating design!
Remember, first impressions matter, and your website's design plays a crucial role in capturing attention and creating a positive user experience. For inspiration on making your website design warm and inviting, see our article on how to make a website look cozy.
Think about the overall look and feel you want to achieve. Consider your brand identity, target audience, and website purpose.
Key design elements to focus on include:
- Layout: How will you organize your content on the page? Use a clear and intuitive layout that guides visitors through your website.
- Color scheme: Choose colors that reflect your brand and evoke the desired emotions.
- Typography: Select fonts that are easy to read and visually appealing.
- Imagery: Use high-quality images that are relevant to your content and enhance the user experience.
Strive for a clean, uncluttered design that is easy to navigate and visually engaging. Ensure your website is responsive, meaning it adapts seamlessly to different screen sizes and devices.

Step 6: Develop and Add Content
With your website's design in place, it's time to populate it with compelling content.
Write clear, concise, and engaging copy that speaks directly to your target audience. Break up long blocks of text with headings, subheadings, bullet points, and visuals to improve readability.
Remember the importance of SEO. Incorporate relevant keywords naturally throughout your website copy to improve your search engine rankings. Optimize your images with descriptive alt text to make them accessible to search engines and visually impaired users.
Use high-quality visuals, such as images, videos, and infographics, to enhance the user experience and make your content more engaging.

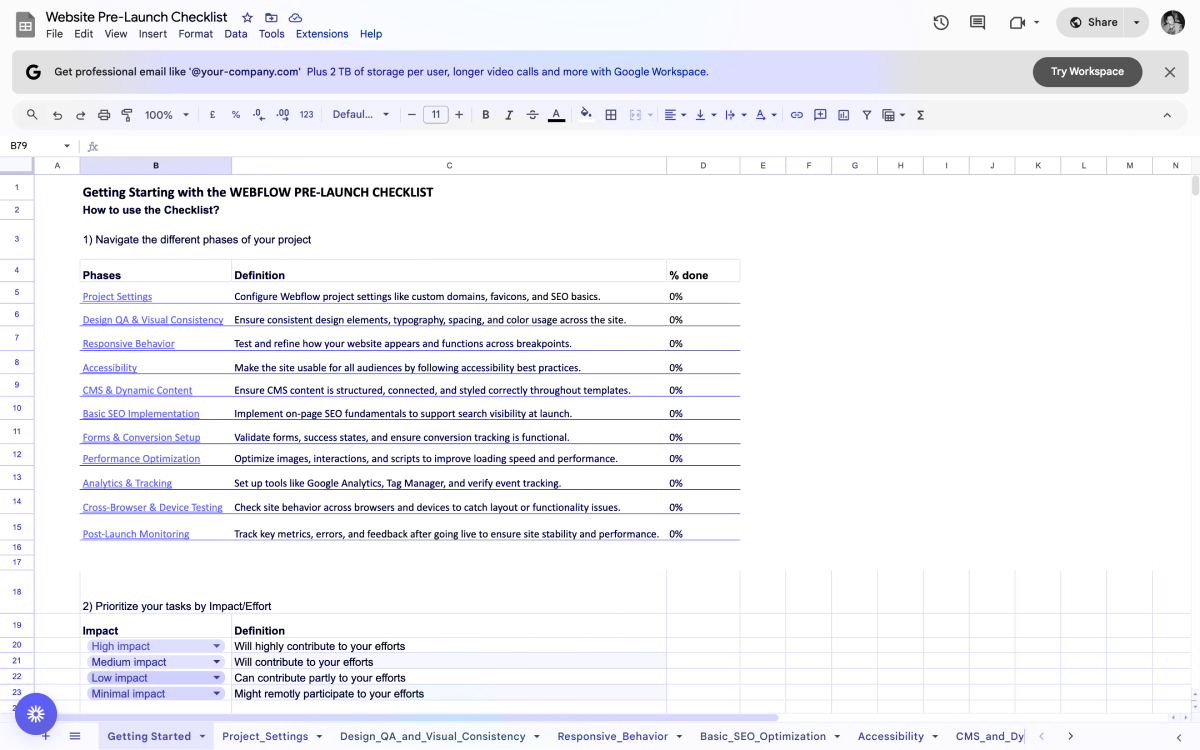
Launching soon? Don’t wing it.
Use our free website launch checklist to avoid common pitfalls—like broken links, tracking issues, and SEO mistakes. It’s a comprehensive pre- and post-launch guide built for teams that care about getting it right the first time.
Step 7: Test, Launch, and Maintain
Before you unveil your website to the world, thorough testing is crucial.
Check for broken links, typos, and ensure all forms and functionalities are working correctly. Test your website on different devices and browsers to ensure a consistent user experience.
Once you're confident everything is in order, it's time to launch! But the journey doesn't end there.
Set up website analytics tools like Google Analytics to track your website's performance and gain insights into user behavior. This data will help you identify areas for improvement and optimize your website for better results.
Ongoing maintenance is essential for keeping your website secure, up-to-date, and performing optimally. Regularly update your content, plugins, and security measures.

Wrapping Up
Congratulations!
You’ve just learned the 7 fundamental steps of building a website from scratch. Now it’s time to take the next step and bring your vision to life. You can either give it a go yourself, or consider hiring a Webflow agency to make sure your site is built for results. Not sure which path fits your budget and needs? Check out our in-depth guide on the cost of building a Webflow website before making your decision.
If you decide to partner with experts, we're here to help. Book a free strategy consultation.