


Introduction
Webflow is a visual development tool that helps it's users implement custom design features with ease. One of the common customization elements within web projects is modifying the background of sections, individual elements, or even whole pages. In this article, we will show you how you can use that feature and change the background color, set an image, video or add effects like dynamic scrolling to your Webflow website.
To summarize, in this guide, we’ll cover how to:
- Change background colors, including solid colors, gradients, and transparency
- Set background images and optimize them for web performance
- Set background videos
- Use Webflow’s Interactions feature to change background colors on scroll
- Implement advanced background effects like parallax scrolling
If you're new to managing styles in Webflow, it might help to first review our guide on how to use classes in Webflow effectively.
By the end, you’ll have a solid understanding of how to enhance your Webflow design with background customizations.
How to Change Background Color in Webflow
Webflow allows you to change out the background color of a section or element. The process is quite simple too. Just follow the following steps:
- Select the Element – Click on the section, div block, or element where you want to change the background.
- Add a Class - Click on the style panel to drop into it and add a class to the element.
- Go to Background Settings – In the right-side panel (Style tab), locate the Background section.
- Choose a Color – Either select a solid color in the sidebar's color picker, or customize a gradient by clicking on image & gradient option above the background color picker.
- Adjust Transparency – You can edit the transparency of a color while selecting the color in the color picker.
Best Practices:
- Use brand-consistent colors for a cohesive design.
- Gradients can add depth but should be subtle.
- Make sure the colors are cohesive and backgrounds are in harmony with the font colors to ensure you are optimizing for readiability.
- Ensure there is an appropriate contrast ratio between the foreground (font) colors and the background color to ensure your visitors can consume the content without hindrance.
To get a more detailed overview of this specific feature, read Webflow's guide on how to change out background colors.
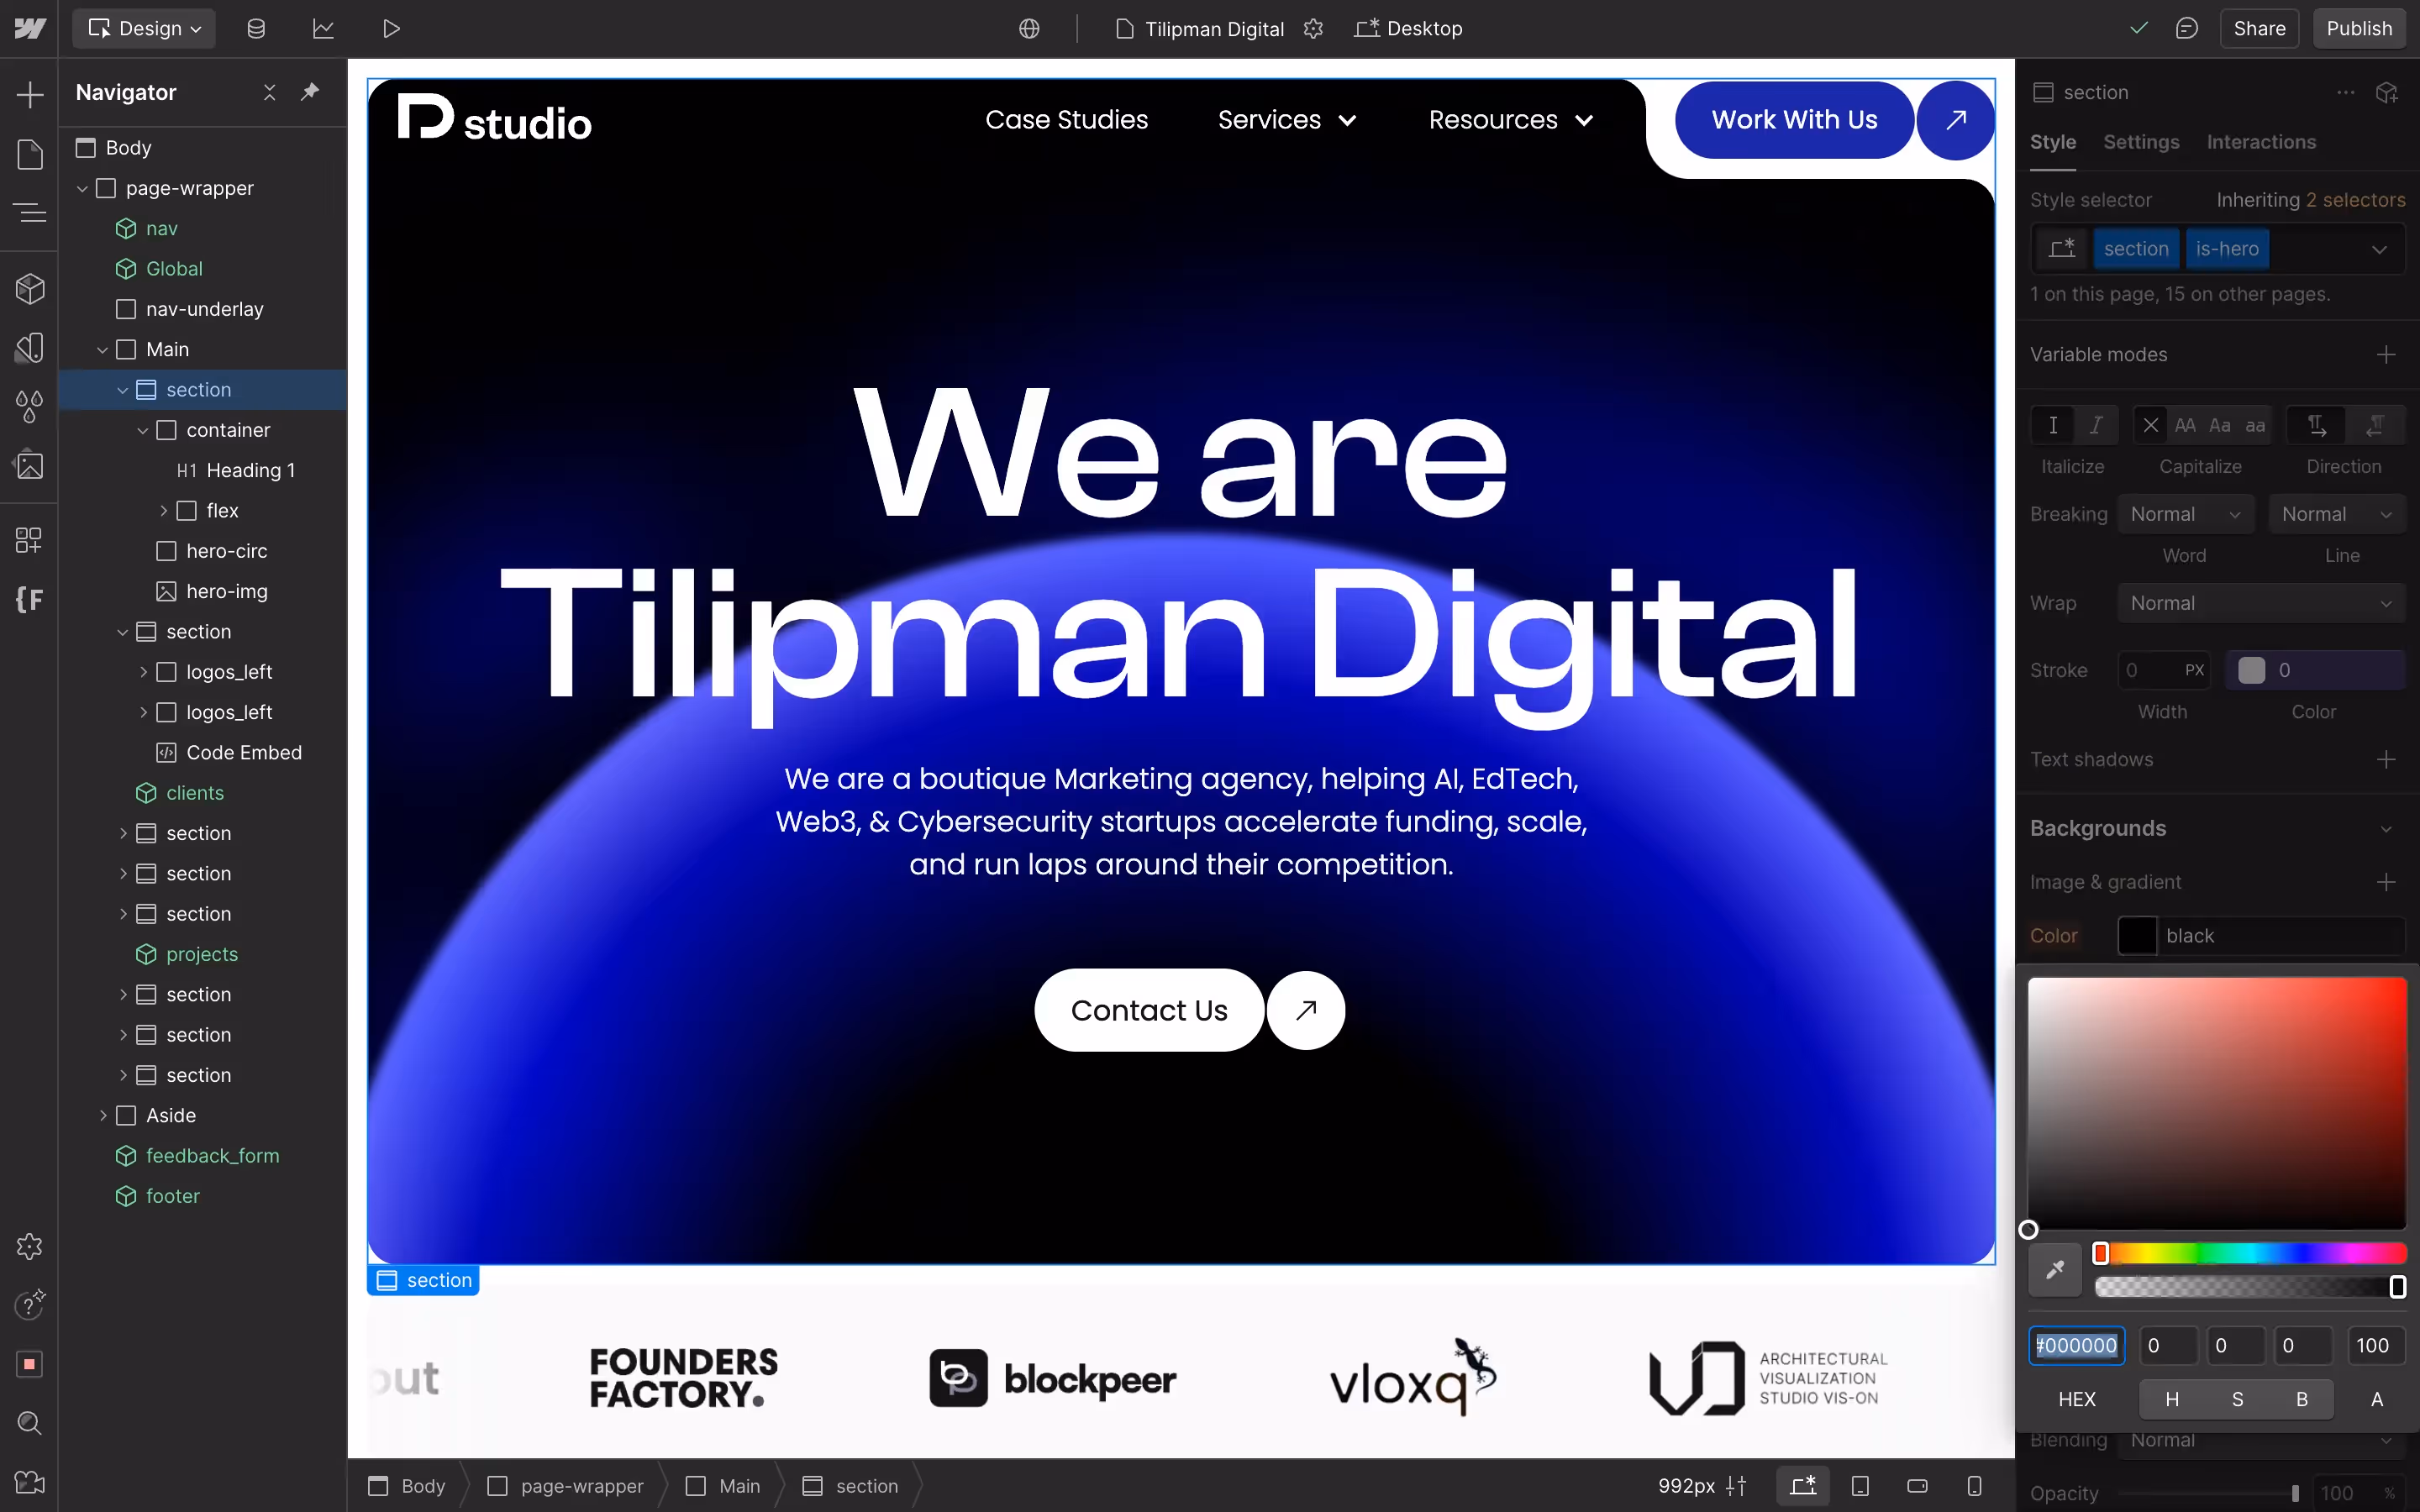
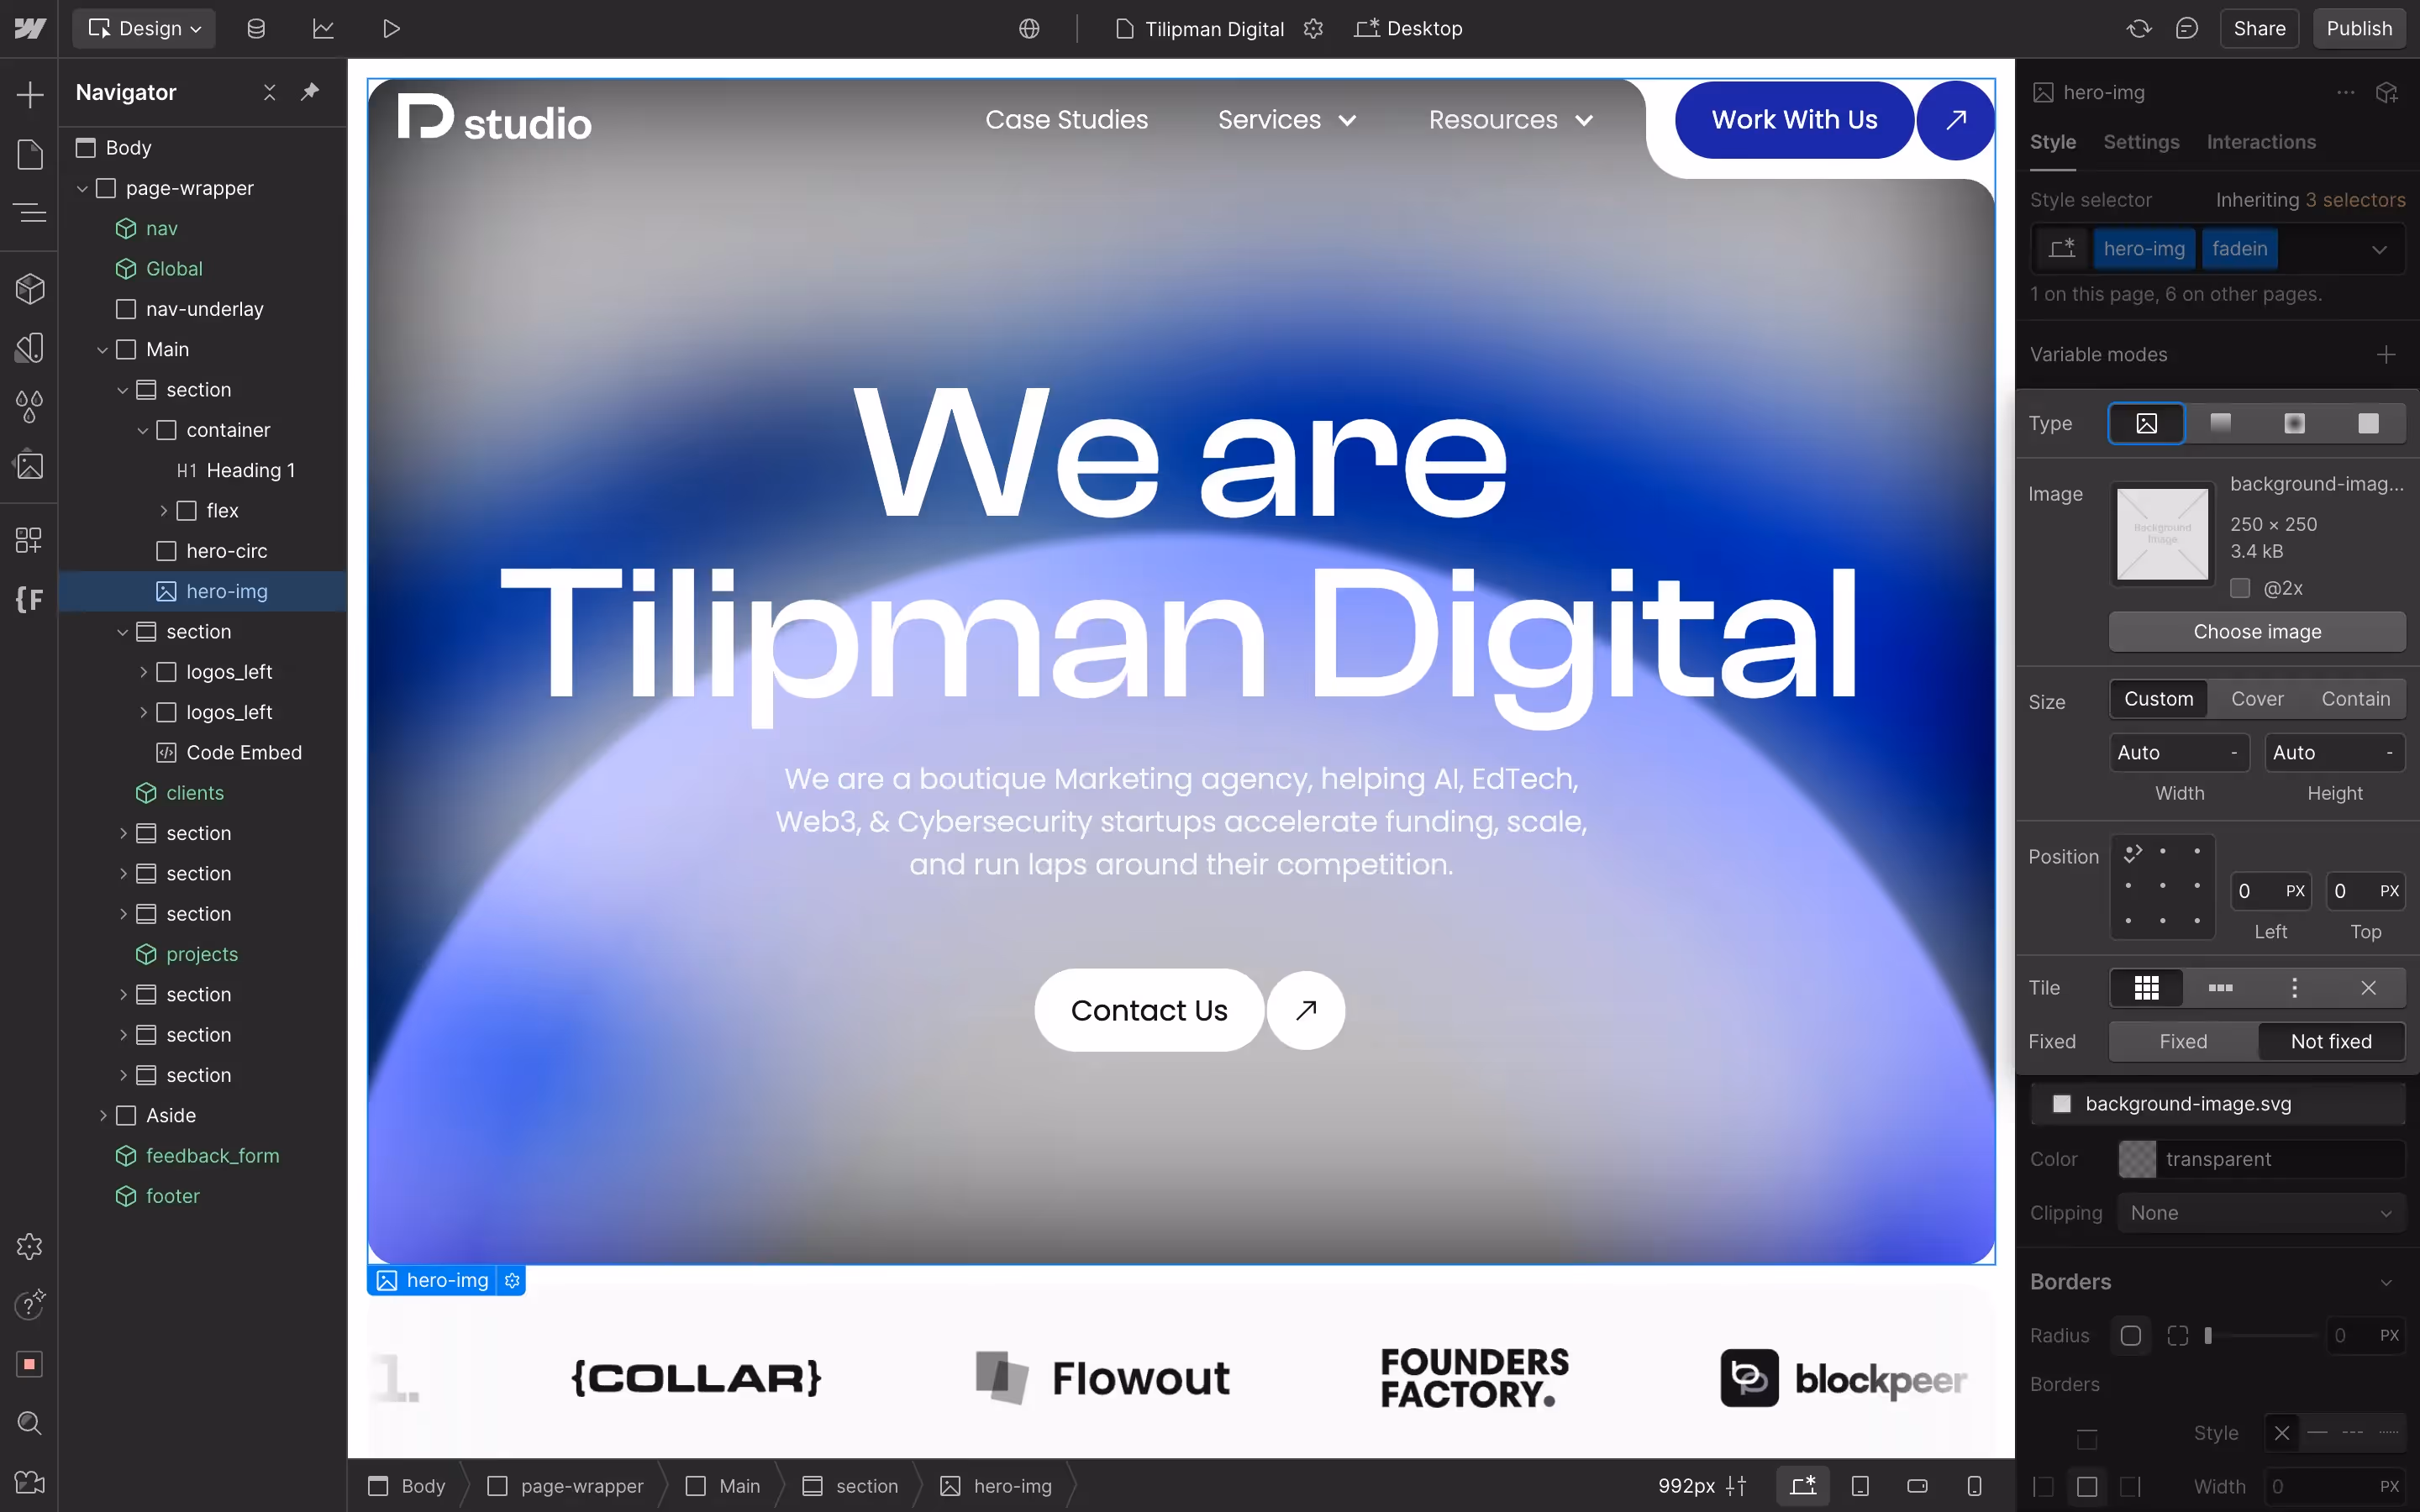
Change out Background Image in Webflow
To set a background image for an element:
- Select the Element – Click on the section or div where you want to apply an image background.
- Add a Class - Drop into the style panel by using the above mentioned method or use Webflow shortcuts by clicking
Cmd + enteron mac orCtrl + enterin Windows. Once you're in the style panel, add a class to the element. - Go to Background Settings – Navigate to the Background section in the Style panel.
- Upload an Image – Click the Image & Gradient tab and upload or select an image from your Webflow assets.
- Adjust Display Settings:
- Size: Choose between Cover, Contain, or Tile to fit the image properly.
- Position: Align the image (center, top, left, right, etc.).
- Repeat: Enable tiling for patterns if needed.
Optimization Tips:
- Minify the image by converting it to WebP format. You can do that in Webflow's image panel. This way the images are compressed and will load fast.
- Stick to a resolution of 1440px - 2000px width for hero sections.
If you're not sure how to do all that, this video should give a good overview, although Webflow's UI has changed somewhat since the video's publication.
Adding a Background Video in Webflow
Background videos can enhance your Webflow site by adding motion and visual interest. Webflow allows you to add videos as backgrounds without requiring custom code. You can do that by following the steps below:
- Drag and Drop a Background Video Element – Locate the Background Video element in Webflow’s Add panel and place it where needed.
- Upload Your Video – Webflow supports MP4, WebM, and MOV file formats. Upload a high-quality but optimized video.
- Adjust Playback Settings – Configure autoplay, looping, and whether the video is muted.
- Customize Video Sizing:
- Set the Width and Height to cover the section.
- Adjust the Positioning to align the video properly.
- Overlay with Content – Add text or elements over the video by placing them inside the same section and using absolute positioning.
Best Practices for Background Videos:
- Optimize File Size – Use compressed WebM files for better performance.
- Keep It Subtle – Background videos should enhance, not distract from, the content.
- Provide Fallbacks – Ensure mobile users get a static image alternative if autoplay is disabled.
- Test Performance – Large video files can slow down page load speed, so test across devices.
By using background videos properly, you can create dynamic and engaging Webflow pages while maintaining performance and accessibility.

Change of Background Color on Scroll
There are multiple methods to achieve this:
- Native Webflow Interactions – Use Webflow's built-in scroll animations and background color changes.
- External Libraries such as GSAP – Leverage JavaScript libraries for more advanced animations and smooth transitions.
Common Use Cases
- Change navbar background from transparent to solid when scrolling down.
- Creating a dynamic page effect where sections change colors as users scroll.
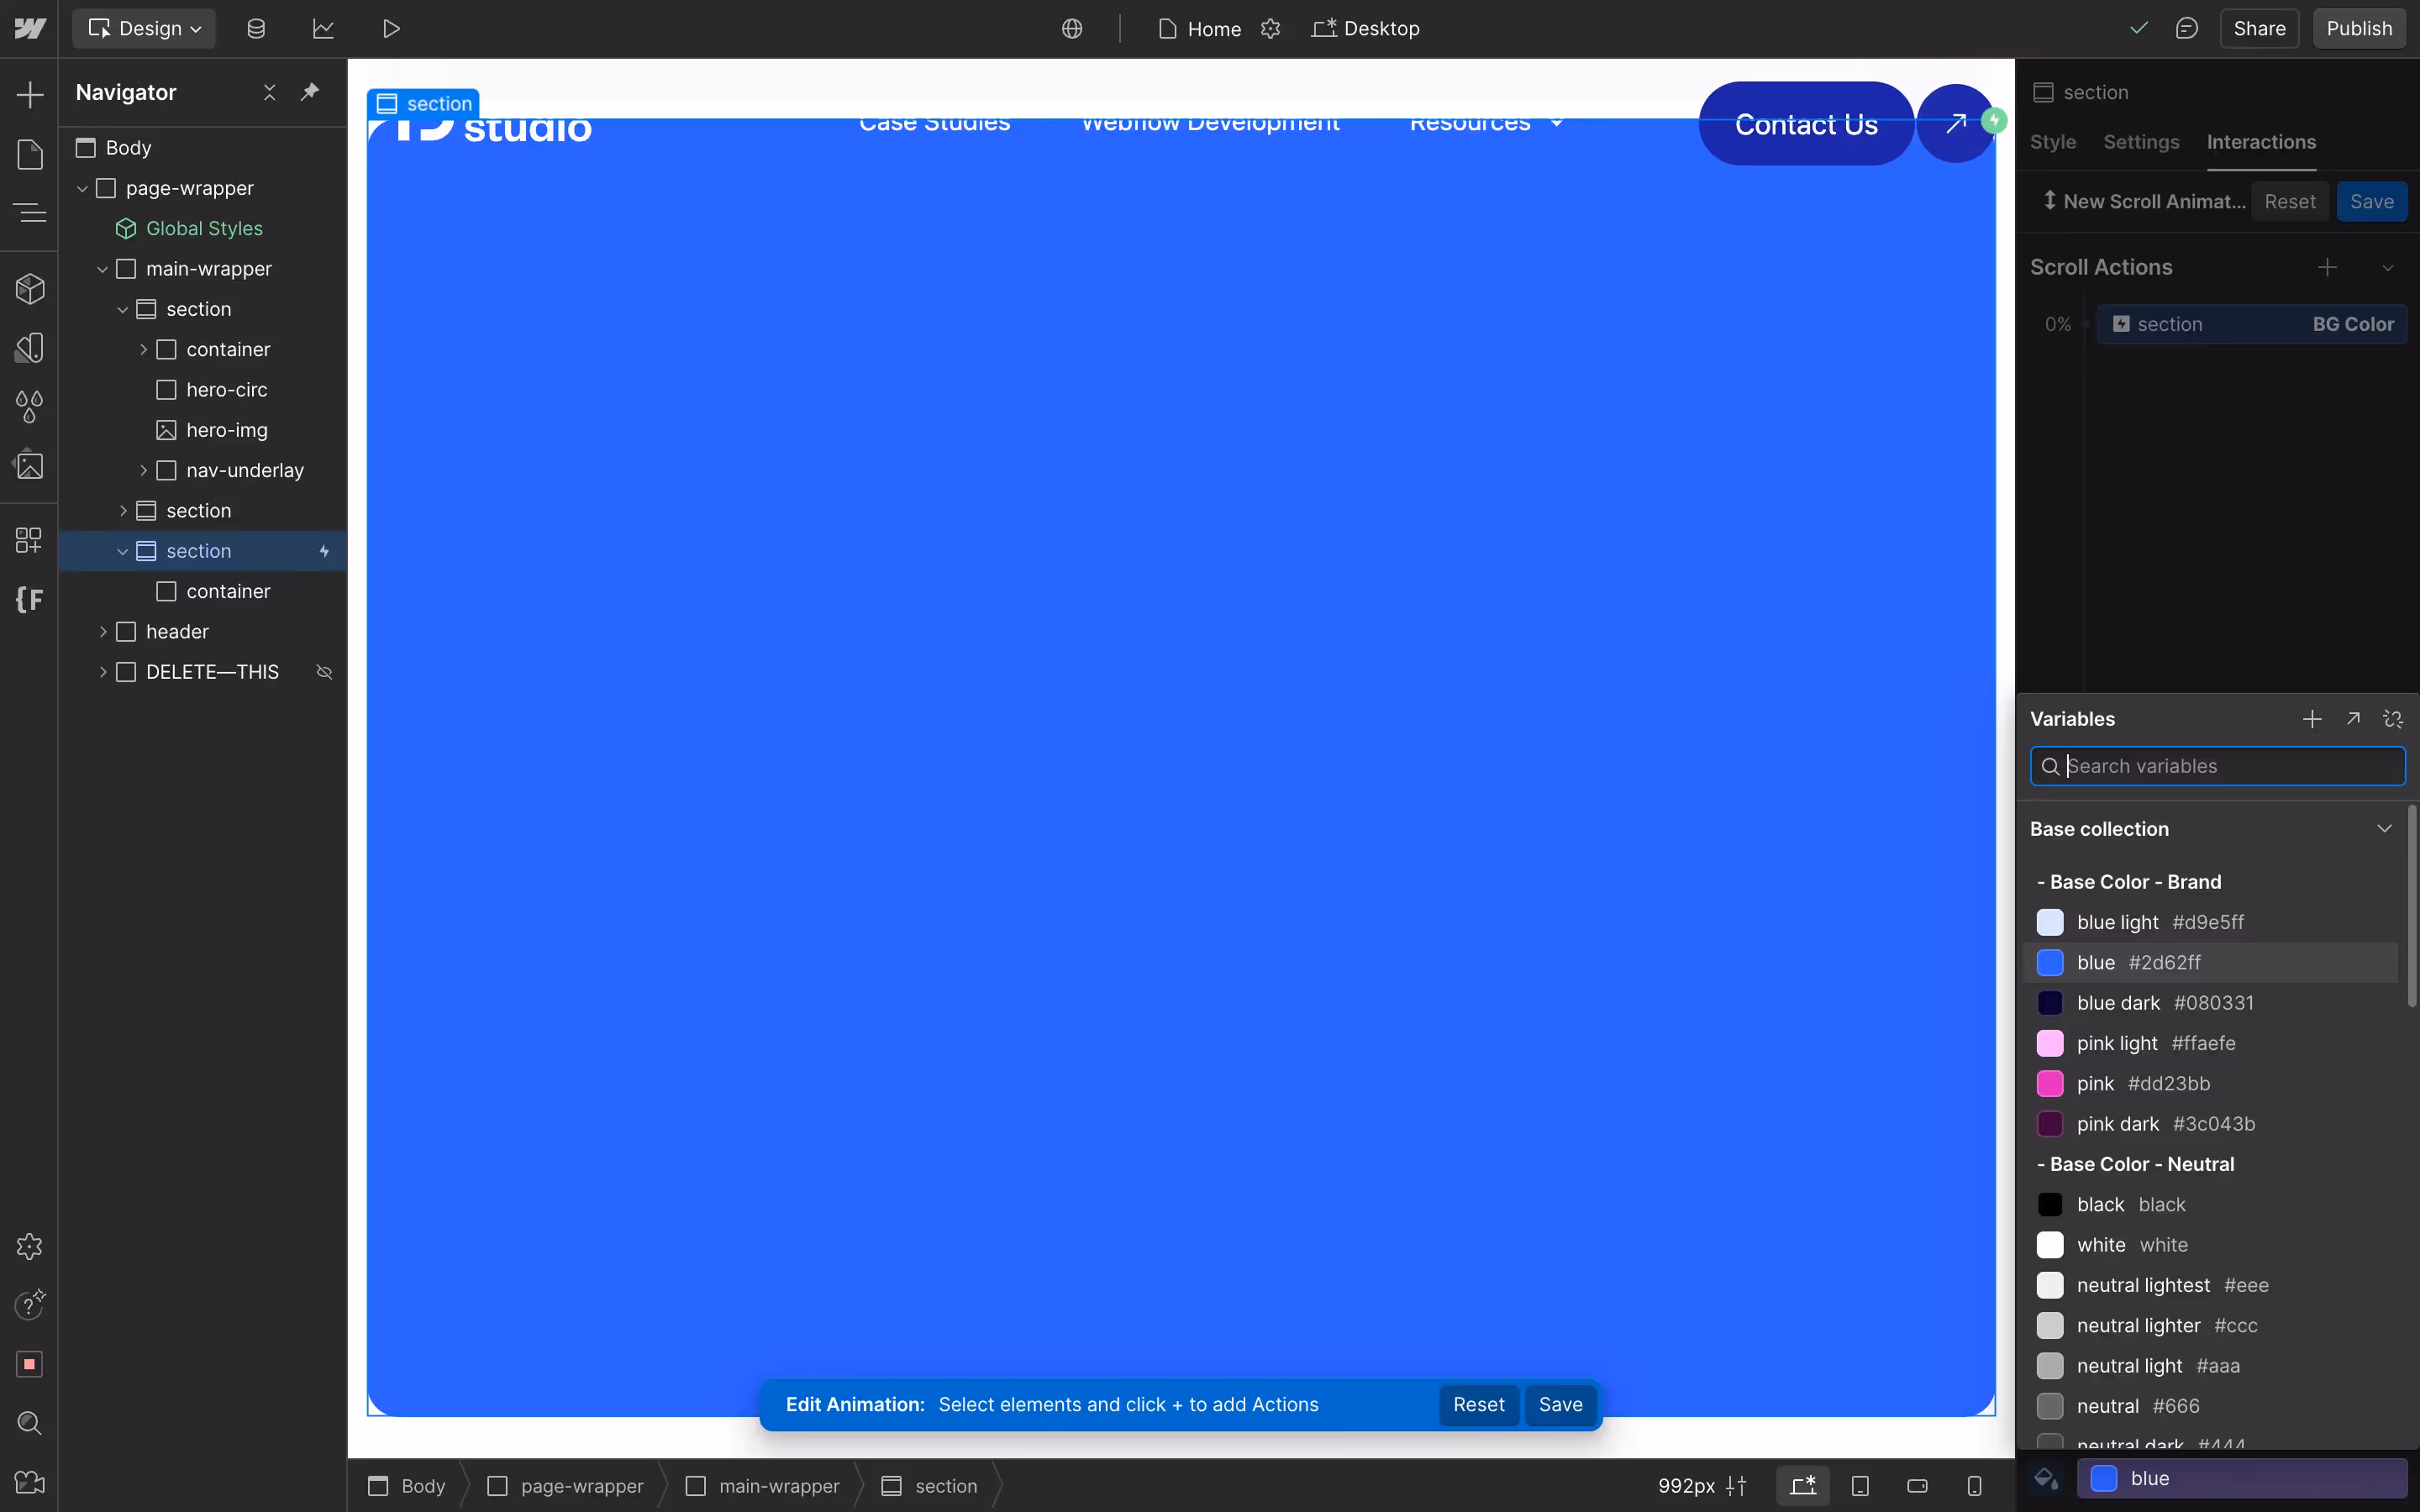
How to Change Background Color on Scroll in Webflow
Webflow’s Interactions feature allows you to dynamically change background colors based on scroll position.
- Select the Element – Choose the section or navbar you want to animate.
- Go to Interactions Panel – Click the Interactions tab (lightning icon) in the right panel.
- Create a Scroll-Based Animation:
- Click Add New Interaction → Scroll Animation.
- Set a Scroll Trigger (e.g., when the page reaches 20% or 50% scroll).
- Add a Background Color Change action and define the new color.
- Preview & Adjust – Test the animation to ensure a smooth transition.
Pros and Cons of Using Webflow Interactions
Pros:
- No coding required – Webflow's built-in UI makes it easy to create animations.
- Seamless integration – Works naturally within Webflow’s ecosystem without external libraries.
- Lightweight – No extra JavaScript or external dependencies, ensuring better performance.
- User-friendly – The visual editor makes it accessible to designers and non-developers.
Cons:
- Limited flexibility – More complex animations may require custom code or external tools.
- Difficult to maintain at scale – Large projects with multiple interactions can become hard to manage.
- Performance concerns – Overuse of Webflow interactions can sometimes cause lag on large pages.
If you're working within Webflow and don’t need advanced animations, its built-in Interactions panel is a solid choice. If you need more control, you will need to write custom JavaScript or use a library such as GSAP.
Using GSAP or Other JavaScript Libraries
Generally, Webflow interactions provide a decent solution, however one might need more flexibility and control. That’s why using a library such as GSAP (GreenSock Animation Platform) could be useful. To use the library you need to embed the GSAP CDN into your page setting’s </body> code.
Example of GSAP Scroll-Based Background Change:
1<script src="https://cdnjs.cloudflare.com/ajax/libs/gsap/3.12.2/gsap.min.js"></script>
2<script src="https://cdnjs.cloudflare.com/ajax/libs/gsap/3.12.2/ScrollTrigger.min.js"></script>
Once the libraries are added, you can add the interaction by specifying the controls you care about per the example below:
1gsap.to(".navbar", {
2  backgroundColor: "#f4f4f4",
3  scrollTrigger: {
4    trigger: ".navbar",
5    start: "top 10px",
6    toggleActions: "play none none reverse"
7  }
8});
Pros and Cons of Using GSAP
Pros:
- Greater flexibility – GSAP offers advanced animations beyond Webflow’s built-in capabilities.
- Performance optimization – More efficient handling of animations compared to Webflow’s interactions.
- Smooth transitions – Provides smoother and more natural animations.
- More control – Allows fine-tuning of animations, including easing, delays, and multiple triggers.
Cons:
- Requires additional setup – You must include GSAP’s library via a CDN or host it in your project.
- Learning curve – More advanced than Webflow’s built-in interactions.
- Potential for increased page load time – If not optimized properly, external scripts can impact performance.
If your project demands highly dynamic animations, GSAP is a great choice. However, for simple background transitions, Webflow’s built-in interactions might be enough.
Using Variables for Background Changes
A best practice for background color changes in Webflow is to use color variables within Webflow's Style Panel. Instead of manually applying colors to multiple elements, define reusable variables:
- Navigate to the Style Panel – Open Webflow’s Style Panel and select your section or navbar.
- Define a Color Variable – Click on the color picker and assign a variable, such as --primary-bg for default backgrounds and --scrolled-bg for scrolled states.
- Apply Variables to Elements – Set the background color using the assigned variables.
- Use Webflow’s Interactions Panel – Modify the variable’s value dynamically on scroll to achieve seamless background transitions.
Advanced Background Effects
If you want to take your background customizations further, consider the following methods:
Animated Backgrounds
- Use Lottie Animations for interactive moving backgrounds.
- Implement Rive animations for lightweight and high-performance animations.
- Apply GIFs for animated effects, but use them sparingly to avoid slow load times.
- Use CSS-based animations within Webflow’s interactions or custom code embeds.
Interactive Background Effects
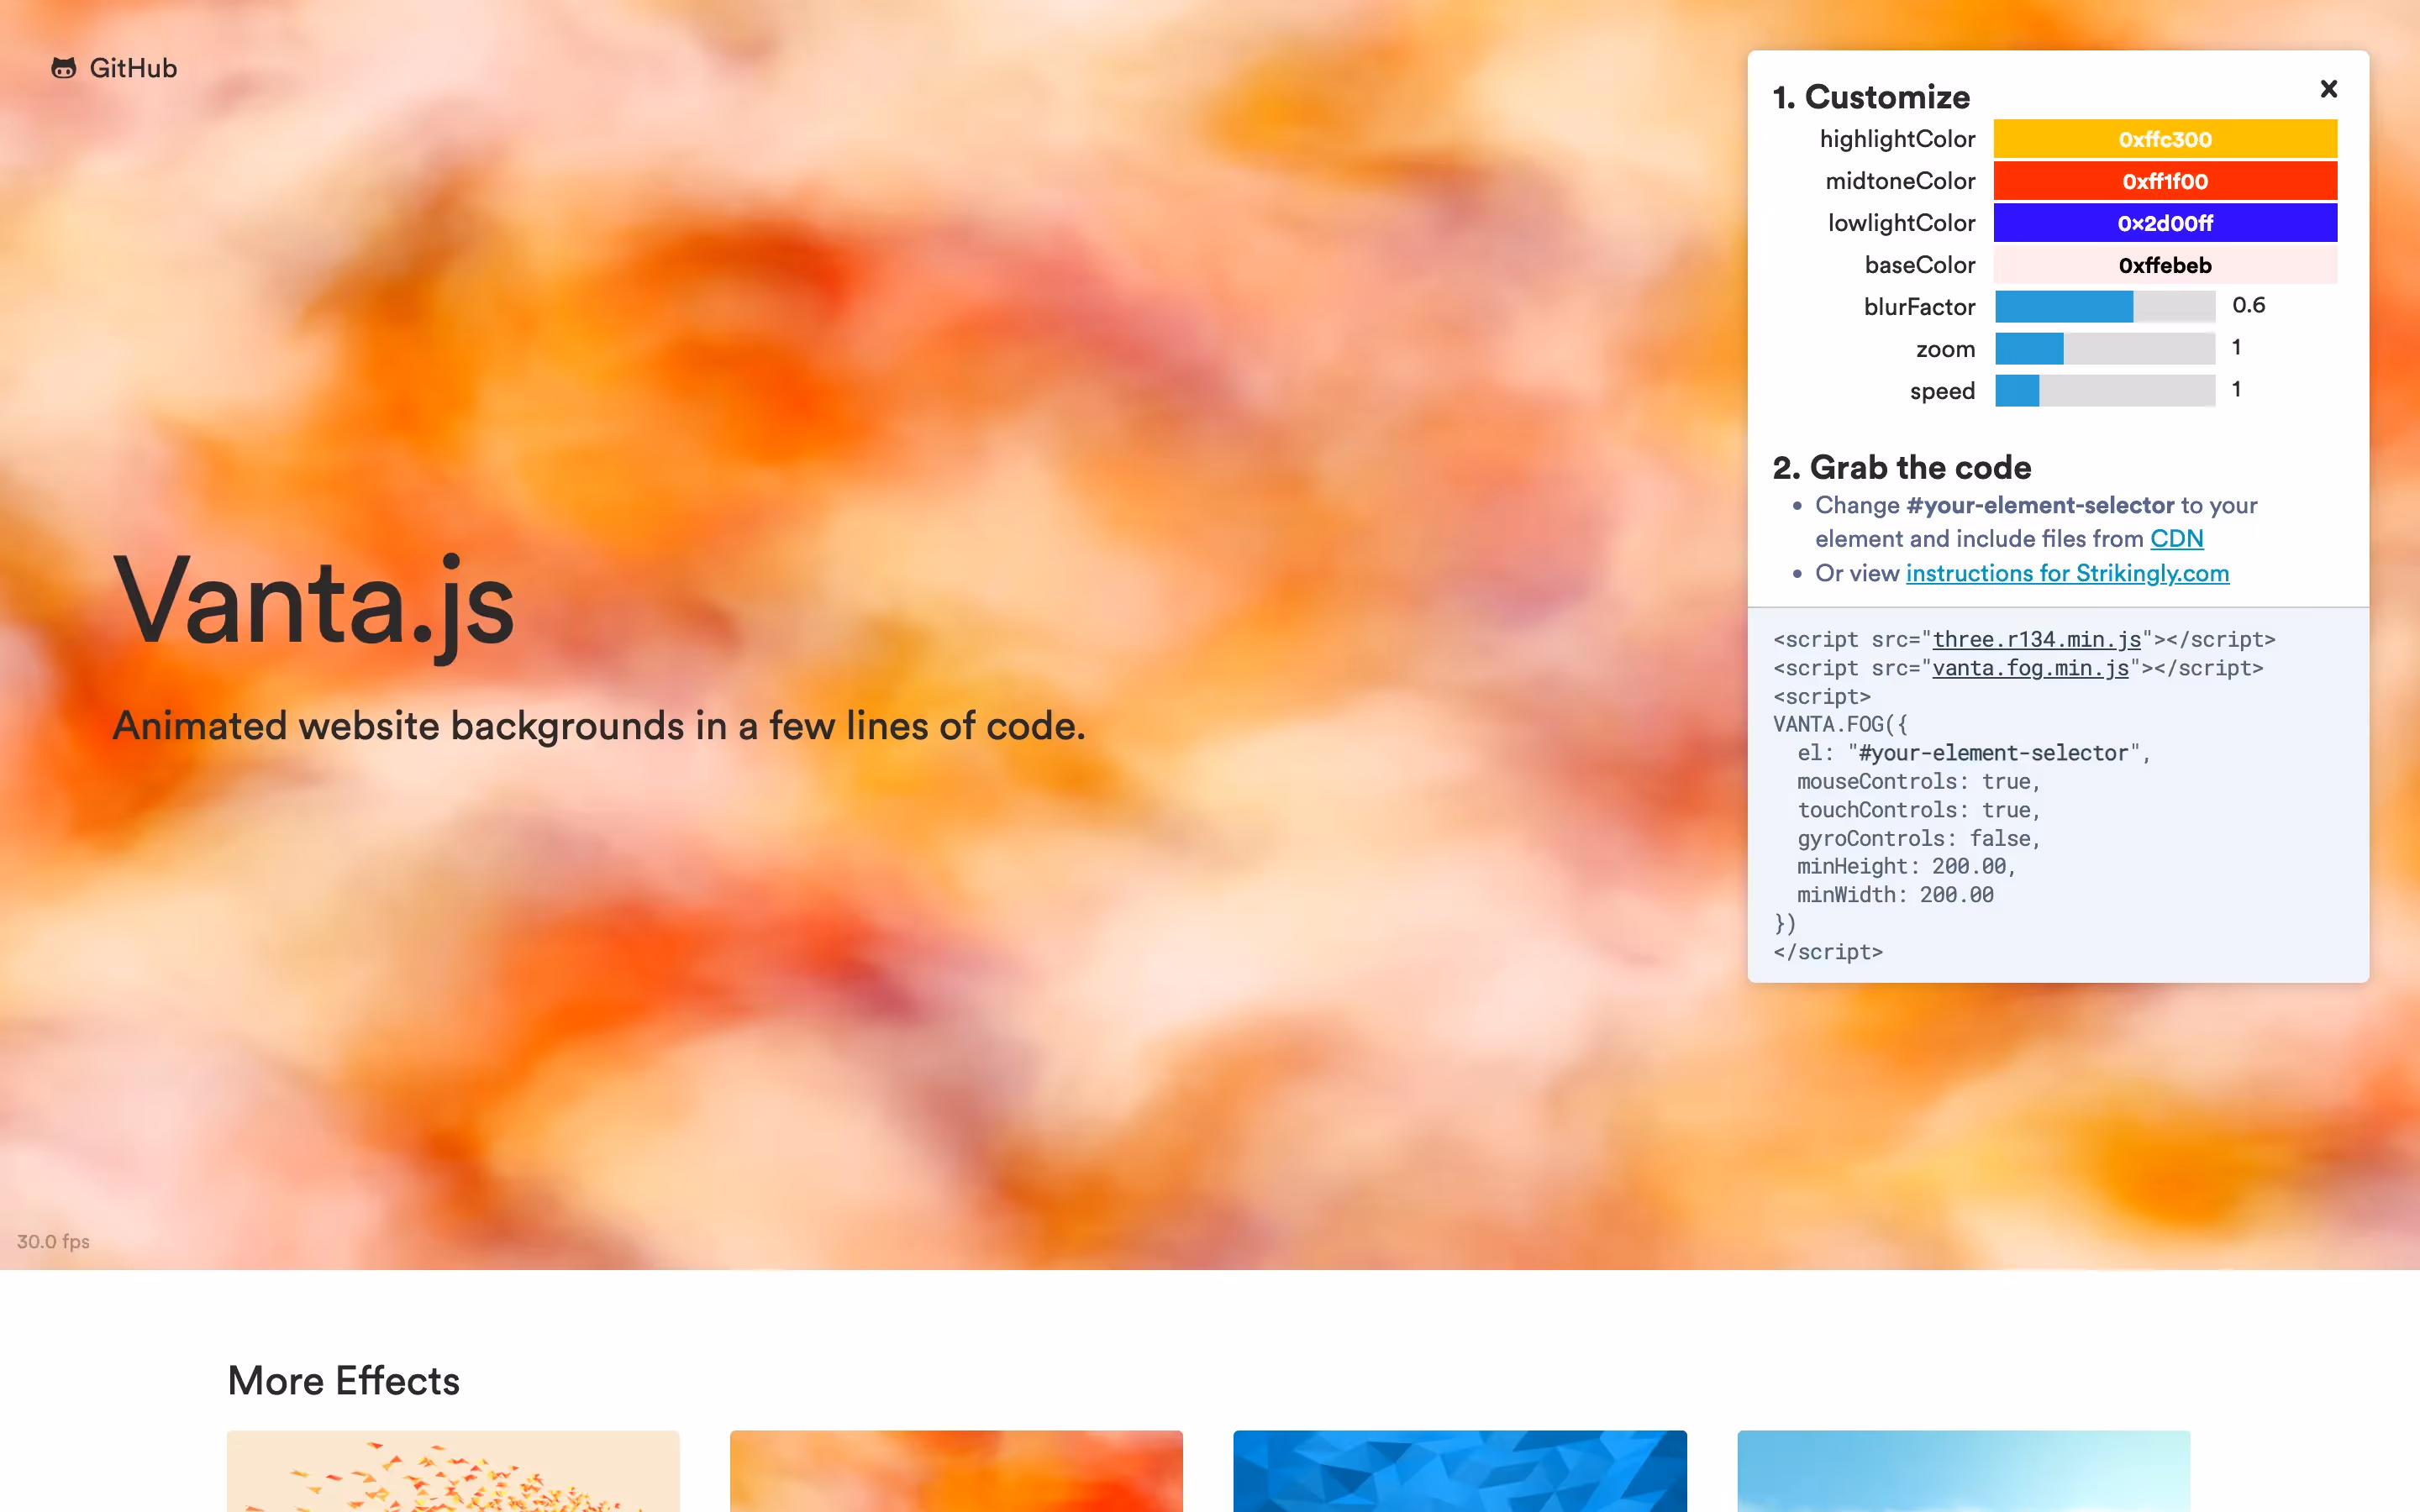
- Leverage 3.js or WebGL for dynamic and real-time background effects. An example of libraries that use these technologies is Vanta.js that has options such as Fog, Waves, Birds, among others for interractive backgrounds. If you're looking to implement the effect in your Webflow website, reading our article on implementing interactive background effects in Webflow using Vanta.js will be useful.
- Implement particle effects to create engaging, interactive environments.
Parallax Scrolling
Webflow allows scroll-based transformations to create parallax effects, but it does not support parallax on background images applied via the CSS background-image property. Instead, you need to structure your elements differently.
How to Achieve Parallax in Webflow
- Wrap the Image in a Div – Create a div block (.parallax-container) and set overflow: hidden.
- Place an Image Inside – Nest an image element inside the div and make it larger than the container to allow movement.
- Use Webflow Interactions – Apply a Move interaction on scroll to shift the image at a slower rate than the surrounding content.
- Fine-tune the Effect – Adjust speed settings for smooth parallax scrolling.
Example CSS for Custom Parallax
1.parallax-container{
2	overflow: hidden;
3	display: flex;
4	justify-content: center;
5	height: 100vh;
6}
7.parallax-image {
8	width: 120%;
9	height: auto;
10}
By structuring the elements correctly and using Webflow’s native interactions, you can create a smooth parallax scrolling effect. However, for more controlled and scalable effects, external libraries provide greater flexibility.
Using Libraries for Parallax Effects
For a parallax effect that offers more control, consider using external libraries such as:
- Locomotive Scroll – Provides smooth scrolling and parallax capabilities with fine-tuned controls.
- GSAP ScrollTrigger – This library gives you control over any type of scroll-based animations, including parallax effects.
- Ukiyo.JS — A library dedicated to parallax effects only.
For a deeper dive into creating parallax effects in Webflow, check out our detailed guide on building parallax effects.

Final Thoughts & When to Hire a Webflow Expert
It is impossible to develop a Webflow project without touching upon background colors in the style panel. It’s a feature that can make or break the user’s perception of your website. There are many ways to add a background—whatever it is—or change it in an interactive way.
If you find that difficult to do and need help implementing background effects, optimizing performance, or even bringing a custom design to life, hiring a Webflow development agency will both save you time and ensure a professional result.
But how do you know if it’s worth bringing in experts? Here’s why hiring a Webflow agency might be the right move for your project.
And if you want to play around with Webflow’s UI yourself and try these techniques out, you can download the clonable we made that includes all of these features.