If sessions still reset, confirm domains are identical to the live URLs and that no redirect strips the _gl paramet
This guide shows exactly how to connect GA4 to a Webflow site, when to choose the Webflow GA field versus GTM or manual code, and how to verify that events and conversions are recording correctly.
What is Google Analytics 4 (GA4) and why it matters
GA4 is Google’s current analytics platform. It uses an event‑based data model, which gives clearer insight into user behavior across pages and devices. If you run a Webflow site, GA4 is the standard way to measure traffic, engagement, and conversions.
What GA4 captures without custom code (Enhanced Measurement)
GA4 can track several interactions automatically once installed. You can toggle these on or off in your data stream settings.
- Page views
- Scrolls
- Outbound clicks
- Site search queries
- File downloads
- Video engagement (YouTube embeds)
For definitions, event names, and limits, see Google’s guide to Enhanced Measurement events in GA4.
Why marketers and founders care
Accurate data guides budget and product decisions. GA4 provides the reports you need to find growth opportunities.
- Acquisition, by channel, campaign, and medium
- Engagement, top pages, navigation paths, and drop‑offs
- Conversions, form submits and thank‑you page views. Instrument post-conversion flows using these thank you page examples to capture
ty_viewandty_secondary_action. - Retention, cohorts and returning users
- Audience, location, device, and tech breakdowns
- Monetization, for ecommerce setups
UA vs GA4 at a glance
A quick comparison to set expectations if you used Universal Analytics before.
Decisions to make before setup
Agree on what success looks like, so your reports answer the right questions from day one.
- Primary conversions to track, for example demo requests or signups.
- Micro‑conversions to watch, for example pricing views or resource downloads
- Key pages to benchmark, for example homepage, pricing, and key articles
- Audiences that matter, for example target geos or devices
- Reporting cadence, weekly or monthly checkpoints with owners
Terminology quick map
If you are coming from UA, these translations help when reading GA4 docs and screens.
- Goals → Conversions (you toggle any event to be a conversion)
- Events with category/action/label → One event name with parameters
- Views → Data streams (web, iOS, Android)
- Bounce rate → In GA4 you focus on engagement rate and engaged sessions
Preparation: what you need before setup
A short plan prevents rework and keeps your reports clean. Fill this section first, then connect GA4 in Webflow.

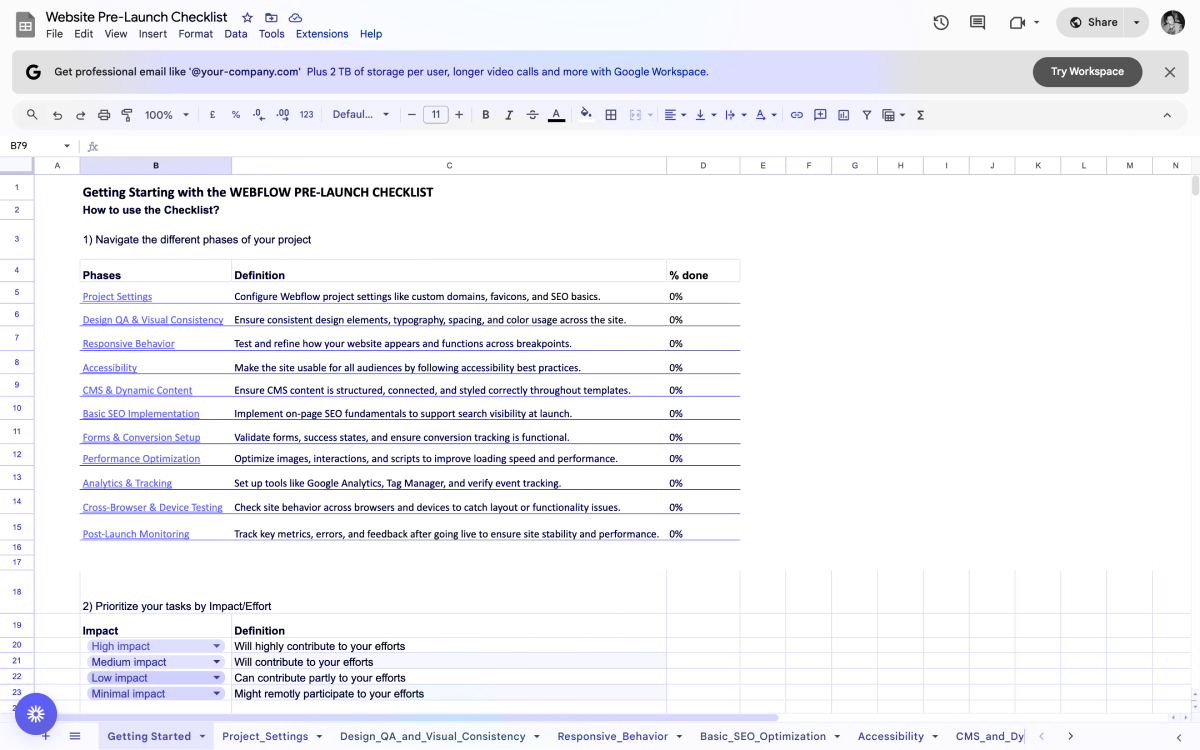
Launching soon? Don’t wing it.
Use our free website launch checklist to avoid common pitfalls—like broken links, tracking issues, and SEO mistakes. It’s a comprehensive pre- and post-launch guide built for teams that care about getting it right the first time.
Tie analytics to business outcomes from the start. Working with conversion rate optimization experts can help turn your GA4 insights into actionable changes that boost conversion rates.
Accounts and access
Confirm you can complete the setup without blockers.
- Google account with access to Google Analytics
- Permission to create a GA4 property
- Webflow Site Settings access and permission to Publish
- If using Google Tag Manager (GTM), access to the container
Property and data stream plan
Decide what domains you will track and how you want data labeled.
Conversions and events to track
Agree on outcomes now, then mark events as conversions after install.
- Primary conversions: demo request, trial signup, contact submit
- Secondary conversions: pricing view, resource download, newsletter subscribe
- Event names:
generate_lead,sign_up,file_download - Thank‑you handling: prefer a redirect to /thank-you for simple validation
Internal traffic and privacy
Keep your dataset trustworthy and compliant from day one.
- Collect office and team IP ranges for an internal traffic filter
- Decide on consent mode if you serve the EU (load GA after consent)
- Confirm data retention window in GA4 admin
How to use this decision log
Treat this as your pre‑flight checklist and handoff document.
- Fill Decision, assign an Owner, and update Status as you go
- Choose one integration method: Webflow GA field (simple) or GTM (flexible)
- Record any custom events you plan to implement after basic install
- Set a reporting cadence and name an analytics owner
Download the template: CSV and Excel (link these in your CMS or attach as resources)
Add Google Analytics 4 to Webflow: step by step
Follow these steps to install GA4 cleanly, then confirm that data is coming through.
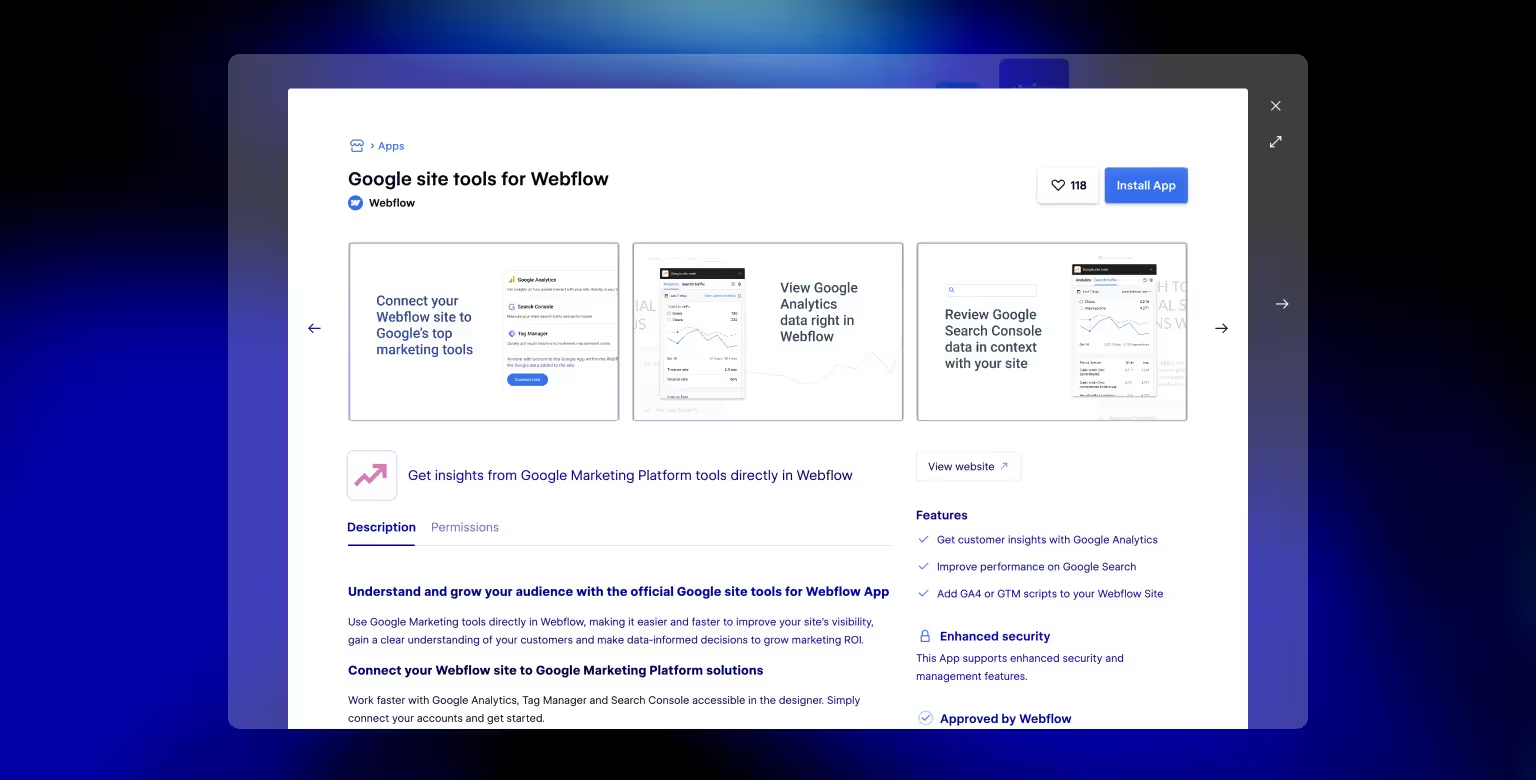
Option 0: Google site tools for Webflow App (fastest)
This official app connects GA4 and shows basic metrics inside the Webflow Designer. Use it when you want reliable tracking live quickly without hand‑editing tags. It is also used for Webflow Google Search Console Integration.
Set up
- Install the app from the Webflow Apps marketplace.
- Authorize Google access for Analytics and Search Console.
- Select your GA4 property and web data stream, or create a new one.
- Publish your site, then check GA Realtime.
Notes
- Webflow accepts GA4 Measurement IDs only (format
G‑XXXXXXX), not UA. - A paid site plan is not required for the GA ID field, but is required for Custom Code or GTM snippets.
- Still verify in Realtime and mark key events as Conversions.
- If you need complex consent flows or multiple marketing tags, plan to use GTM after the initial setup.
Step 1: Create your GA4 property and web data stream
You need a GA4 property and a web data stream to generate a Measurement ID.
- In Google Analytics, go to Admin → Create and create a GA4 property.
- Set the correct timezone and currency.
- Open Data streams → Web, enter your site URL and a stream name.
- Leave Enhanced measurement on for default events; refine later if needed.
Step 2: Copy your Measurement ID
This ID links Webflow to your GA4 stream.
- In the Web data stream details, copy the Measurement ID (for example
G-XXXXXXX).
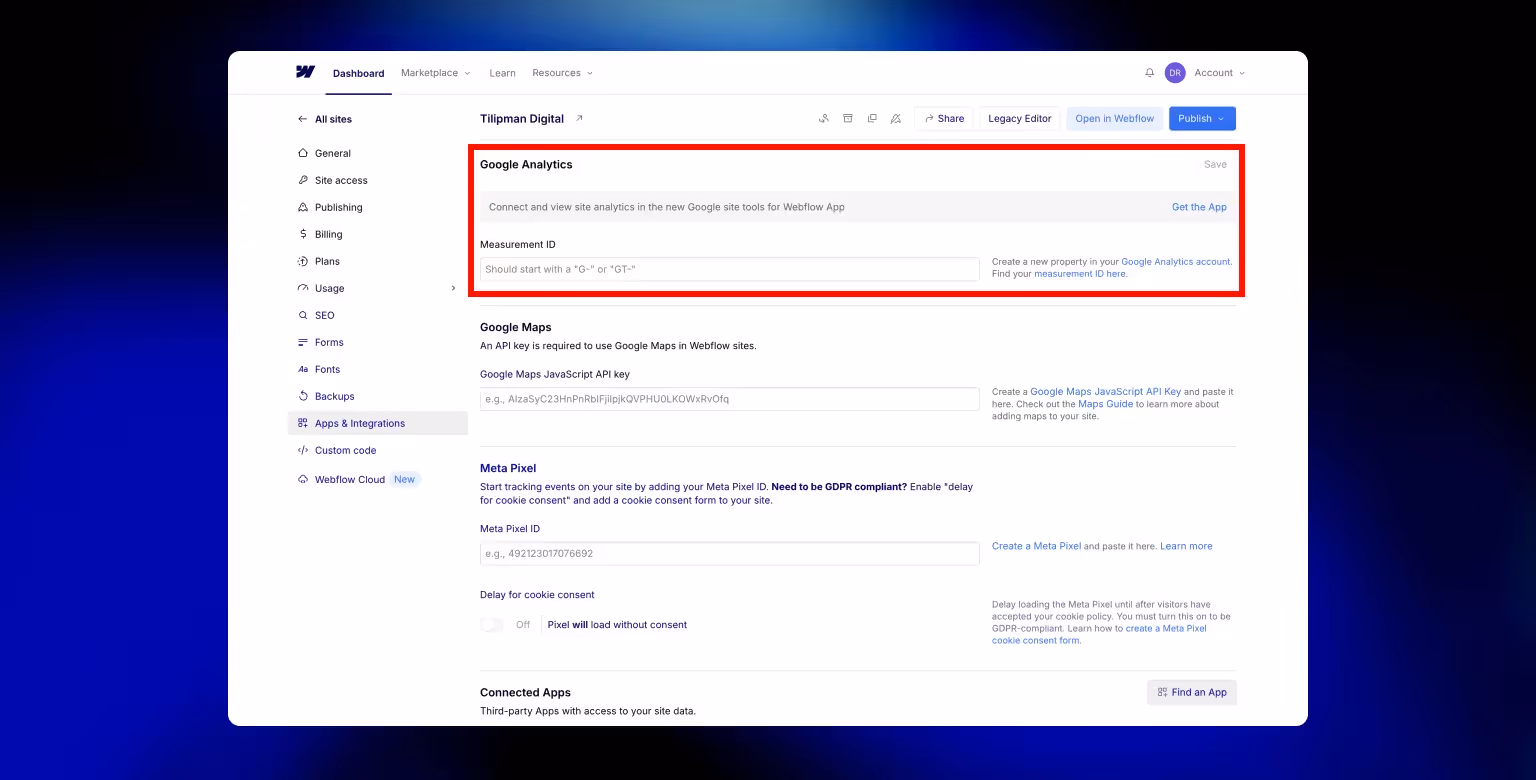
Step 3: Add the ID in Webflow
Use the native integration field for the simplest, most reliable install.
- In Webflow, open Site Settings → Apps &Integrations.
- In Google Analytics, paste your GA4 Measurement ID.
- Click Save changes.
Use only one install method. Do not add the GA script via Custom Code or GTM if you use the integration field.
Step 4: Publish the site
Publishing injects the tracking script on your live pages.
- Click Publish and choose the correct domain or domains.
Step 5: Verify tracking (Realtime and DebugView)
Verification prevents silent data gaps and confirms the connection.
- In GA4, open Reports → Realtime. Visit your site in another tab and look for active users and
page_viewevents. - Open Admin → DebugView and use Tag Assistant or a debug browser to see incoming events.
- If you see no data, republish the site, confirm the ID, disable ad blockers, and try again.
Real-world example
We implemented Google Analytics through Google Tag Manager to run on every conversion across the site. This allowed us to see both the traffic we were driving and how that traffic converted, helping tie SEO efforts directly to business outcomes.
"They’ve been the best vendor we’ve had… From now on, they’re my only SEO agency recommendation.”
— Ariel Eiberman, CMO @Cryptoworth

See our Cryptoworth case study for a detailed look at how analytics-driven SEO translated into real-world growth for this Web3 startup.
If you're a visual person and would like to see the step-by-step in action, here's the video that will help you do just that:
CRO checkpoint
Tie analytics to business outcomes from the start.
- Ensure forms redirect to a thank‑you page, or plan a custom
generate_leadevent. - In GA4 Admin → Conversions, mark your key events as Conversions.
- Record decisions in your setup log so handoffs stay consistent.
Alternative method: add GA4 via custom code
Use this path if you want to paste the gtag.js snippet yourself. It requires a paid Webflow Site plan because Custom Code fields are premium features.
Add the GA4 script in the head
Placing the script in the head loads analytics on all pages consistently.
- In GA4, open your Web data stream and locate the Global site tag (gtag.js) snippet.
- In Webflow, go to Site Settings → Custom Code → Head and paste the snippet.
- Click Save and Publish.
Avoid duplication
Duplicate scripts inflate metrics and break attribution.
- Do not use both the Webflow GA field and a manual <script>.
- Search your site for existing GA or GTM snippets before adding new ones.
When manual code makes sense
This method is useful when you need fine control over initialization.
- You must pass additional config on load, such as
user_properties. - You want conditional loading based on your own JavaScript logic.
- Your stack avoids GTM and you prefer minimal dependencies.
If implementing custom tracking code is outside your comfort zone, a Webflow development agency can ensure GA4 is integrated with fine-tuned precision and no performance issues.
Quick validation
Always verify after publishing so you catch issues early.
- Check Reports → Realtime in GA4 while browsing your site.
- Use Tag Assistant or DevTools Network tab to confirm gtag/js loads.
Enable consent mode in GTM (quick recipe)
Load GA4 only after consent where required. This setup works with any consent banner (CMP) that updates consent signals for Google Tag Manager (GTM).
Before you start
- Your consent banner (CMP) should expose consent states to GTM (for example via dataLayer or GTM’s Consent APIs). Follow the instructions to set up Consent Mode in Google Tag Manager so GA4 only fires after consent where required
- Decide your default in regions that require consent. A safe default is denied until the visitor grants it.
Configure in GTM
- Create a Consent Initialization tag for your CMP
- Tag type depends on your CMP. Fire it on All pages at Consent Initialization (earliest) so consent is known before other tags.
- Set default consent state (optional but recommended)
- In GTM Admin → Container Settings → Consent Overview, set default to
analytics_storage = deniedin regions where consent is required.
- In GTM Admin → Container Settings → Consent Overview, set default to
- Gate the GA4 Configuration tag
- Open your GA4 Configuration tag → Consent Settings → enable Require additional consent and select Analytics storage.
- Leave the trigger as All pages. GTM will block the tag until consent is granted.
- Gate GA4 Event tags
- For any GA4 Event tag, enable Require additional consent → Analytics storage as above.
- Wire the CMP to grant consent
- On accept, your CMP should update GTM consent to
analytics_storage = granted. Many CMPs include this by default; otherwise push a gtm.consentUpdate event.
- On accept, your CMP should update GTM consent to
Verify
- Open Tag Assistant (Preview) and load a page with the banner.
- Confirm GA4 Config is Blocked before consent and Fires after accept.
- In GA Realtime/DebugView, confirm events appear only after consent is granted.
Region notes
Common mistakes
- GA4 tag firing before the CMP loads. Fix: fire CMP at Consent Initialization.
- Consent required but not enforced. Fix: enable Require additional consent on GA4 tags.
- Consent granted but GA4 silent. Fix: check that CMP actually sends gtm.consentUpdate or equivalent grant call.
Alternative method: use Google Tag Manager (GTM)
Choose GTM if you plan to manage multiple tags, add custom events without editing Webflow, or coordinate consent and marketing pixels in one place. For example, if you’ll integrate your site with a CRM in addition to GA4, our Webflow HubSpot integration guide shows how to connect Webflow forms to HubSpot alongside your analytics.
Add GTM to Webflow
The container connects your site to GTM so tags can fire.
- Create a GTM account and a Web container.
- Copy the head snippet and paste it in Site Settings → Custom Code → Head.
- Optionally add the noscript snippet in a global embed near the top of the body.
- Publish your site.
Create a GA4 Configuration tag
The configuration tag initializes GA4 across all pages.
- In GTM, add Tag → GA4 Configuration and paste your Measurement ID.
- Set Trigger: All Pages and Save.
- Preview to test, then Submit to publish the container.
Add GA4 events (optional)
Explicit events improve conversion reporting and funnel analysis.
- Create GA4 Event tags for actions like
generate_lead,sign_up,file_download. - Use Click or Form Submission triggers, or CSS selectors, to fire events.
- In GA4, mark primary events as Conversions.
If you route leads to CRMs or ops tools, our Webflow Zapier integration can help you keep analytics and workflows in sync.
Verification
Confirm both installation and event firing before you rely on the data.
- Use Tag Assistant Preview to see tags fire on page load or interaction.
- Check GA Realtime and DebugView for incoming events with the right names and parameters.
When to choose GTM vs the Webflow GA field
Make this choice based on complexity and future plans.
- Webflow GA field: simple installs, page views, and basic Enhanced Measurement.
- GTM: multiple pixels, consent coordination, custom events, and faster iteration.
Configure site search tracking in GA4
Track what visitors search for on your Webflow site so you can improve content and UX.
How it works
When Enhanced measurement → Site search is enabled, GA4 records search interactions and passes the query as a parameter (for example search_term). Webflow’s default search query parameter is q.
Steps
- In Google Analytics, go to Admin → Data streams → Web → Enhanced measurement → Configure.
- Toggle Site search On.
- In Query parameter, enter q (Webflow’s default). If your site uses a different parameter, list it here.
- Save your changes.
Verify
- On your live site, run a search (for example /?q=pricing).
- In GA4, open Reports → Realtime and click your session; look for search events and the
search_termparameter.
Notes
- If Site search is Off, GA4 will not capture query terms from the URL.
- If you changed your Webflow search component to use a different parameter, update it in GA4 so terms are captured.
CRO use cases
- Identify common queries you don’t rank for or pages that need clearer paths.
- Add quick links and CTA blocks for high‑intent searches (for example “pricing,” “demo,” “docs”).
If you're a visual person, and want to see the GTM setup step-by-step, here's a video that does just that:
Enable cross‑domain tracking in GA4
Keep sessions intact when users move between your main site, app, or checkout domains.
When you need it
Use cross‑domain tracking if visitors navigate between domains or subdomains during a single journey, for example:
GA4 with gtag (Webflow GA field or manual script)
- In GA, go to Admin → Data streams → Web → Configure tag settings → Configure domains.
- Click Add condition, choose Contains or Equals, and add each domain (for example example.com, app.example.com, checkout.examplepayments.com).
- Save.
GA4 with GTM
- Open your GA4 Configuration tag.
- In Settings, expand Cross domain linking and add the same domains.
- Save and Submit your container.
Verify
- Click a link from your main site to the secondary domain and check the URL for a
_glparameter (GA4 linker). - In Reports → Realtime, confirm that the session count does not reset when moving between domains.
Troubleshooting
- If sessions still reset, confirm domains are identical to the live URLs and that no redirect strips the
_glparameter. Make sure that your Webflow 301 redirects are set up correctly. - Avoid mixing multiple install methods (for example Webflow GA field and GTM) on the same site.
CRO tip
Cross‑domain tracking clarifies where drop‑offs happen, for example between the marketing site and sign‑up flow, so you can fix friction that costs conversions.
Integration tips and troubleshooting
These practices keep your dataset clean and make later troubleshooting faster.
Avoid double counting
Use one install method per site: Webflow GA field, or manual <script>, or GTM. If numbers look inflated, search your source for duplicate gtag.js or multiple GTM containers. If managing tracking scripts and site updates feels overwhelming, our Webflow maintenance service can handle ongoing analytics upkeep and technical fixes for you.
Tune Enhanced Measurement
In the GA4 web stream, review toggles for scrolls, outbound clicks, file downloads, site search, and video. Disable noisy events and add manual GA4 events where precision matters.
Exclude internal traffic
Define internal traffic (office/home IPs, VPN) in Admin → Data settings → Data filters. Test filters in DebugView, then enable them so your reporting reflects real users. Keep crawlers focused and reduce noise in analytics by tuning your Webflow robots.txt.
Consent and privacy
Load GA only after consent where required. If you use GTM, follow the consent mode setup (Consent Initialization tag, default denied where needed, gate GA4 tags until consent is granted).
Ecommerce in Webflow
If you sell online, turn on GA4 ecommerce reports and test add-to-cart and purchase flows. Confirm currency, tax, and shipping parameters show correctly in reports.
For a deeper dive into launching a successful online store, refer to our Webflow eCommerce site guide to ensure your Webflow shop is set up for smooth tracking and sales performance.
For specific symptoms and fixes, use the Troubleshooting matrix below.
Troubleshooting matrix
Use this table to pinpoint issues quickly. Work one row at a time, re-test after each change.
Debug tools
- Tag Assistant (Preview): see tag firing order, consent state, and blocked tags
- GA4 Realtime & DebugView: confirm events and parameters arrive as expected
- View source / Network tab: confirm gtag/js or GTM loads once per page
After the fix
Re-run the exact action you’re testing, then note the change in your setup log so future edits do not reintroduce the issue.
Looking to combine GA4 with something else, but not sure if we can integrate Webflow with your tech stack, browse the Webflow integrations we work with.
FAQs on Webflow Google Analytics Integration
These answers cover the most common questions that surface during setup and validation.
Can I use GA4 with a free Webflow plan?
Yes. You can paste your GA4 Measurement ID in Site Settings → Integrations and publish. Manual code or GTM requires a paid plan because Custom Code fields are premium.
Where do I add GA4 in Webflow?
Open Site Settings → Integrations, find Google Analytics, and paste your Measurement ID. Save and publish.
Do I need Google Tag Manager?
You won’t need GTM for most setups. Use GTM if you want multiple pixels, custom events, and consent coordination. For basic analytics, the Webflow GA field is simpler.
How do I track form submissions?
The most common method is through a thank‑you page redirect and marking the pageview as a conversion. The second way is to trigger a GA4 Event on successful form submit (via Custom Code or GTM) and mark it as a conversion.
Will Google Analytics slow down my site?
The GA4 script loads asynchronously and the impact is minimal. Keep only the tags you need.
Can I use one GA account for multiple Webflow sites?
Yes. Create a separate property per site so data stays clean. Each site gets its own Measurement ID.
How long until data shows up?
Realtime should show activity within minutes. Other reports take longer to populate, especially on new properties.
I used Universal Analytics before. What now?
Create a GA4 property and connect it. UA is deprecated, so new data should flow into GA4. Keep historical UA exports if you need legacy comparisons.